It has been way too many years since I gave my wife a Valentine’s Day gift, or even a card. (She always told me not to…should I have believed her, or was that some sort of “feminine wiles” at work?)
Emergency!
This year, at breakfast, she showed up with a lovely card she had bought for me. Made me choke up. So when she left for work (I had the day off) I went right out to the shed and rummaged around for materials to make a valentine for her.
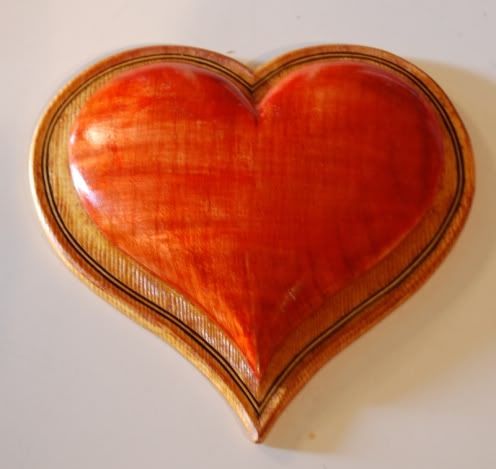
The red heart is made from a scrap of curly bigleaf maple left over from the cello I made last summer. The backing is Englemann spruce I had sitting on a shelf. Didn’t get much else done that day…but when she got home, it was done. I hope it makes up for some of the wasted Valentine’s Days of years gone by. 🙂
Luthier’s Valentine, made for my wife, Ann, February 2012
I couldn’t ask for a finer wife. We’ve had over thirty-one years together. I’m sorry it took me so long to think of a proper Valentine’s Day gift.
For those interested, the entire finish is shellac, dyed different colors, except for a single coat of propolis on the spruce, after the first coat of shellac, to accentuate the grain. The purfling is cello purfling.
If you found this post helpful, please share with your friends!
Tonight I shaped the upper sides of the upper corner blocks and the lower sides of the lower corner blocks to receive the upper and lower ribs.
Shaping the Blocks
I did some of the shaping on my oscillating spindle-sander–a very handy tool which has paid for itself many times over–and some with an incannel gouge (Curved, but beveled on the inside face, rather than the outer face), finally smoothing with a half-round rasp.
More work for the Bending Iron
I noticed that during the time the bent ribs have been languishing in the unheated shop, they had straightened a little, so I turned on both the bending iron and the glue-pot, and while I waited for them to get hot, I carved some more on the pegbox of the scroll. It is nearing completion, in terms of depth and inside dimensions, but there is a whole lot left to go before it is anywhere near final completion. It takes about 20-30 minutes for the bending iron to get really hot, and that is about right for the gluepot as well.
Installation procedure
I dry-fitted the ribs first, to make sure that once they were glued in place, both ends would fit correctly and the length of the ribs would lie flat along the curve of the mold. Then I loosened the lower end and slathered the hot hide glue on, and clamped the rib into the curve with a clamping caul (a elongated wooden block shaped to force the rib tightly into the curve of the corner block.) Once the corner block end was in place, I glued the upper end to the neck block.
Note to self: warm the wood before gluing!
The shop was awfully cold, and the glue was gelling very rapidly. I hope I achieved a good joint– if not I can correct it tomorrow. I should have heated the joints with my heat gun, before applying the glue, but I wasn’t sure where it was, and didn’t feel like stopping everything to go look for it…so I just worked very quickly. 🙂 We’ll see how it turns out.
My other work: barge-building
Tomorrow, Ann and I will attend a barge launch at Gunderson, LLC, in Portland, where I work. We build large ocean-going barges, and rail freight-cars, there. Here’s a video of an earlier launch, if you have never seen one: http://www.gbrx.com/Videos.php?expandable=2
(I would rather build cellos…) 🙂 When I get home I will try to get the lower ribs installed, and the pegbox completed.
If you found this post helpful, please share with your friends!
Today a young man came to work on his viola– so it was a rather distracted day– but I did accomplish a few things:
Re-work and new work
I discovered that the C-bout ribs I glued in place last night were actually not in good contact, so I will steam them off and re-install them. No biggie, but not happening today.
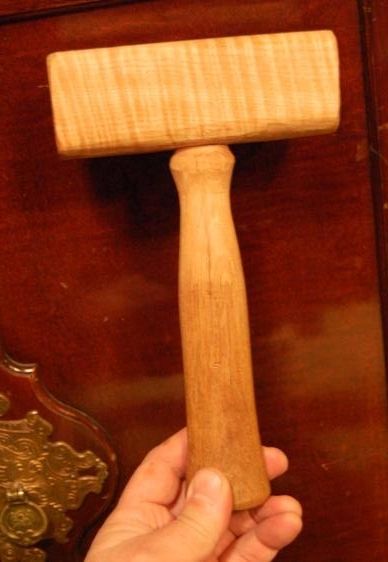
I laid out and began cutting the scroll and neck for the cello, and, partway through, decided I really needed a carving mallet. (sigh…I know…) Anyway, I had a chunk of a neck billet left over, and a piece of an old sledge-hammer handle, so….
New Tool
Anyhow, I also have needed a drill press, as, when my youngest son moved out, he took with him the only drill press we had; so I found one (1/2 hp, 5 speed, 5/8″ chuck) on Craigslist, and this evening we went and got it.
Current status:
The scroll is cut out and the volute trimmed about halfway around the curl (all the outer-most turn). All the ribs are bent, and the glue-pot is full– so tomorrow evening I hope to try again. Great weather we are having, so I may get to do a lot more outside.
Be patient…the cello is on the way. 🙂
If you found this post helpful, please share with your friends!
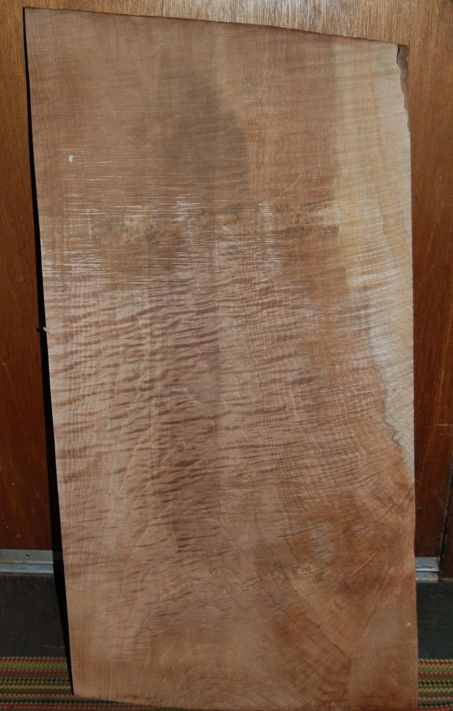
This will be another “Davidov” 1712 Stradivarius model, similar to the one on my Chronology page (instrument #16), but with a one-piece back. I like one-piece backs, but they are not very common on a cello. This wood (back, sides and neck) is from the same maple log as that from which instrument #19 (five-string fiddle #2) is made. The belly will be Sitka spruce. I plan to make the whole instrument darker than the last one was. Here is a photo of the slab from which the back will be made:
This is a slab of old-growth Big-leaf Maple heartwood. Not everyone will use heartwood, but I like it. I planed some of the rough surface off so that you can see the flame in the wood.
I will try to post photographs of the progress, as the cello emerges.
If you found this post helpful, please share with your friends!
Classical violin, modeled after the 1735 “Plowden” Guarneri del Gesu
December 2012;
For my 21st instrument, I decided to try a “copy” (rather a loose imitation) of a Guarneri del Gesu violin, the 1735 “Plowden”; it turned out very playable; well balanced, with good tone. It is made of European maple and spruce, purchased from International Violin Co., in Baltimore, Maryland.
I messed up the varnish and had to start over, so the varnish did not come out exactly the way I wanted it to…but it looks pretty similar to the original, even at that. So I am happy with it.
I’ll try this model again, soon. But the next thing on my list is another cello. 🙂
If you found this post helpful, please share with your friends!
This viola is made of Sitka spruce with a Red-maple one-piece back, Red Maple neck, and Big-leaf maple ribs, with willow linings and spruce blocks. It was just completed this morning (November 30th), so it is as new as new can be.
This is taken with a flash,so the colors are a little brighter than reality, but that’s the best I can do for now.
I will be participating in a violin-maker’s trade show at “Fairfield Inn & Suites” in Lake Oswego, tomorrow afternoon (December 1st). I hope to exhibit six violas, three violins, a cello and a five-string fiddle.
The show is open from One PM to Seven PM, and is free to all. I hope we get a lot of players attending…it is very encouraging to makers to have players test-driving their instruments.
If you found this post helpful, please share with your friends!
Bowed instruments have an odd dependency on animal fiber…they depend on the force of a tight, well-rosined horse-hair ribbon driving a tight, carefully tuned string. The resulting friction produces a pattern of vibrations in the string, which is transferred to the bridge, and thus to the soundboard of the instrument. The soundboard and the rest of the instrument dissipate the energy by radiating sound.
Some players are not very aggressive with their bow-strokes. The hair on their bows may last for many years without apparent deterioration. Others need new hair every six months, while still others, very aggressive, may only get a few weeks out of a re-hair.
As long as the only service needed is the replacing of the horse-hair ribbon, the job of re-hairing a bow is not too time-consuming. Very experienced bow-repair craftspeople can rehair a bow in 30 minutes or less. I have known people who could do the job in 20 minutes, and watch television at the same time. I am not one of those people. It takes me an hour, if nothing goes wrong, and I don’t watch TV in the first place, let alone while working on someone else’s bow.
Basswood blocks
Usually, I have to replace the tiny basswood blocks (wedges) that hold the hair in the tip and frog mortises. Cutting a tiny block of wood whose six sides are not parallel, but which is trapezoidal in two directions. and a parallelogram in the third, is tricky, especially when it has to precisely fit a cavity in a very expensive piece of exotic wood. (Most violin-family bows are made of Pernambuco, an endangered species from Brazil. A growing number is made from Ipé or Bloodwood…still exotic, but less scarce.) If the wedge is too tight, it could split the bow-head. Too loose, and the hair will pull out. The same problems exist when cutting the wedge for the frog, but it is a little easier in my experience…there are less angles to worry about.
The hair
The hair itself is fractious, tangling easily, untangling with great difficulty. It expands longitudinally when wet, and shrinks as it dries. I buy the hair in bulk: a one-pound hank looks like a whole tail of a horse. I cut just the right amount of hair from the hank, using a gauge to measure the quantity (some people count the hairs), then tie one end of the hair as tightly as possible with a very strong nylon thread. I trim the hair back, close to the knot, then singe the cut ends of the hair, next to the knot, to swell the ends a little, and finally work superglue into the swollen hair-ends and the thread of the knot, to make sure it will not come loose later.
The Procedure
I fit the bow-tip end first, trimming the wedge to a snug (but not really tight) fit laterally, and a quite snug, but not excessively tight fit longitudinally. (Remember: too tight, and you split the bow-tip…that is catastrophe!) I press the wedge into place with a narrow piece of maple that I keep for that specific purpose. Then I comb and re-comb the horse hair until there are neither crossed hairs nor any tangles of any sort. If I find kinked or damaged hairs, I remove them.
I dampen the hair, being careful to not soak the portion near the tip—I do not want any water to get on that wedge, or wick up into it. If the wedge swells and cracks the bow, it is my fault. I comb out the hair again, and match it against the frog mortise, with the frog adjusted as far forward on the stick as it will go. I use a watercolor pencil marker to mark the hair ribbon where I want the frog-end knot, then grip the hair carefully and keep the ribbon from twisting or changing angles as I tie the frog end knot. I then treat it exactly as the tip-end.
Remember to put the ferrule back in place before wedging the hair into the frog! If I forget, then I have to remove the frog wedge, install the ferrule, and re-fit the hair into the mortise. Once all is correct, I install the frog on the bow, and partially tighten the screw, to tension the hair just a little. I re-install the slide and ferrule, then carefully spread the hair into a smooth, flat ribbon, and insert the comb into it from between the stick and the hair. I insert the hair spreader wedge between the frog and hair ribbon, with a tiny dab of hide-glue on the hair side of the wedge, forcing the hair tightly against the ferrule, and jam the wedge in place with the stainless steel comb.
If all went well, that is a finished bow re-hair. If there are stragglers—hairs that didn’t quite attain the same tension as those around them, it is possible to “flame” the ribbon. This is accomplished by re-dampening the hair, tensioning the bow, and very rapidly running the bow back and forth through the flame of an alcohol lamp. The heat of the flame will shrink the looser hairs to match the tighter hairs, and flatten the entire ribbon. Understand: if there are many loose hairs, or the ribbon has been twisted sideways or something, so that it will not properly tighten, then flaming will not make a good re-hair out of a bad job. For this reason, many bow-repair people will not admit to ever flaming the hair. But, done correctly, and under the right circumstances, I think it does no harm.
Rosin
I prefer to rosin the bow as soon as the hair is dry, and try it out on an instrument. Some customers, however, are very particular about which rosin is used, and prefer to rosin it themselves. It is good to ask ahead of time, and avoid misunderstandings.
Different strokes…
Not all hair is the same. Coarser hair is usually used for bass and cello bows than that which is ideal for violins. Different colors (natural, of course, not dyed) tend to have different characteristics, as well. Some players prefer black hair for bass bows. An experienced craftsman knows what hair is best for each job. An experienced player knows when the bow/hair/rosin combination is “just right.”
If you found this post helpful, please share with your friends!
Maple, Spruce, Willow, European, Domestic, Red maple, Big Leaf maple, Sitka spruce, Englemann spruce
Wood Selection: Where does it come from, what kind is it, and does it matter?
Treasure does grow on trees!
Traditionally, violin-family instruments have been made from maple and spruce, pretty much exclusively, though there are relatively rare counterexamples–a viola made of poplar, or willow; a bass made of willow, etc. A large number of scrolls were carved of pear-wood.
Usually, though, the scroll/neck, back plate, and ribs/sides are made of maple, and the belly, or front plate (soundboard) is made of spruce. The bassbar is also spruce, as is the soundpost, which is sometimes called the soul of the instrument. The fingerboard and other fittings are usually made of Ebony, which is an extremely hard, dense, jet-black, exotic hardwood. It is really only available through import. I would like to explore other options, but, for now, Ebony is the best choice. Linings and blocks are typically either spruce or willow, though there is no hard and fast rule on the wood for linings.
So…what do I use?
So far, I have used exclusively maple and spruce for the body of the instrument, but have experimented with a variety of maple species, and three different spruce species. I have a large billet of American Black Cherry from which I hope to make a cello (Back, neck and ribs), someday soon, as a friend, Oded Kishony, has made a very good cello of cherry. (He did warn me, however, that, though its tone was superior, it was difficult to sell; orchestra people are very serious about tradition…)
Paul Schuback and other master makers have taught me that, while domestic maples are fine for larger, deeper-toned instruments, European maple is superior for violins. No one denies that some very nice violins have been made of American maples…they simply recognize that European maple has the edge, as far as violin tone is concerned. I cheerfully bow to their wisdom, and will probably make most violins of European maple or Red maple, from now on. Red maple, from the eastern USA, seems to most closely match European maple.
Here is the Red maple from which I made my #10 instrument (a violin):
This is Michigan Red Maple from Elon Howe. Pretty stuff.
Big Leaf Maple
Violas, celli and double basses are another story. Big Leaf maple is somewhat softer, and lighter, but sometimes very beautiful. Evidently its different physical characteristics make it ideal for larger instruments and thicker graduations. Here is a Big Leaf maple log that was given to me, and which is destined to become violas, celli and basses:
This log was given to me by Terry Howell, a local land owner and logger. He graciously dragged it out of his woods, cut it into lengths that were manageable, and loaded it onto a trailer with his front-loader. Thanks, Terry!
Here’s what a piece of it looked like, inside, when I split it:
I split some off, to look inside…this piece became neck billets. (The goop on the end surface is a wax sealer, so that the wood will not crack while drying.)
Incidentally; if you have wondered why it is called “Big Leaf” maple, take a look at this:
That is an honest 17″ wide Big Leaf maple leaf. They are not all this big, but no other maple comes close.
And here is where I get Willow for blocks and linings: I watch for when people lose large limbs in wind or snow storms, and ask if I can remove them. This one was full of a honey-bee nest, but it is good wood.
Willow log for linings. A limb fell during a windstorm..turned out to be hollow, and full of honeybees. They were gentle little folk, though, and did not offer to harm me.
Here’s what’s left of the nest, still in the tree.
The nest was pretty exposed after the limb fell– I hope they were able to rebuild elsewhere. Good little insects to have around.
Spruce
So far, I have had to purchase all the spruce I have used. There are some nice stands of Sitka and Englemann spruce here in the Northwest. I hope to go on a “Spruce Safari” someday, and bring home a prize log. 🙂 But I’m getting older, and logging isn’t easy. We’ll see.
In some ways I almost prefer buying the spruce– I can ask for exactly the grain-count I want, and the age (since cutting) I want, and, if I care to drive to the warehouse, I can sort through the stacks and get the exact look I want. But I pay for those privileges, and it is tempting to just find a great log, cut it up myself, and save the money. 🙂 Spruce is nearly always the first choice for soundboards, from violins to pianos, because it has the stiff, lightweight characteristic that resonates best to produce the sound. (A vibrating string by itself makes very little noise…amplified by a spruce soundboard, it can fill a room, or even an auditorium.)
Other Tonewoods
There have been makers who have (quite successfully) used other woods to build instruments. The grip of tradition is strong, however, and makers frequently have a tough time selling instruments that are NOT made of Maple and Spruce. I am willing to try other woods, but if, for example, someone wanted a fiddle out of Zebra-wood, while the idea is intriguing, I can foresee problems, and I would probably want my money up front. The instrument would doubtless be beautiful, and might even play well, but I see it as a risk I am loath to take. The labor is my most costly investment, and it is the same whether I build the instrument of traditional woods, or non-traditional. If I can’t sell it, then I have lost my time and effort, not to mention the cost of the exotic wood. As I mentioned earlier, Oded Kishony made a Cherry cello, and, while the tone actually turned out to be superior, the cello was very difficult to sell. Tradition matters, even today. Pine has sometimes been used for soundboards…even Western Red cedar has occasionally been used. But there is a reason everyone comes back to spruce– it works the best, as a rule. Plenty of counter-examples, I know, but they are in the extreme minority.
There are makers who use Walnut, Western Red Cedar, Pine, Douglas Fir, Pacific Redwood, Cypress, and a host of exotic woods. No problem…but I am at an age where I can no longer afford to take unnecessary risks. I really prefer the traditional woods, anyway. However, I may do some experimentation on the five-string fiddles. Wandering outside the “orchestral sphere” sets one free to experiment a little more.
A friend (Cliff Stansell, of the Pistol River Trio) has recently suggested that I try a fiddle of Port Orford Cedar. It’s nice stuff, and I may give it a go, but it will be a five-string fiddle, whose target market is not nearly so attached to tradition. There are five-string fiddles made of many combinations of exotic or domestic woods. He also asked about a five-string fiddle with an Oregon Myrtle back, sides and neck, and Port Orford Cedar front: it could happen…it surely could. 🙂
What is a “Luthier” (definition)? What is “Lutherie”?
So…What IS a Luthier?
The old French word simply meant “a lute-maker”. And his business was called lutherie.
“Loot-yeh” is pretty close to the French pronunciation. We Americans have a cheerful disregard for the pronunciation rules of the languages from which we borrow our vocabulary, so we typically pronounce it “Loothy-er”. The work of a luthier, lutherie, is usually pronounced “looth-er-y”
What does it mean Today?
The meaning has shifted, over the years, to cover the builders of all stringed instruments. Lute-makers are still luthiers, but so are guitar-makers, ukulele-makers, mandolin makers, and, of course, violin-makers. Violas, basses, cellos, five-string fiddles and dulcimers are also made by luthiers. Banjos, pianos, violas da gamba and harps, among others, are also built by luthiers. And the process of building and/or repairing stringed instruments is also called “lutherie”.
Usually when one is looking for a luthier, they are not looking for someone who made one guitar for a summer project, or something of that sort– they are looking for someone who is at least a competent worker, and who can reliably repair an instrument, without further damage. That takes some training and experience.
Some people have the privilege of attending a full-time, extended training program, or serving a term as an apprentice, under a master maker. This last is still likely the best training, although some fine schools are now available. Some cannot take the time from their established responsibilities to go away to school for an extended period, and learn from books, and/or piecemeal from a variety of teachers.
Workshops are now available in many parts of the United States, wherein one can begin to learn the skills to make guitars, violins, bows, etc. (Incidentally, one who makes violin-family bows is called an “archetier”… another French word.)

 Follow