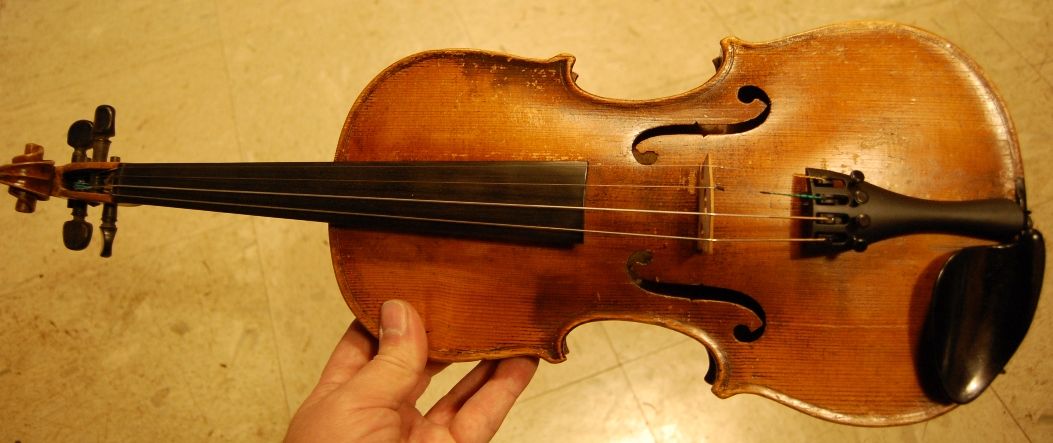
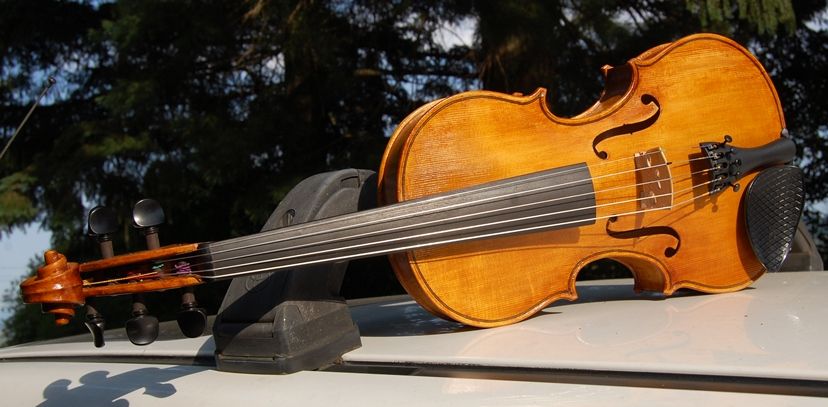
Progress on the “Plowden” Guarneri del Gesu-model violin
The Plowden is “in the lead” and pulling ahead!
One fiddle is running ahead of the others. That is how it usually turns out when I am building more than one instrument simultaneously. Something catches my attention in one instrument, and I bolt for the finish line with it. I don’t know why…happens every time, though. I think this will be one of my best efforts, and should turn out to be a concert-quality violin. We will see, though.
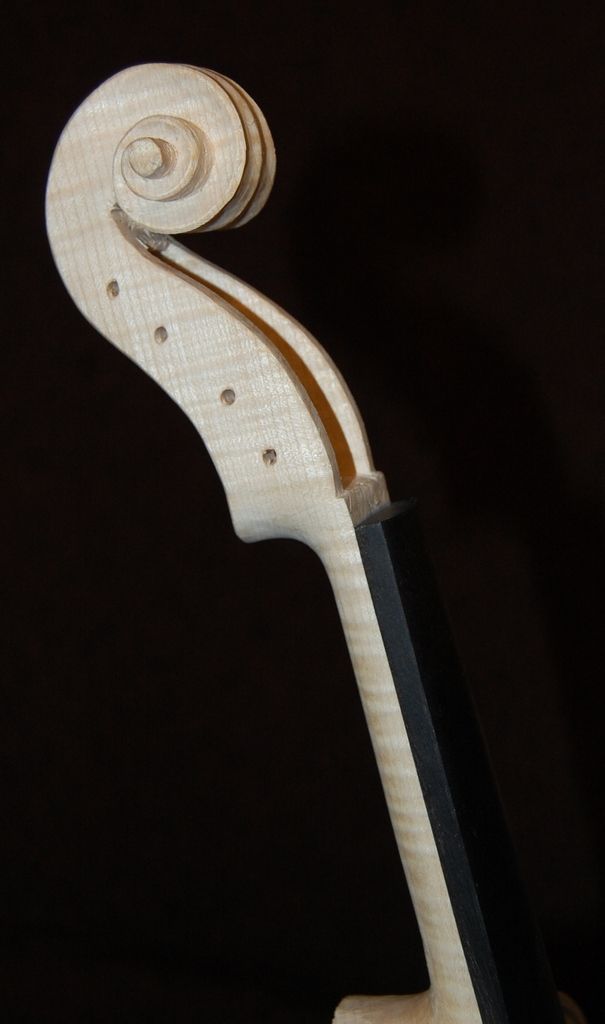
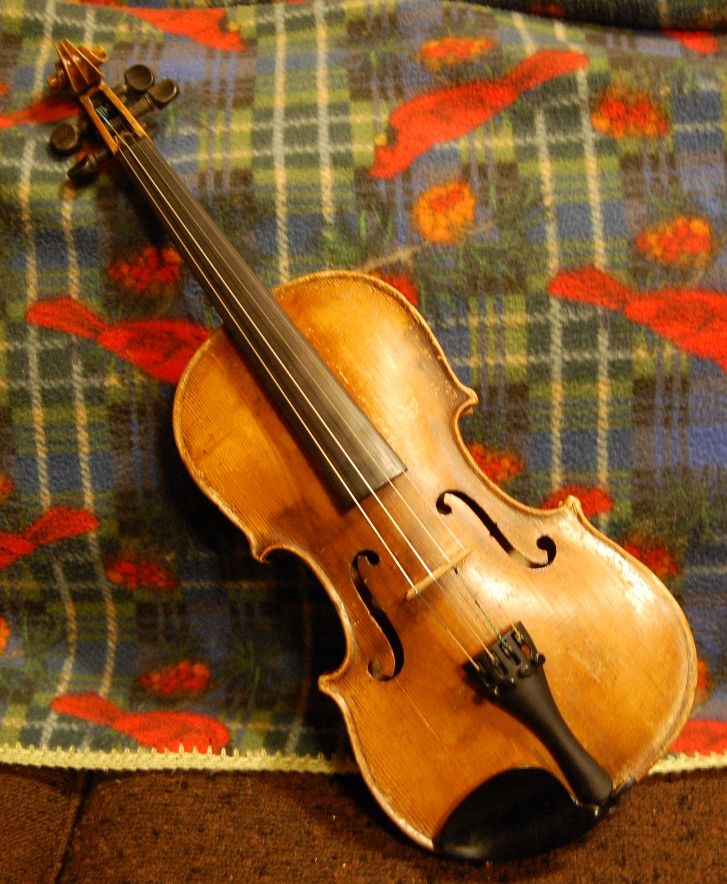
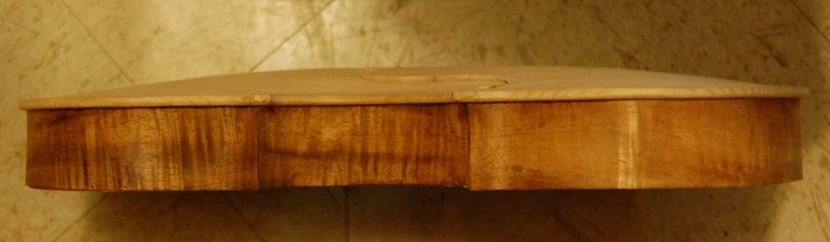
Scroll and neck complete– Fingerboard temporarily glued in place
There will still be fine-point tweaking and smoothing I will do, up until the day I begin varnishing, but the scroll was nearly enough complete that I went ahead and mounted a fingerboard on the neck, and began shaping the two of them together. The string “nut” (the tiny bar of ebony that will cross the top of the fingerboard as a support and anchor for the strings as they cross over into the pegbox) will be fitted and installed pretty much the last thing before the bridge, soundpost, and final set-up.
Scroll and neck with fingerboard
Setting the Neck
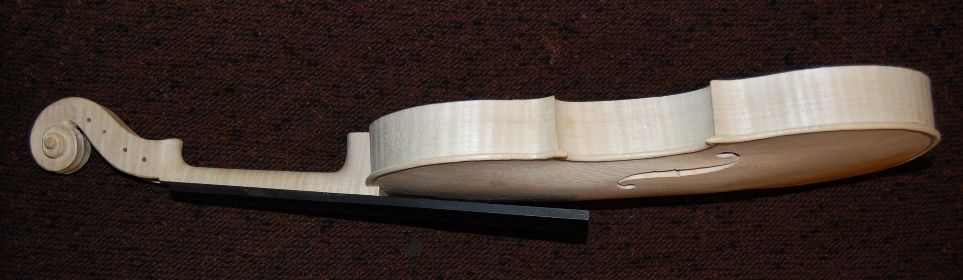
Once I had the entire neck shaped, with the exception of the final shaping of the heel (which is completed after the back plate is installed), I could begin setting the neck.
Now: I used to install the back plate and then install the neck, but that meant that when I set the neck, I had to continually worry about the angle of the heel as it presented itself to the button (the top “tongue” of the back plate that overlaps the heel of every violin-family instrument…critical to the strength of the joint.) If I install the neck first, making sure that the heel overlaps the neck block at least a little, so that I can plane it absolutely flat before installing the back plate, I eliminate the struggle to get that perfect heel-to-button joint. It becomes perfectly easy.
So…for all you luthiers reading this, yes, I am aware of the traditional way to fit this joint. I learned this particular option from reading the work of the late David Rubio. It took me a few years to recognize the value of the change, and I tried it for the first time when working on my first cello. It worked so well that I have gradually begun to do it on all my instruments.
Here is the back of the instrument, mold still in place:
Back view of instrument with neck set, but mold still in place. The heel of the neck is just barely extending past the neck block. Also, the front plate is in view, through the clamping holes in the mold.
Here is the side view:
Side view of instrument with neck installed.
And the front view:
Front view of instrument with neck installed, and mold still in place. The mold is visible, through the f-holes.
What’s Next?
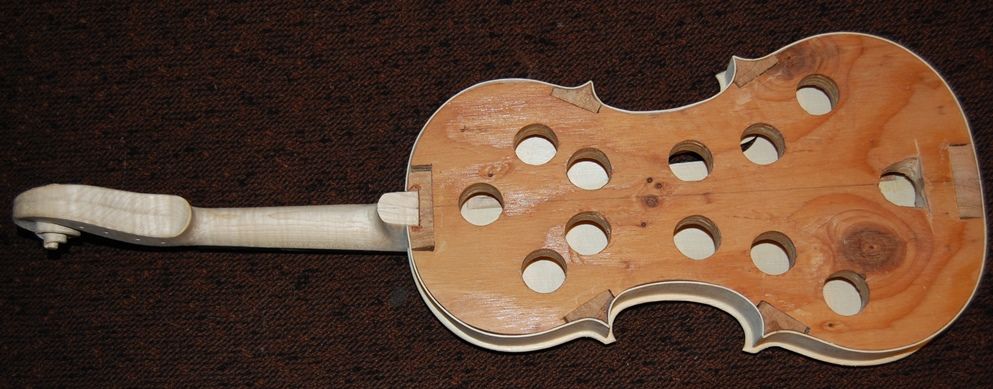
The next step will be to level the back of the corpus, so that the blocks and the neck-heel are all in the same plane. I may have to wait until the mold has been removed before completing that task: the mold is pretty much level with the blocks, and I have no desire to sand the mold. So, I may end up removing the mold, installing the linings, and then levelling the back of the corpus, along with the heel of the neck. Then I can clean up the inside of the corpus, shaping the linings and blocks, and cleaning up any rough spots. Then I can install the back plate and get moving on the purfling. After that it will be time to do all the final preparations for varnishing.
So…that is the progress report for this week.
I will try to catch up on the 14-inch viola and the 3/4 size violin soon.
Thanks for looking.
If you found this post helpful, please share with your friends!
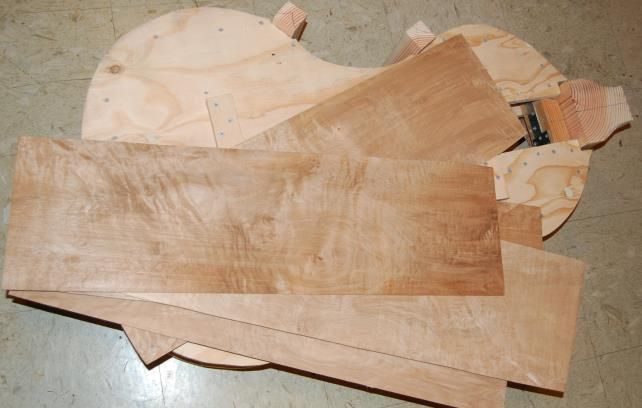
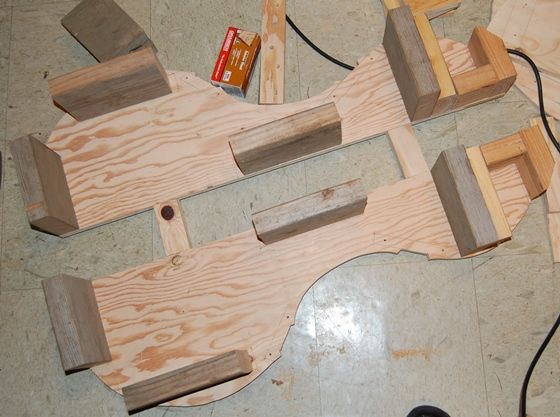
As you may recall from the previous post, the blocks on this upright bass were pretty huge, compared to what they needed to be, so there was really a lot of wood to remove.
Mold with blocks and ribs. Blocks are still way oversized, and the ribs are still straight. Gotta change all that.
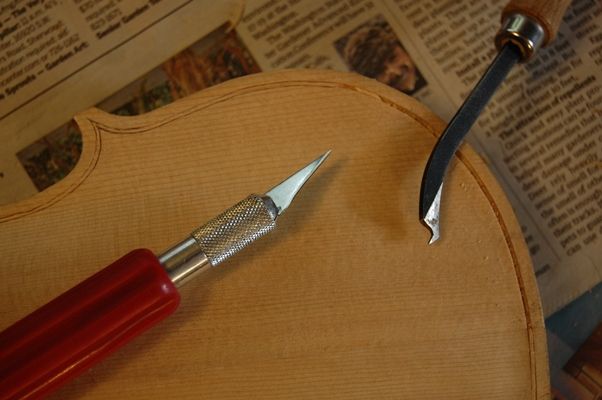
“Kutzall” Tool
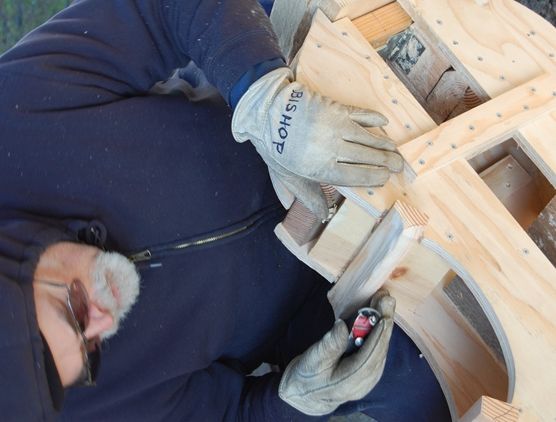
So! A drastic need makes for drastic measures. Ordinarily, on a smaller instrument, I would use the bandsaw and oscillating spindle sander to shape the blocks, but this mold is reeaaalllly heavy (over-built, I think…oh, well, it will be removed and the bass will be normal), even though it is a soloist bass, so I can’t see trying to manhandle it around on my big bandsaw. The saw could handle it, but the table for the saw is not big enough to hold the mold steady, and I am not strong enough to just hold it up there by sheer strength…. So… what to do?
This tool (carbide abrasive disc) is something my wife bought for me a year ago (Christmas), but I had never used it much. It is called a “Kutzall”, and it tears away wood incredibly rapidly, without loading up, and without burning the wood. So I used it to remove the large rough sections, then used the plane to remove the torn surface, and finally, to shape the blocks:
Kutzall disc, with 5″ DeWalt angle grinder: Not for the faint of heart! Absolutely wickedly effective, but not as dangerous as the Lancelot tool.
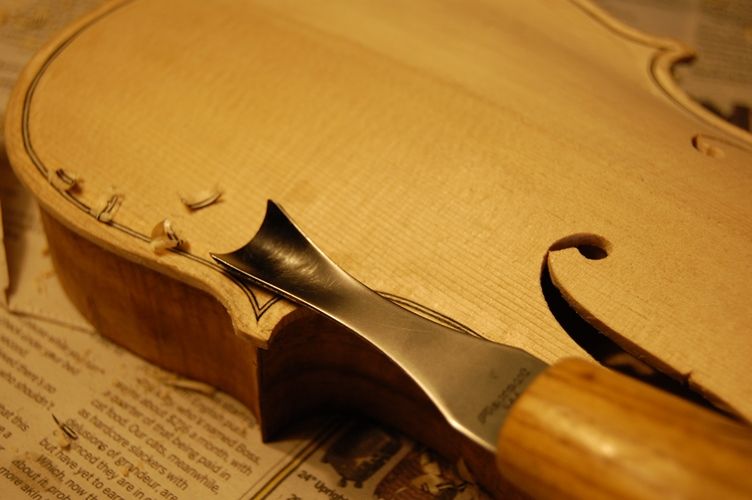
Stanley #100-1/2 Squirrel-tail Plane
It was about 37 degrees, F, outside, but the sun was bright, so I worked outside.
Smoothing and shaping the corner blocks, using a Stanley “Squirrel-tail” #100-1/2 hand-plane.
The little plane is somewhat hard to control, because the curvature of the sole is so extreme, but, if it is sharp and if the blade is set for a very shallow cut, it works well.
It does have to be sharp! (Time to sharpen….)
Stanley # 100-1/2 curved-sole plane…for those of you who are unfamiliar with it.
I was able to shape the blocks pretty close to finished shape with the little plane, but there are some irregularities. I have another tool for that problem.
The bottom block was planed entirely with a low-angle plane (also Stanley– can’t recall what number.) but it worked very well, and the bottom block was easy…I didn’t use the grinder at all on this one. So here are all the blocks, pretty close to finished:
Bottom block planed with a small, flat-sole, low-angle plane.
And, here you can see the finished blocks, ready for sanding:
All the blocks, ready for coarse-sanding. The small plane leaves ripples. The sanding tool should remove them all.
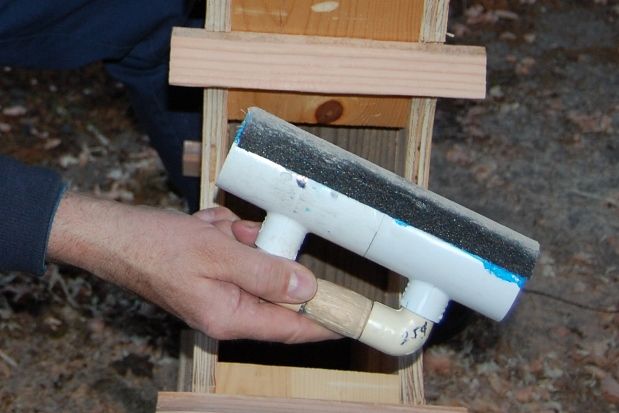
Homemade PVC Sanding Tool
As I mentioned earlier, the oscillating spindle sander I have would not be tall enough for these blocks even if I could manhandle the mold up onto the machine. So, I made this little sanding tool out of re-claimed PVC fittings from the “Habitat for Humanity Re-Store”, and spent more on the little can of PVC cement from the hardware store than I did on all the other materials…about $2.50 at the Habitat store. I used PVC cement to affix the abrasive cloth to the pipe, too, and bound it up with strips of plastic bag until the solvent outgassed and the cement was set.
Sanding block fabricated from four PVC fittings and a 2″ section of 2″ PVC pipe, with a little piece of wood for the handle grip. Comfortable, efficient, and cheap.
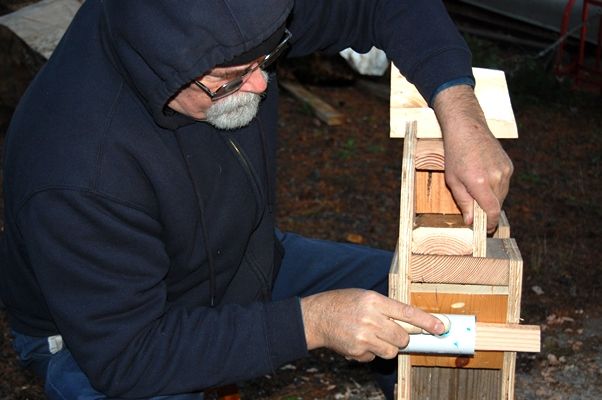
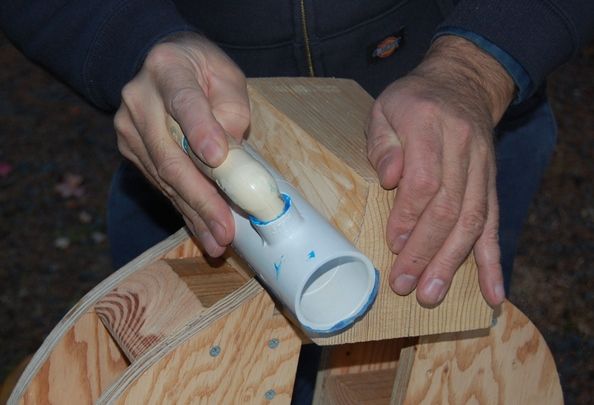
The homemade sanding tool worked extremely well for the small corner blocks, and did very smooth work. On the neck block I used it cross-grain, holding the tool parallel to the “trough” of the curvature, and sliding it up and down the curve. It worked well, there, too, just not as perfectly as on the corner blocks. All in all, it is a very satisfying tool.
Sanding the corner blocks.
Sanding the neck block, I kept the block parallel to the “trough” of the curve, and pushed it up and down, across the grain to get a smooth surface.
Change of Plans
You may have noticed that, though I had planned to use Willow for blocks and linings, those blocks are not willow: the corner blocks and end block are all Douglas Fir, and the neck block is laid up of three layers of clear, vertical grain Sitka Spruce. It was a matter of availability. I do have willow for the linings, and, as that in my preferred wood when I have a choice, that is what I will use. It cuts easily, bends easily, and is very pleasant to work with for both linings and blocks.
I have really felt that I was “spinning my wheels” on this project. It is large enough that I feel the necessity to work outdoors whenever possible, but the weather has not cooperated very well…it rained nearly every day for the last month. In addition, I have been struggling with a cold or some such virus. Today I was cold in the house when the thermometer read 75 degrees, so that is not normal. I finally felt a little better, this evening, and went outside for the few minutes it took me to sand the blocks, but it has been cold out, so I didn’t stay long.
Ah, well, that’s life. I’m grateful to be back on the project again.
Thanks for looking.
If you found this post helpful, please share with your friends!
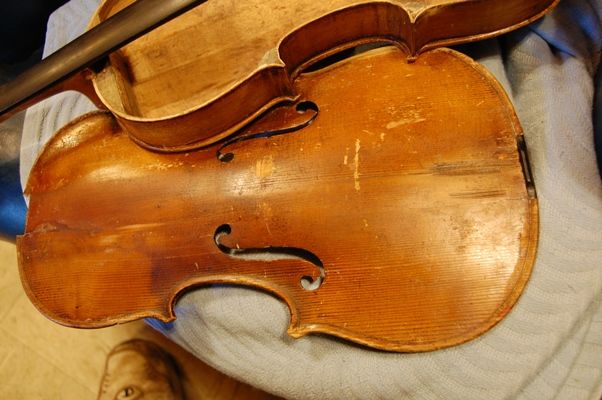
We frequently hear the term “basket-case” in reference to one’s mental-state, but it originated in the reality of all the parts of a dilapidated mechanism or household furnishing being literally placed into a basket and delivered to a craftsperson who (it was hoped) could put it back together and make it functional.
There have been a few times when I have received such a violin…usually either having belonged to the customer’s Great Aunt, or Grandfather, or something, or a relic from their own childhood (which they are trying to hang onto.) In some cases it is worse– the customer simply acquired the instrument at a garage sale (or some similar “depository of fine musical instruments”), in pieces, and wants me to make it work.
In all of the above cases, I try to kindly explain that the labor involved will cost far more than the instrument will be worth when completed, and they must decide whether they want the instrument badly enough to pay that much to have it playable. (We are not talking about a full restoration, just bringing a dead fiddle back to life.)
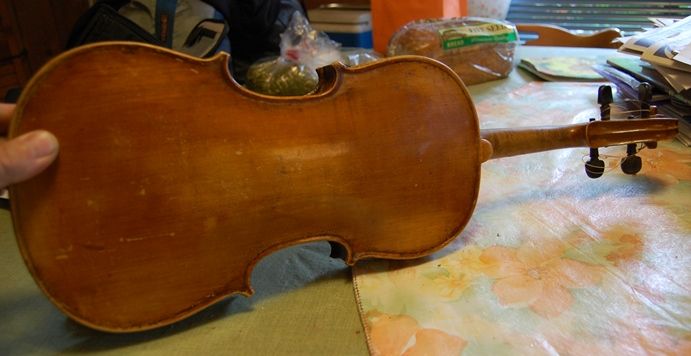
“Bread-Bag Fiddle”
In the particular situation at hand, it was a mix: The violin was coming to pieces, and was literally in a bread-bag, with the mouth of the bag tied off, to prevent the escape of any pieces. BUT, the person who brought it to me was not asking me to fix it for him…he simply offered it as a potential “project” fiddle. I gave him what he had paid for it at a junk-shop (styled “Antique Shoppe”) and tossed the bagged corpse in a box to gather dust, thinking that perhaps someday I could do a photo-story of sorts with it, in a “sow’s-ear-to-silk-purse” type of story. (Given the relative quality, I should probably edit that to say, “calico-handbag” as opposed to silk purse, but that is another matter.)
A few months ago, however, a parent contacted me, asking whether I had an “old fiddle” (full-size) for sale at a reasonable cost, to replace her daughter’s fractional size violin. Initially, I told her I did not, but upon further reflection, it occurred to me that I had the “bread-bag fiddle”. I told her exactly what it was, to the best of my knowledge (I had not opened it sufficiently to see some of the surprises), and suggested that, if I could make it a reasonable player for a price she could afford, that perhaps it would meet her expectations.
I sent her some photos, so she could see that, at least for now, it sort of “put the ugh in ugly”, and that it would never win any prizes for looks, regardless of what I did.
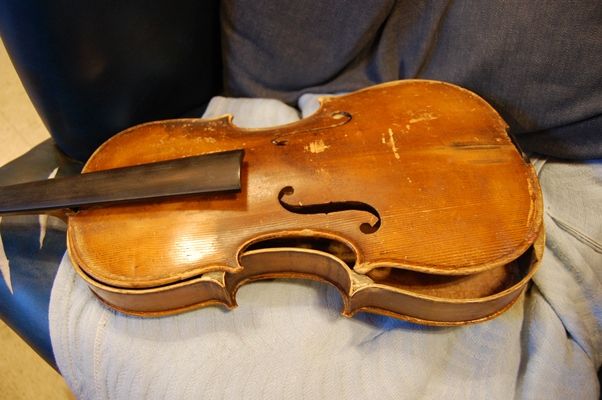
Front plate condition
Back was not as bad, but very plain.
But–some folks like old fiddles! As it turned out, she and her family were pleased with the prospect, and told me to carry on with the “restoration.” (I repeat…this is not a true restoration, but rather a “revival” or “resurrection” of a dead or nearly-dead violin.) I had another commission going at the time, and I let them know that I could not begin immediately, but they were not in a hurry, so it was agreed that their project was next in line. I was able to begin about a month later.
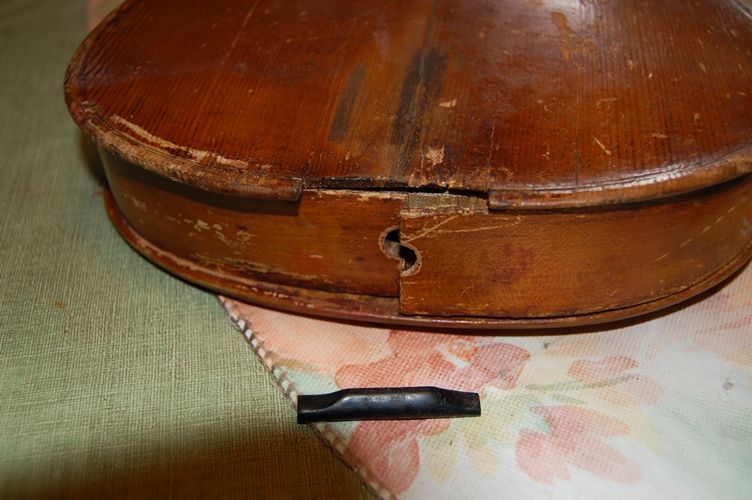
Diagnosis: YOW!
Outside
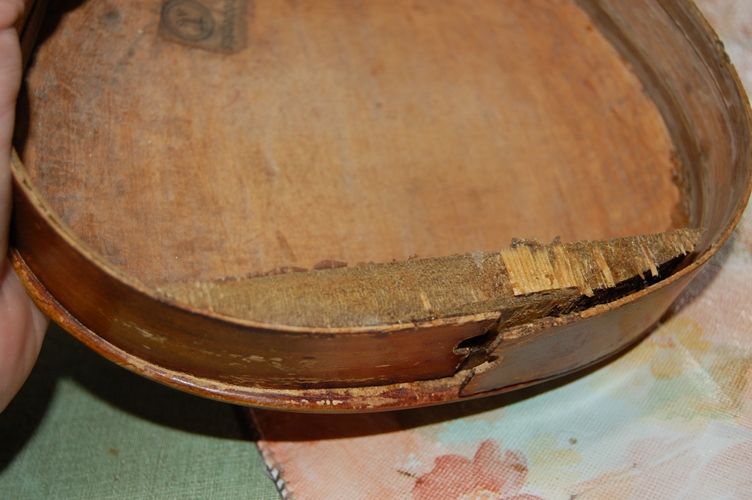
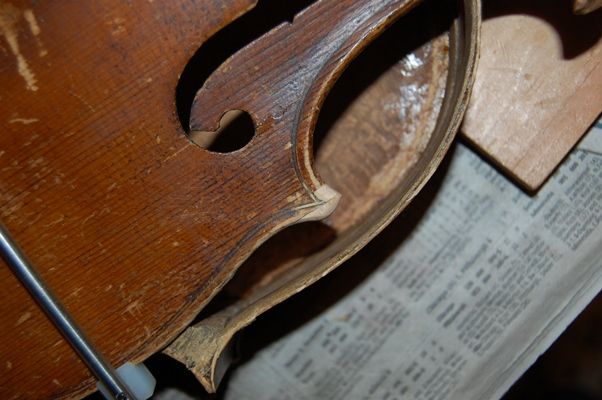
The back had come loose from the ribs, partway around, and the (monstrous) lower block was separated from the ribs, as well, and (despite my best attempts) would not fit together perfectly. (sigh…)
Loose ribs, detached saddle, separated top and bottom plates. End pin was long-gone.
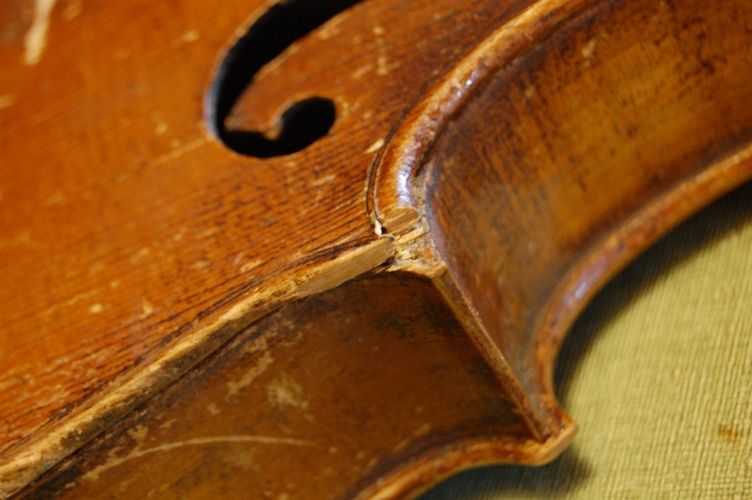
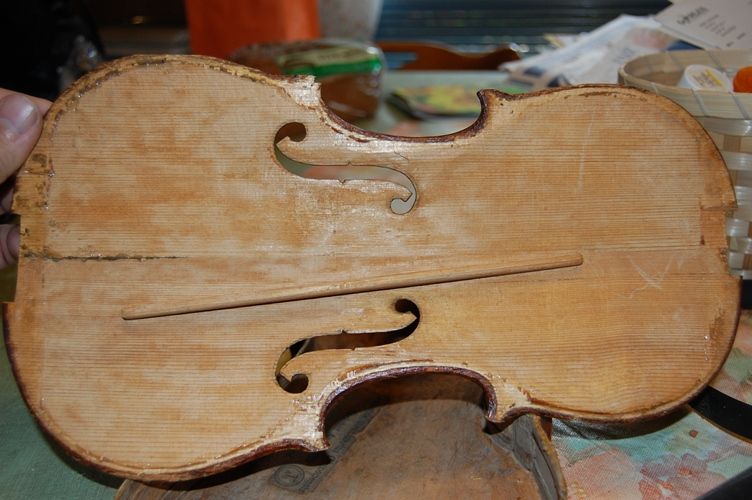
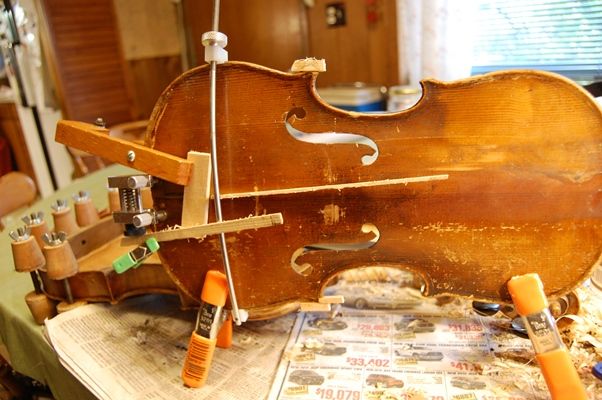
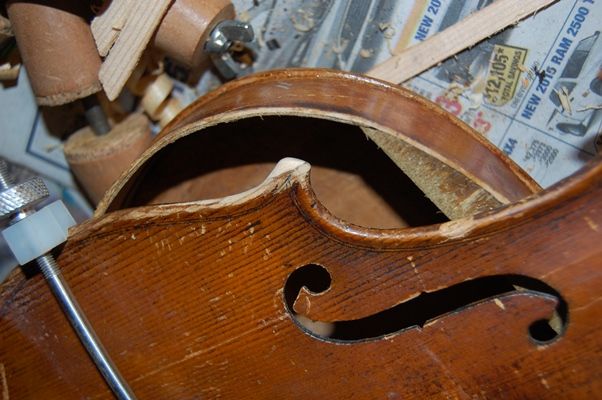
Three of the four corners of the spruce top had missing wood, along with one lower-bout edge. One of the three had wood broken off, not just chipped or worn.
Missing corner wood, snapped off at the purfling miter.
Inside
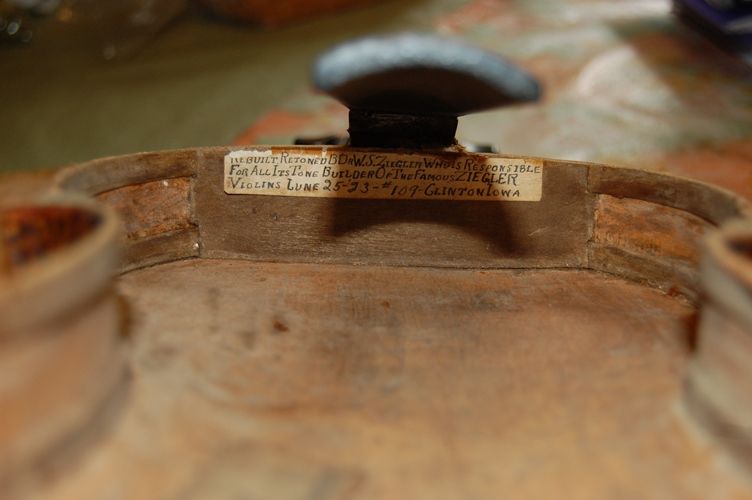
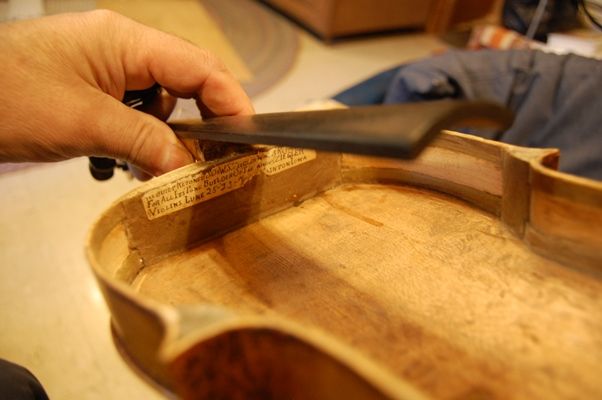
The exterior was bad enough, but when I opened the corpus I found the history, literally written on a label, and proudly claiming responsibility for the carnage within.
Repair/innovation label; June 1923.
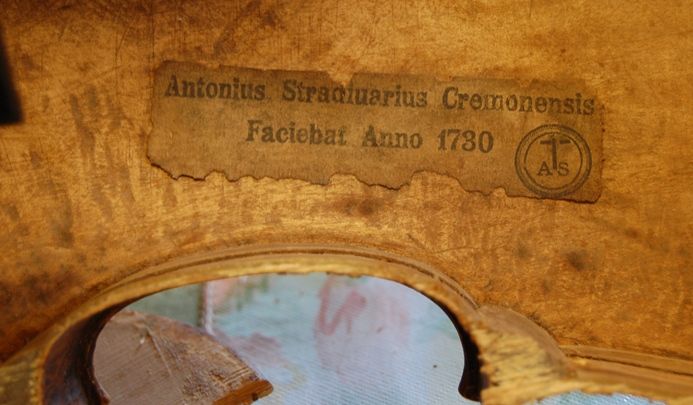
And, as usual, the “Tony Stradivari” label is there to confuse things further: I left it there, of course, and glued it down securely, so it would not fall out. 🙂
The inevitable “Stradiuarius” label: inserted in literally millions of instruments churned out of factories and cottage industries in the late 1800’s.
Here is a photo of the tail-block and loose ribs:
Those chips of spruce stuck to the end block were glued back in place in the top plate, along with other, earlier missing wood.
The “repairer-rebuilder-innovator” had removed the normal blocks and replaced them with very heavy, oversized, hardwood blocks. That was bad enough, but he had also (in response to a bass-bar crack) installed a bar at about a 20 degree angle across the longitudinal axis, rather than the 2 degree (or thereabouts) angle that is normal.
One thing to be observed, too, is the peculiar “mottled” look of the inside of the top plate, and how much fresher the wood appears here, than inside the back. From this, I see that this instrument was originally one of the very cheap fiddles for which the maker took not even the trouble of smoothing the inside of the top plate, but left it extremely rough, like chainsaw sculpture, in the knowledge that few, if any, would ever see it, whereas the back was very smooth inside, where any eye could glance inside and see the work. The “re-builder” smoothed all the rough gouge-work, removing the original “integral” bass bar (which had been carved in place, out of the same billet as the rest of the top, not carved separately and fitted to the plate), and had continued by adding the big blocks, slanting bar, etc.
How do I know? Because I have smoothed such an instrument myself, and that is how the top plate looks afterward. The areas where the most wood was removed are quite bright, whereas the places where only a little smoothing was in order are darker, showing the oxidation of the years. No harm done, there, and he did a fair job of it.
Whack-o bass-bar. Bad-repair of center-seam, too.
The ribs (as they came from the low-end European factory) were 2-3 times the thickness they should have been , in the upper bouts, though pretty close to normal in the lower and center bouts. There were several cracks. Some I had seen from the outside– some became obvious when I opened the box. Inside (due to inexpert top removals over the century or so of the fiddle’s existence), sufficient wood had been lost in the areas of the corner blocks that I felt it was necessary to replace wood there, as well.
First things First
Since the back was relatively undamaged, and it had to be re-secured to the blocks so that I would have a firm foundation from which to build, I reglued the blocks to the back, and
Re-gluing the back to the garland. You can see that I was also working on the top plate.
I scraped and scraped the block and ribs, to try to get the loose ribs to fit back in place perfectly, but, in the end, they still were pretty rough. I kept telling myself that this was not a restoration, just a resurrection.
I soaked loose the old, dirty glue in the center seam, and pulled it together as tightly as possible, then re-glued and clamped it. I went ahead and glued as many cracks as I could manage at the same time, wedging them in or out, as was needed to make them flush on the outside and tight, edge-to edge. I added the orange clamps as two pairs of “legs”, so that the plate could stand on edge and not twist under its own weight and that of the clamps.
Multiple repairs in progress: center-seam, cracks, and missing corners.
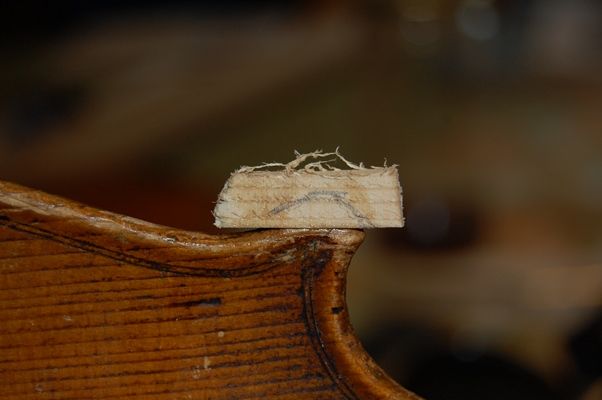
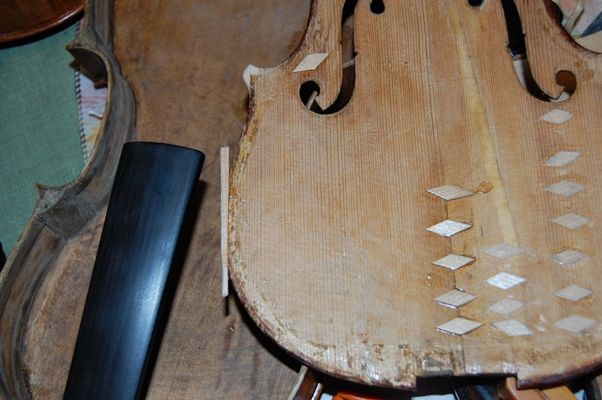
As you can see, I also began replacing the corners at that time; here is how it works:
Spruce block glued in place, and shape of corner traced on the block.
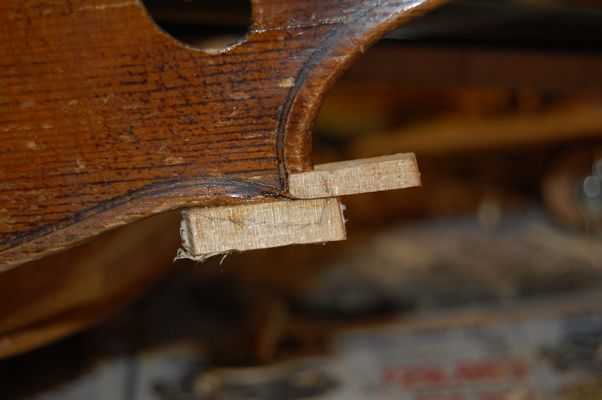
Two blocks required on this corner.
There was a third corner needing a minor wood-replacement, and a lower-bout edge worn (and splintered) off, as well. the procedure for replacement was the same in all cases.
After the glue was dry on the replaced corners, I carved and filed the new wood to match the old shape.
One new corner nearly complete.
Another replaced corner nearly complete.
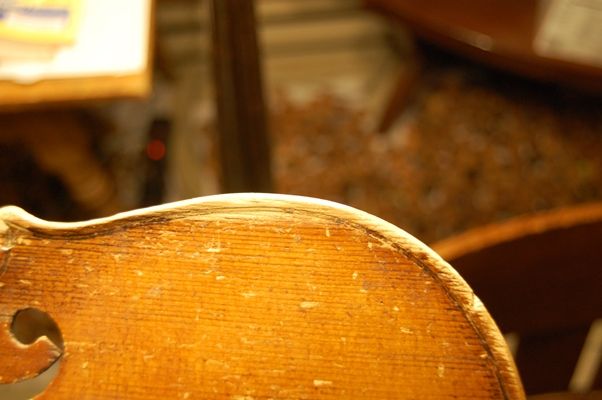
One lower bout had a missing edge, too, so I glued new spruce in place, and, after the glue was dry, I carved and filed it to match the original curve.
Missing wood replaced on lower bout edge. The wood will be filed and carved to shape.
Replaced edge ready for coloring and varnishing.
Later, I will stain the new wood to match the old, using coffee, dirt, and ash, then retouch the varnish to match the old varnish.
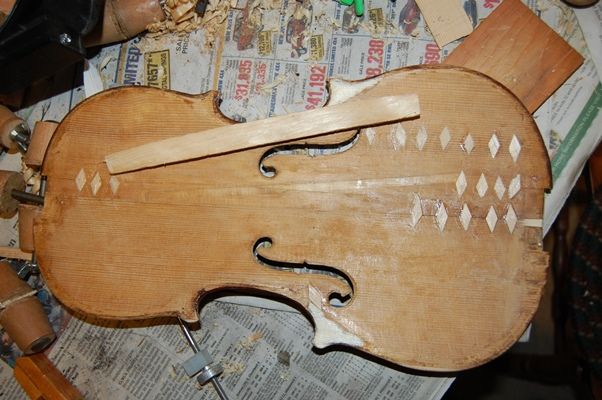
Heavy repairs
The bass-bar had to come out, so, after the glue had dried in the various cracks, I planed out the old bar, (and glued “cleats” on the inside along each crack) and prepared to fit a new bar. The bass-bar was going to have to be shorter than usual, as the huge end blocks crowded the normal position.
Cracks and center-seam cleated from inside; old bassbar planed out, and new one ready for fitting.
You can see that I had already begun replacing the wood missing from the inside corners: I sawed a 1 mm-thick “veneer” of clear, vertical grained spruce, glued it to the smoothed and flattened corners, and later planed it flush with the surrounding areas.
The bass-bar fitting went quite smoothly, using chalk on the inside of the top plate, and pressing the bar against the chalked area to disclose the high spots on the bar. I had it ready to glue in a pretty short time, and trimmed it the next morning, after the glue was dry.
New bass-bar, glued and trimmed.
Side view of new bass-bar, stained with coffee (which also raised the grain.) I sanded it afterward, to smooth it again.
Almost Ready for Re-assembly
Once the entire interior was smooth, with all missing wood replaced, I could start thinking about closing up the body of the violin. I re-fit and glued in place the saddle that had come with the fiddle.
Completed interior.
Meanwhile, I had checked the back and ribs for appropriate thickness– a few areas of the back were abnormally thick, so I planed and scraped a millimeter (or so) of wood out of those areas, then even more from the upper bout ribs, where the wood was three times the normal 1 mm thickness. Perhaps it will help….
Scraped upper bout ribs showing white against the patina of age.
Lower back was too thick on the treble side. Other than that it wasn’t too bad.
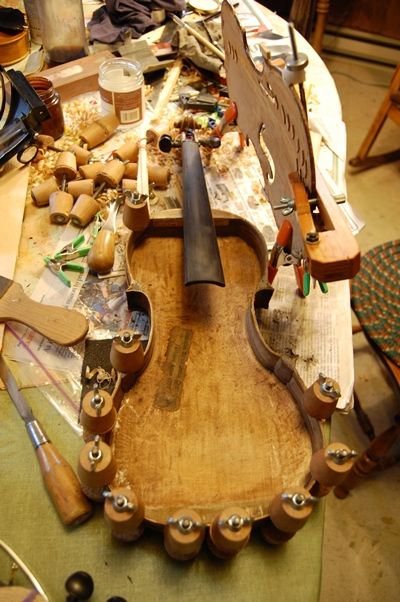
So, I was ready to close:
Ready to close!
Looking more hopeful!
I dry clamped the whole corpus (body) in exactly the way I wanted it to go together, using spool clamps, just like the ones used when I was gluing the back to the garland, above.
Then, when I was sure everything was right, I heated hide glue, and, loosening a few clamps at a time, I used a palette knife to carefully insert the thin, hot, hide glue between the front plate and the linings and blocks. Then I re-applied those few clamps and repeated the process with the next few clamps until I had glued all the way around. I seldom think to take photos of thsi process, so…there aren’t any. Sorry.
Once the glue was dry, I could take off the clamps and get ready to begin final touch-up of varnish, and general polishing.
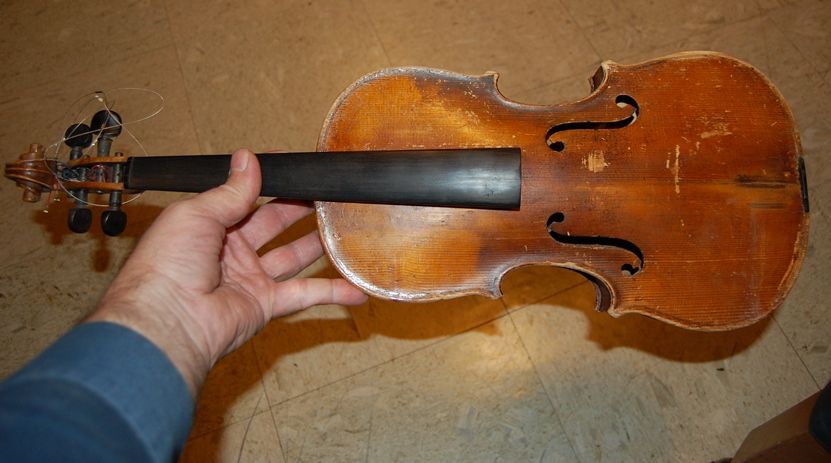
Closed, and ready to begin finishing. Old strings still tangled on the pegbox.
Back view.
And, the front! Still lots of “owies…” But, when I tap it, it tries to talk…I think it’s gonna sing pretty good!
So, I spent a few evenings cleaning, and touching up varnish, so that nothing sticks out as damaged, nor as “new”. Not too shiny, but not too grubby, either. What I am attempting is “Old fiddle Chic.”
New Helicore strings because that is what the customer prefers. (Installed after the photos.)
Looks as though the bridge was a little crooked when I snapped the photos– it was straightened later, as well. 🙂
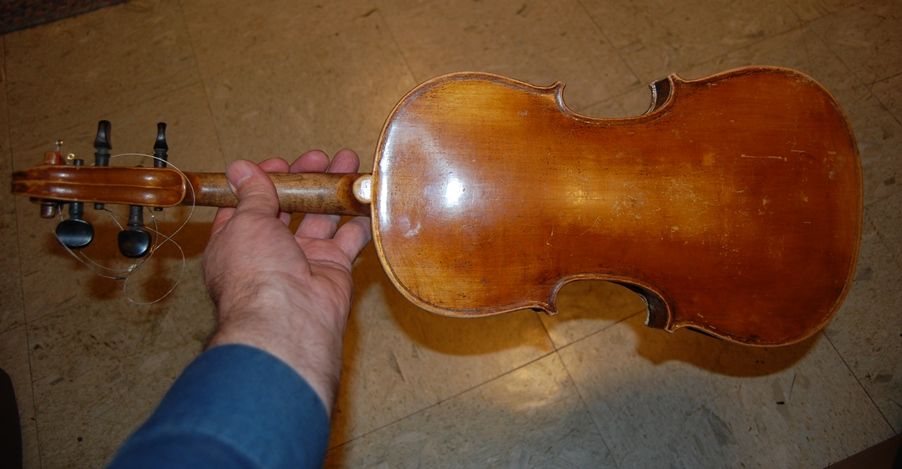
And, there it is, ready for new adventures! Just a tad over 100 years, and ready for another century. 🙂
Warm, friendly Old Fiddle, headed for a new home.
Not all of the old scars have become invisible (though some have)…some are a permanent part of this old fiddle’s character, and simply show that is has been well-loved and well-played. Future things will undoubtedly include a new fingerboard (someday) and new pegs (eventually). But for now, it is ready to sing.
The old fiddle turned out to have a rich, deep voice, and the new owners are very happy with it. I hope to hear the young lady play someday.
Thanks for looking.
If you found this post helpful, please share with your friends!
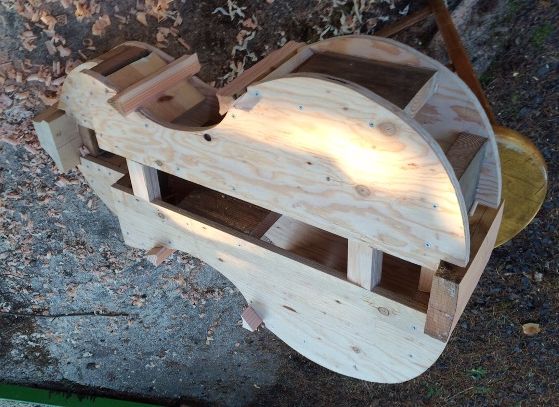
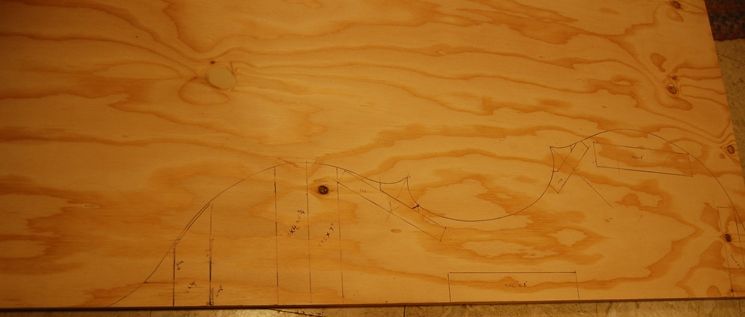
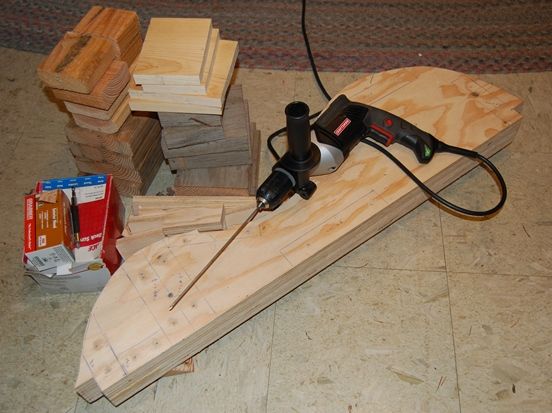
I designed this upright bass mold to be collapsible and to allow me to affix the blocks to the mold with screws, so that there is no glue to have to separate later. I also wanted the mold to be slender enough from front to back that I could install the front and back linings without running into the mold, so I gave myself a 1″ clearance between the front and back faces of the mold and the front and back edges of the ribs. Since the back will taper in the upper ribs, losing two inches of depth between the middle of the upper bout rib and the top rear edge of the neck heel block, I had to accommodate that taper as well: I simply made a 2″ “step” in the mold to allow the taper to occur.
Finally, I wanted the mold to be stout enough to allow me to handle it without fear of damage. So, the construction is of 3/4″ plywood, spaced by blocks of 2 x 6 and (in the upper half of the upper bout) blocks of 2 x 4. The corner block mounts are of 1 x 6, so I do not have to use large screws to affix the corner blocks. The neck and tail block mounts are of heavier stock; 2 x 4, and removeable, to allow the mold to collapse laterally, and clear the ribs for removal.
Using the Mold Template
In the last post, I had completed the mold template, and had commented that I would use it to make the mold, and then, later, to establish the shape of the blocks. So this is how that works:
I bought two quarter-sheets of 3/4″ plywood from Home Depot. That is a pretty expensive way to buy plywood, but it solved two problems:
I really don’t need a whole sheet of plywood, and
Even the quarter sheets were difficult to get into my car…but not impossible.
I took the quarter-sheets home, and positioned the mold-template flush with one end of one of those sheets, and offset by two inches. I am building a collapsible mold, and I want 4″ clearance between the mold halves. I don’t need that much for mold removal, but I do need enough for my hands and forearms to reach up inside the mold and remove the screws holding the molds to the blocks. So a 2″ offset on the template will result in a 4″ gap down the center of the mold.
I traced the mold template onto the quarter-sheet, and it looked like this:
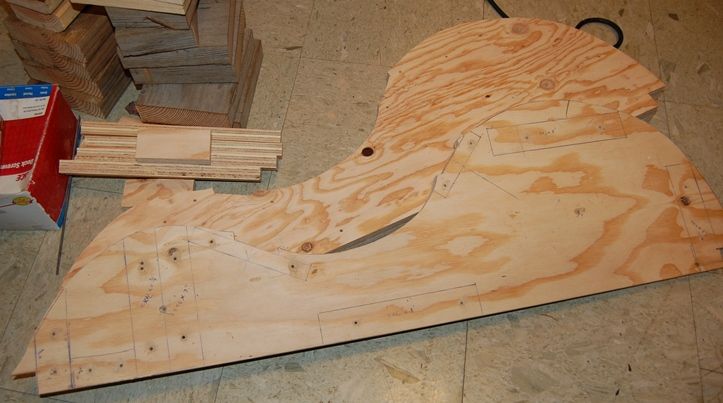
Template design traced onto mold plywood.
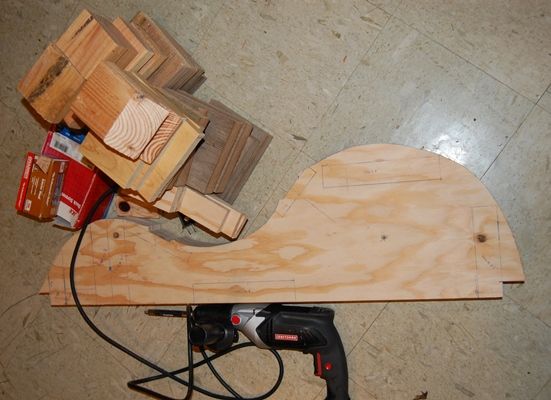
You can see that I also laid out the location and outline of the instrument blocks, the block mounts and all the spacer blocks that would become part of the mold. This took less than half of one of the quarter-sheets of plywood, so I sawed the sheets into strips, 11″ wide , and about 39″ long, and stacked them into a “sandwich” of four pieces, held together with two screws, countersunk flush with the surface. Then I sawed the whole sandwich out on the bandsaw, and smoothed the edges with the oscillating spindle-sander.
I cut all the needed blocks to complete the mold, and I was nearly ready to begin assembly.
All the mold parts–the four mold quarters are still screwed together in one piece.
It was tempting to take the mold quarters back apart at this point, but, fortunately, it occurred to me that I could do all my drilling at once, so things would line up, and so that I only had to drill each hole once. So I made a drill bit out of a welding rod and drilled every screw location through all four plywood quarters. (Welding rods are way too soft for most uses; they use extremely low-carbon steel for the core wire of welding rods, but it was OK for this soft plywood.)
All the holes in one step.
Finally I separated the quarters, and countersunk all the screw-holes.
Separated mold-quarters.
Assembling the Mold
I laid the mated pairs side by side, and lined up perfectly, then transferred the block locations and lines to each panel so that I could see where the blocks were to fit, on all four pieces.
Transferring the lines– it looks kind of funny, because the center 4″ is missing.
Then I assembled my spacer blocks and installed them:
Front and back with spacers.
Once the spacers were attached with screws, the front and back were pretty stable and I could begin assembly. The back plate still needed to be cut off at the beginning of the rib taper, so it could accommodate the taper, but I began by assembling (as many as possible of) the internal members to the front plate of the mold. It turned out to be pretty easy.
Beginning mold assembly process.
Then I positioned the back plate pieces on the internal blocks and screwed it down tightly. I have used no glue in the mold, so, if I need to make modifications it will be easy to do.
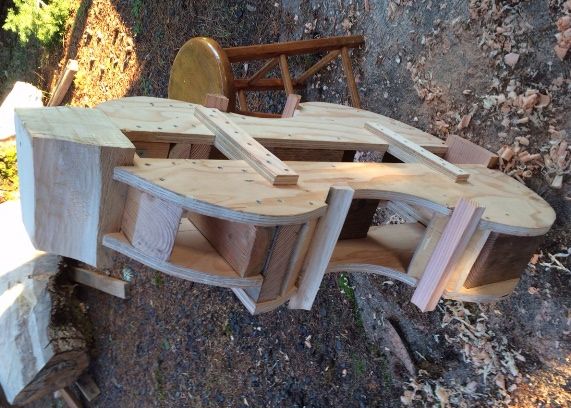
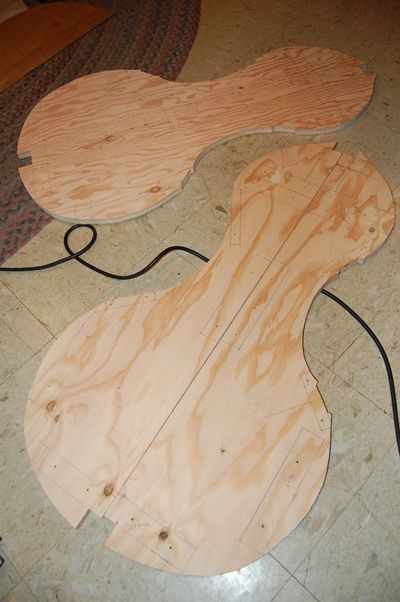
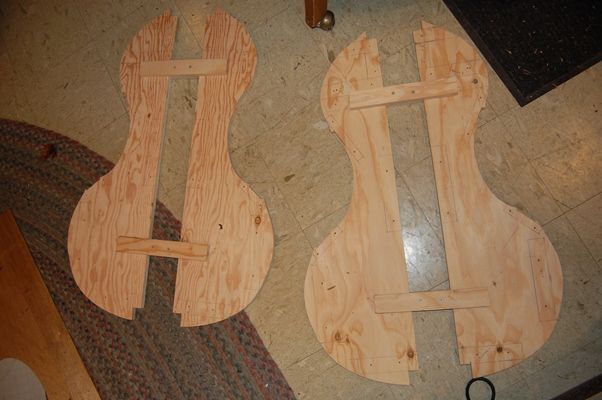
Front plate of the (nearly) completed mold.
Bass mold showing back plate “step”, and corner block mounts.
Bass mold with neck template for size comparison. Upper and lower block mounts are not yet installed.
The way by which I had intended to attach the upper and lower block mounts does not appear to be workable, so I will have to re-think that part. I had planned to install them on hinges, and to be able to screw down a steel bracket on one end to secure them, but it turns out that it will be too difficult to access the screws, so I will have to give it some thought and re-design that aspect of the mold.
At any rate; that is where the project stands for now.
I called the wood supplier, and they assured me that my European Spruce should show up today or tomorrow. No problem, really, but I want to get those plates joined soon. (I already have the local Big Leaf Maple in my shed, waiting to be used.) By this weekend, I hope to have the blocks installed and shaped, the front and back plates joined and the ribs cut. We’ll see how it works out.
Thanks for looking.
(P.S. : The wood showed up this evening… Good looking stuff!)
If you found this post helpful, please share with your friends!
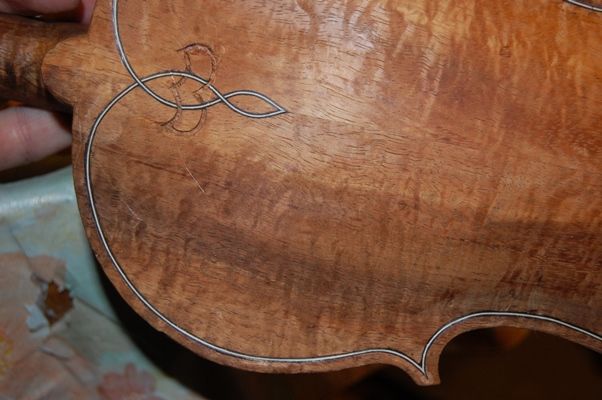
Some makers, especially those making violas da gamba, Lutes, etc., make much more complex purfling weaves. Some of the Celtic designs employ the technique in very sophisticated ways. The point is to make an illusion of 3-D “over and under” weave in the purfling. As far as I know it has zero effect on tone; just appearance.
Installing purfling
When I left off, last post, the purfling groove was nearly complete, but not quite: I finished picking out the last bits of wood in the “fleur de lis” areas, then went all the way around checking for depth and width.
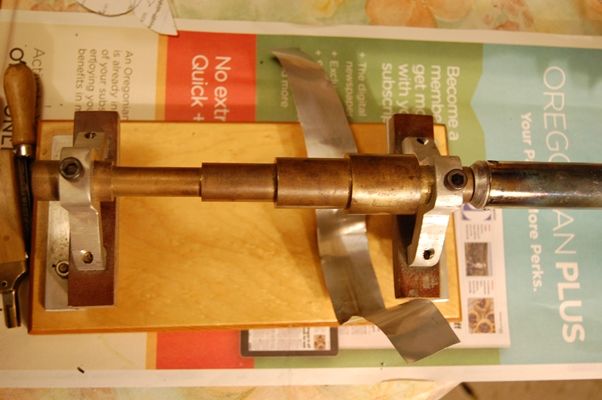
My purfling bending “iron” is an old-fashioned solder-iron affixed to a brass cylinder with various diameters. I don’t know who made it…I got it from my friend Jake Jelley.
Purfling bending iron: my bending strap is spiral-cut from a large energy-drink can I found at work.
Starting with the completed purfling groove, I first cut and bent the center-bout purfling strips, and inserted them into the grooves, making sure the mitered ends were all the way into the corners of the “bee-stings”, as the sharp miter-ends are commonly called.
Then I cut and bent the long upper and lower bout strips, and fitted them carefully into place, jamming them tightly into the miters at the corners, and trimming them to fit exactly at the other ends.
Dry fit lower and center bout purfling strips
Upper bout purfling dry-fit
Then I began gluing the long strips in place, so that they would stay put while I installed the short ones. I tipped the center strips up and inserted hide glue in the groove, then pushed them back in place, and forced them to the bottom of the groove, so that the glue was squeezed out all the way along each strip. Then I repeated that procedure on all the upper and lower-bout purfling strips. Afterward, I could begin work on the “fleur-de-lis” designs.
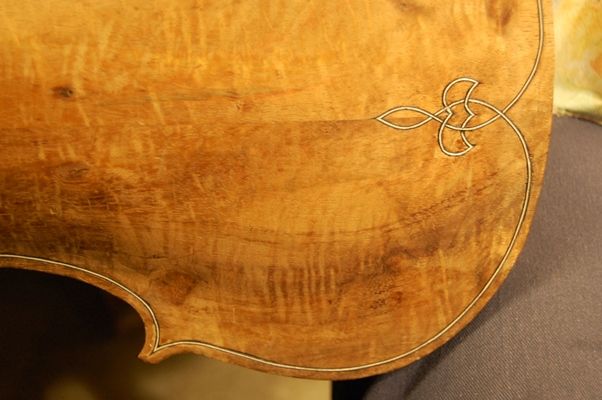
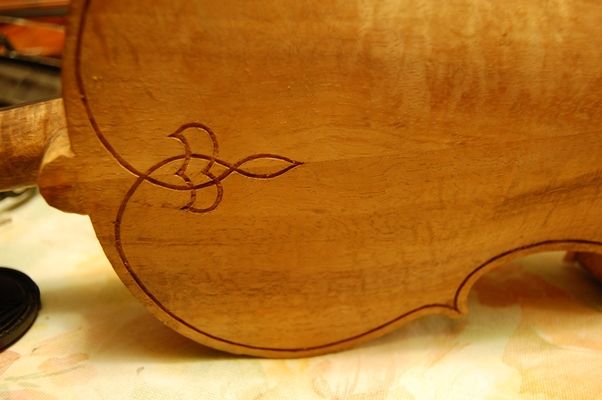
Fleur-de-lis design begun
Upper fleur-de-lis begun
The “Weave”:
You can see that I had to decide, initially, which strip goes “over” and which goes “under”: In reality, of course, they are all at the same level, but, choosing which gets cut off (thus looking as though it goes “under”) and which goes on through an intersection (thus appearing to go “over”) determines which way the “weave” seems to go. Once I pick a direction, I need to pay close attention to see that it continues with the “over and under” look, to make the “weave” illusion appear correctly. I also try to make both ends the same way (starting “left over right”, for instance).
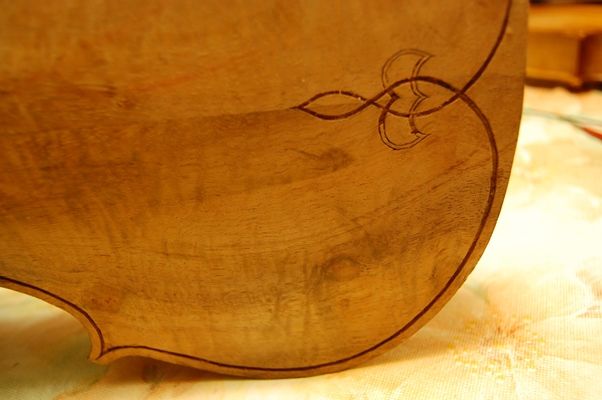
Purfling weave half done
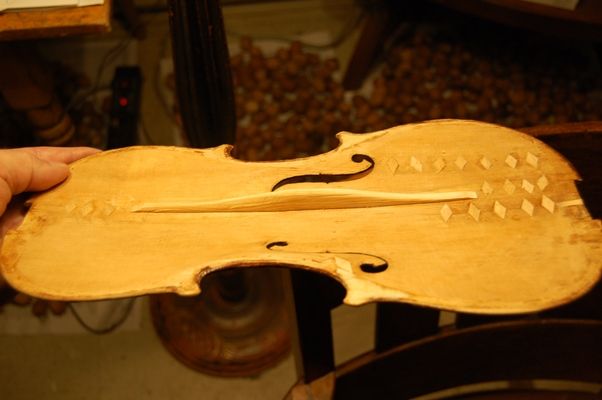
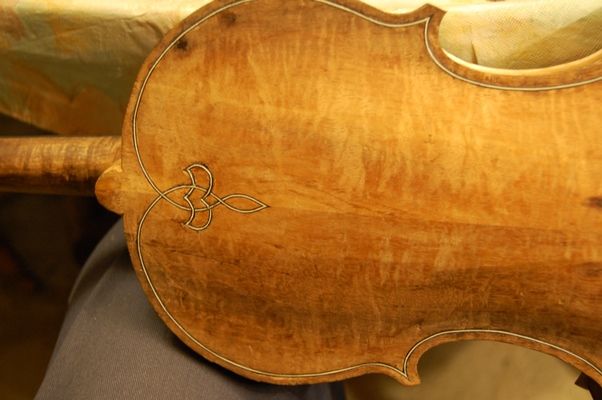
Lower purfling weave complete, ready for final scraping and edgework (which has not been begun.)
Upper purfling weave complete.
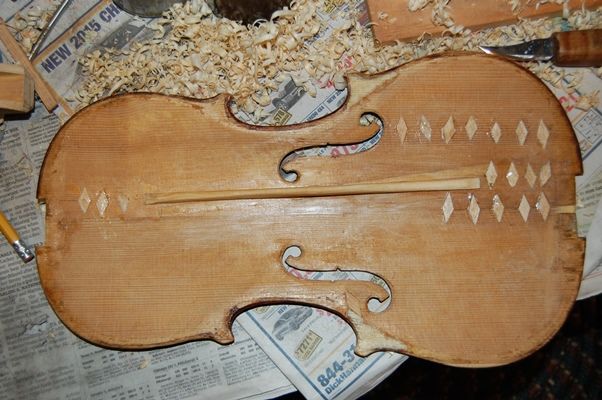
Purfling weave completed: next step will be to cut the channel.
All that is left on the back, now, is the channel, the edgework, and final scraping. We are officially “on the home stretch!”
Thanks for looking.
If you found this post helpful, please share with your friends!
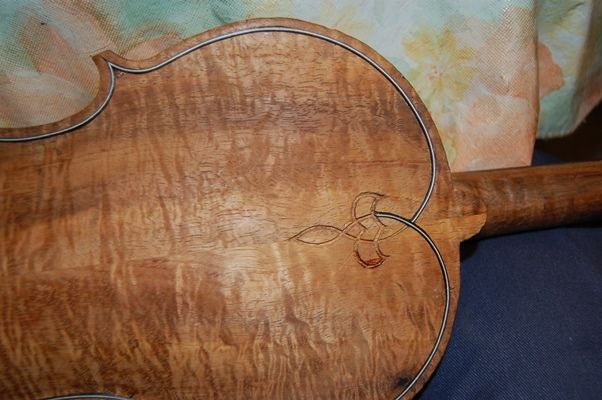
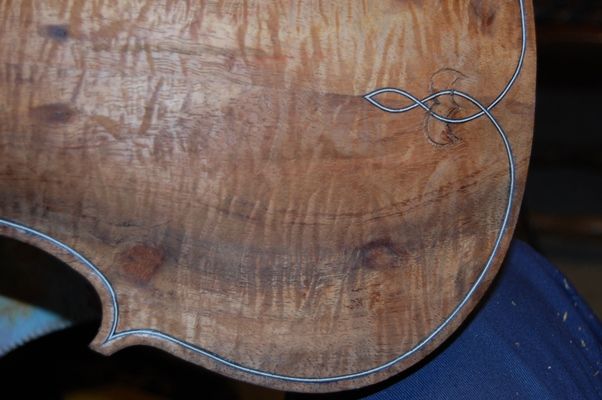
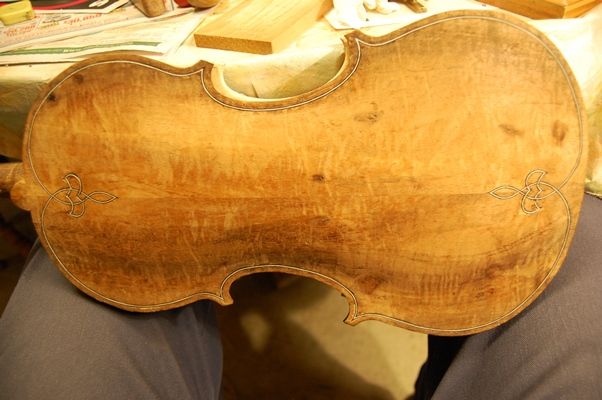
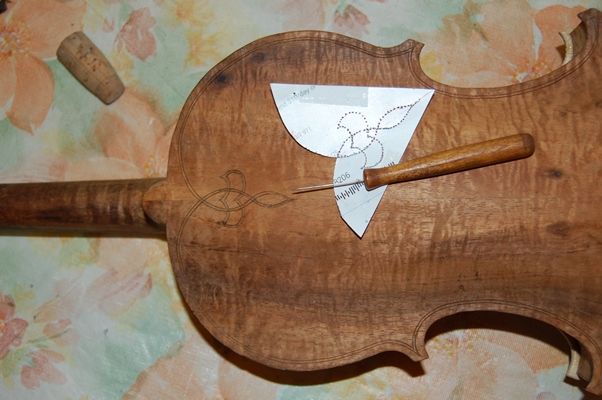
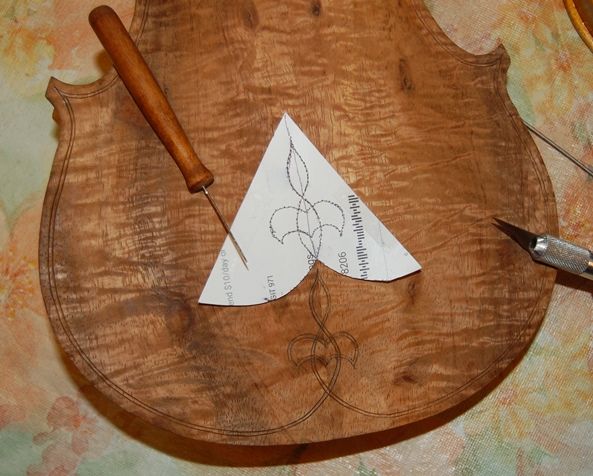
I use the same purfling marker to begin the layout of the back purfling as I did on the front purfling, except that, as I have a habit of using a “signature” fleur-de-lis on the upper and lower ends of my five-string fiddles, I have to stop short of the corners and ends, and sketch those areas in by hand. However, I had noticed that, since I have literally been sketching them in by hand, no two were alike, and they were pretty time consuming. So, today I made a small template out of tag-board…a junk-mail offer for some thing or another, that just happened to arrive at the time I needed such a thing. (Serendipitous, that….)
I used the purfling marker to lay out everything except the corners and ends, then used the template by poking through it with a needle, to lay out the ends, and sketched in the corners with a pencil and knife.
Purfling layout: Upper end and corners, with template and needle.
Purfling layout: Lower end and corners, with template, needle and knife.
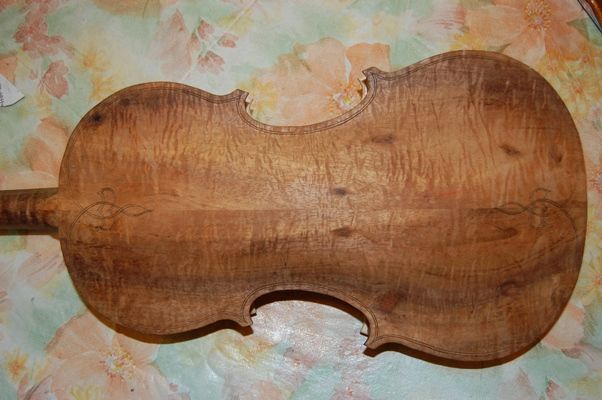
And, now I am ready to cut all my purfling grooves, pick them out, and begin installing purfling.
All back purfling laid out and ready to cut.
Cutting the groove and picking out the waste wood.
This part is hard on the hands. Some very good luthiers, today, now do this part using a dremel tool, but I tried it a couple of times and had some rather nasty accidents. I reverted to cutting the grooves by hand. It is hard on my hands, but I end up doing better work. I just have to take breaks now and then.
Something I had to bear in mind on this fiddle, is that the Koa grain is so curly and wild that I could have no confidence that the purfling pick would not chip out a larger piece than I intended. So, I had to move carefully, and take small “bites.”
Also, inlaying the “purfling-weave” (the fleurs-de-lis) was risky, as the graduation was already complete, so I did not have lots of extra wood to work with. I had to make sure I did not cut too deeply. I worked carefully, and took my time, and got through the challenge without mishap. Aggravated my arthritis somewhat, but that is OK, too; I will just take a break for a day and do some other things.
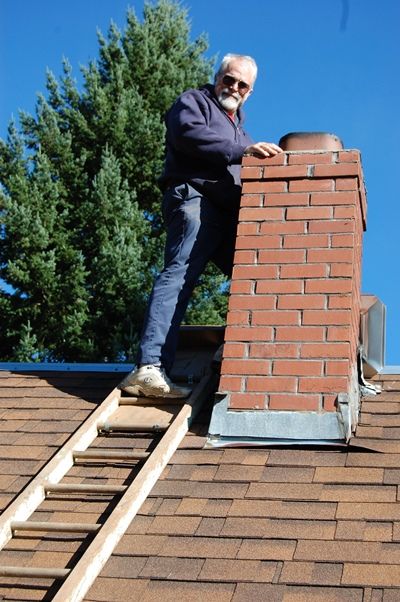
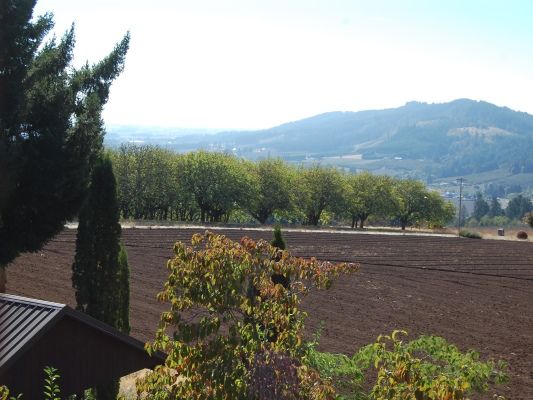
The chimney needed to be cleaned, and commercial cleaners refuse to do it, as they say our roof is so steep and high, that it is too dangerous. (sigh…) So we bought a set of chimney brushes, and, every year, we do it ourselves. That took a few hours Saturday morning. We heat with wood, and it is important to clean that chimney every year.
Chimney cleaning!
Nice view from the roof, though!
But in the afternoon and evening, I went back and got back to work on the fiddle. Section by section I sliced along those marks and cut the grooves as deep as I thought I needed them, then began picking out the wood from between the cuts.
Upper purfling groove, partly cleaned and nearly ready for the purfling strips.
Lower purfling groove. Ran out of energy, but this is all that was left to do. I’ll get it another day.
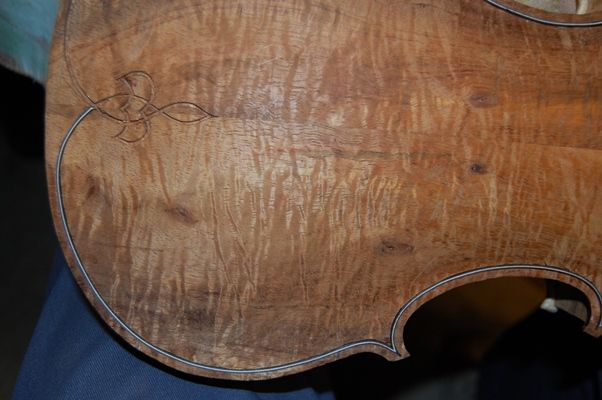
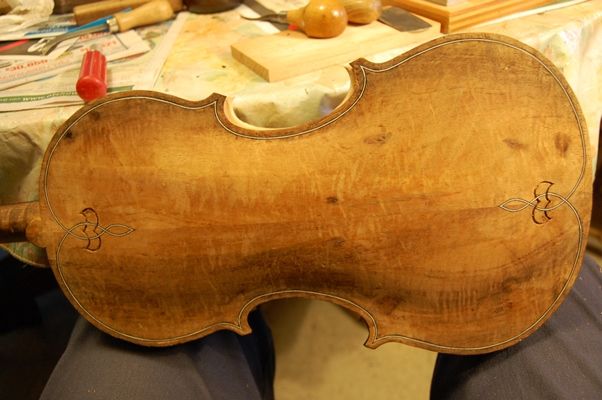
Whole back, as it stands, now.
Anyway: I think that is about as far as I am going to get, this weekend. I will try to finish the purfling by Wednesday, get the heel and neck and scroll at the absolutely finished level, then start doing all the final edgework, and prepping for varnish.
Thanks for looking.
If you found this post helpful, please share with your friends!
It was fun working on the Sawmill, and just as we got that done our daughter came home (from Switzerland) for a visit, so, between that and all the overtime at work (teaching print-reading classes), it has been hard to get going again, but the fiddle has been patiently waiting on the dinig room table for me to get back to work.
Installing the Front Plate
I levelled the garland by scrubbing it back and forth on a sanding board, then aligned the plate on the garland and clamped it with spool clamps. After heating up the glue, I removed a few clamps at a time and inserted the glue with a thin pallete-knife, and re-applied the clamps. In this way, I can work my way around the perimeter, accurately and easily gluing the plate in place without fear that the glue will gel before I can get the plate clamped in place.
Front plate glued in place
Ready to begin Purfling
The purfling is an inlay that is partially decorative, and to some degree a protection against cracks and splits– an edge reinforcement. There are some (usually very cheap) instruments that have the purfling simply painted on, so that it only looks good, but has no other function. They are usually seen as sub-standard, though, and I will not consider making an instrument that way…so, here is the beginning point: the purfling marker. Two blades set apart by the exact thickness of the purfling to be inlaid, and the distance from the edge set, as well.
Purfling marker
Some people call this a purfling cutter, but it really does not workwell if you try to use it to cut the slot. I mark the slot with this tool and then cut the slot with a sharp, thin knife. In use, the purfling marker should be held exactly perpendicular to the plate, and tightly against the plate edge.
Purfling marker in use: see the double lines.
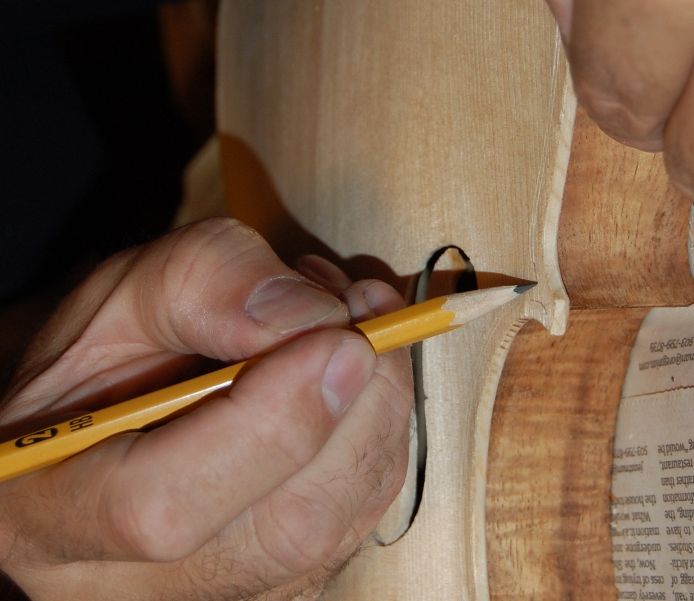
The purfling marker will not complete the corners, and they are fairly critical to the overall look, so I carefully sketch them in with a very sharp pencil.
Sketching the corners
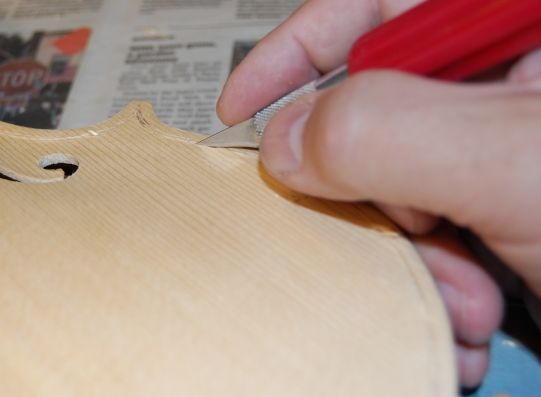
Cutting the Purfling Slot
I usually use an X-acto knife to cut the slot, and pick the center out with one of several tools made for that purpose.
Purfling tools.
The first trip around the plate it is important to go lightly but very accurately, so that I am barely deepening the marks left by the purfling marker: after that I can cut more deeply.
Incising the Purfling Slot
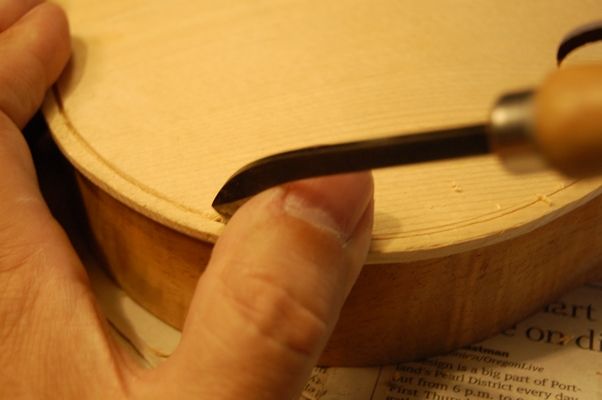
Cleaning the Purfling Slot
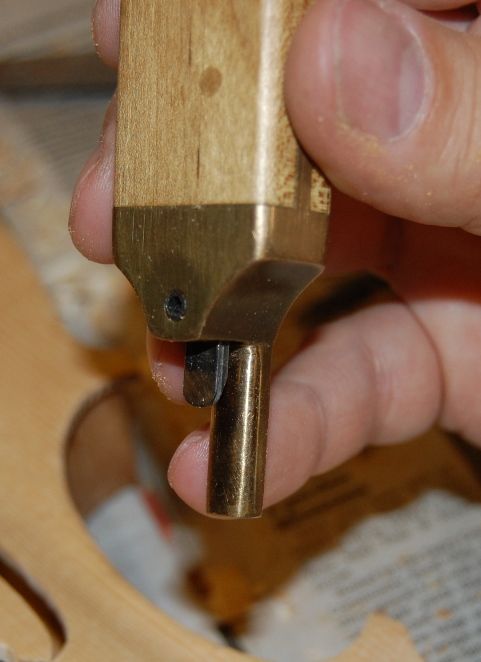
After I am satisfied that the cuts are the correct depth all the way around, I carefully pick out the center of the slot and clean the slot, using a purfling pick. I have some that I made myself, but this one was given to me by Jake Jelley, and it works very well.
Purfling Pick in UseReady to Install Purfling
Installing the Purfling
Some people make their own purfling…maybe I will try it someday, but for now, I buy mine in three-ply strips. The strips are too brittle to bend, so I use a bending iron to make them flexible and to bend them to the correct curvature for the tight corners.
Purfling strips with prepared front plate
I try to install the C-bout purfling first, then force the mitered ends of the upper and lower bout purfling against the mitered ends of the c-bout purfling. It takes practice to get good at this: I do not claim to have “arrived”. But it does seem to be getting easier. (I read the other day that someone asked Pablo Casals why, at 93 years of age, he was still practicing the cello for three hours a day. He said, “I think I am seeing some improvement!”) (Good one, Maestro!)
C-bout Purfling installed dry
Then I install the rest of the purfling strips: I want the slots to fit snugly, but not so tight that I will struggle to install them once I apply the hide glue.
All Purfling installed dry. Spliced in some places, but after gluing the splices will be invisible.
Gluing and Trimming the Purfling
I lift each section up out of the slot, one at a time (tilting them, so as to try to leave the mitered ends in their places), and use the palette knife to slip thin hide glue into the slot, then press the purfling back into the slot, all the way down. I use a roller made for installing the rubber trim around window screens to force the purfling all the way home. The glue squeezes its way into the mitered corners, and secured them. The plastic roller is easy to clean afterward with hot water.
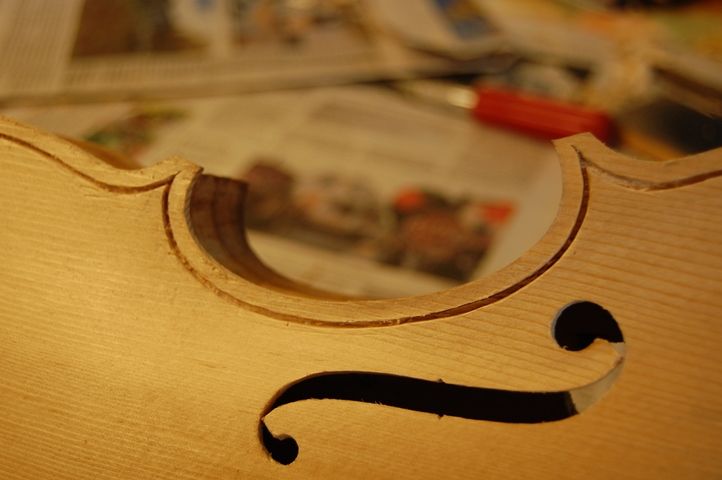
Once the purfling is glued in place, I mark a line around the margin of the plate, using a compass, with the pencil set to about 1.6mm (1/16″ or so), so that I have a guide to follow as I cut the “channel” (trimming the purfling below the surface into which it has been glued.) I want the wood surface and the purfling to make a smooth curve that begins near the edge of the plate, cycles down through the purfling, and sweeps back up to join the curve of the violin plate. I carve the channel with a gouge, then scrape to complete the curves. The faint pencil guide line can be barely seen in this photo.
Trimming the purfling and cutting the channel.
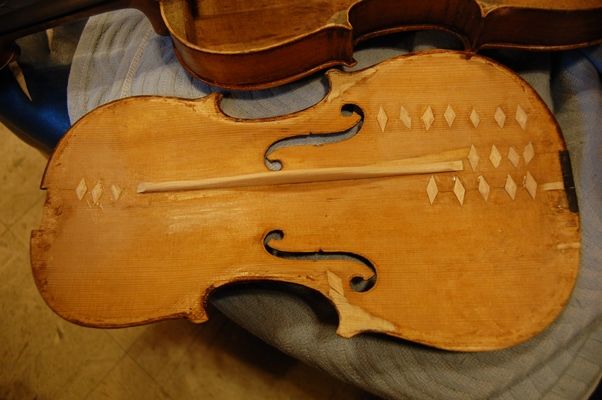
And there is the finished work, ready for the next step.
All the purfling is trimmed, the channel is cut, and the scraping is complete.
The outer edgework will be completed after I install the neck. I used to wait and install the neck last, but I eventually decided that I prefer to install the neck and fingerboard while the front plate and rib garland are still on the mold, then trim the heel of the neck to be in plane with the back of the rib garland so that the back plate can be installed last. But that is a subject for another post….
If you found this post helpful, please share with your friends!
Here’s the most recent five-string fiddle, handmade in Oregon, varnished and ready to play.
The sound is balanced across all strings and has good volume. I guess I would say it still sounds a bit “new”, but that is to be expected with less than five minutes play time. The strings are Helicore, and were sold specifically for a five string fiddle. I have set them up with Dominants, and they sound good that way, too.
Just as I began to take photos (on my car again) the sun came out from behind a cloud, and the varnish glowed very nicely. (I love it when that happens.)
Varnished Five-string Fiddle in the Sun
Varnished 5-String Fiddle Back
And the side view with the varnish in the Sun
I am looking forward to hearing a good fiddler (old-time, country, bluegrass, celtic) put this one through its paces. Or a violist or a violinist…I’m not particular.
Thanks for looking.
If you found this post helpful, please share with your friends!
It has been a while since I felt that I could afford the time to work on the bow…I would go by and look at it, sometimes, but I had other things to do– cleaned the chimney, took apart the wood stove and re-cemented gaskets, etc. It’s funny–the commercial chimney sweeps all tell me that my chimney is too dangerous, and they will not touch it– (very steep roof– 12:12 pitch– and quite high). So I have to do it myself every year. Ah, well…it gives me something to grin about…and leaves me sore for a few days every year. I’ll be 60 this month: the irony that I have to go clean the chimney that men half my age refuse to attempt is not lost on me.
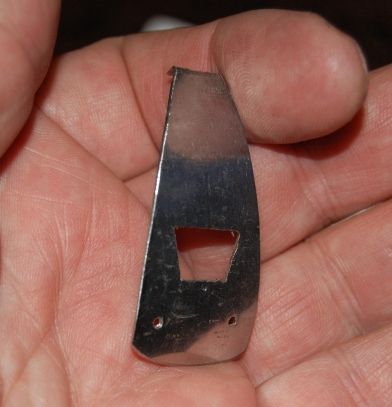
Making a Stainless Steel Bow-tip Plate
Anyhow, I finally took apart one of the stainless utensils I had bought for a dollar at a resale shop, and hacksawed out the rough shape of the tip plate. Drilled holes for pins, cut out the trapezoidal window for the tip mortise, and bent the little tab on the end of the tip plate. Felt pretty good about it…bent it to fit the curve of the bow tip. Looked pretty nice.
First try at making a stainless steel tip plate for a bass bow.
Making the Ebony Liner for the Bow Tip
I had a terrible time bending ebony to fit the bow tip (probably a little too thick), but I managed to do it, and even got it fitted, glued, and trimmed to size:
Ebony lining with stainless tip plate, for Bass Bow.
Fitting the Tip Plate
Then, I had hoped to glue the tip plate in place, and even went to the auto-parts store and bought some black epoxy that is supposedly “specially formulated to glue all metals”. But when I got home and looked more carefully, trying to fit the tip plate to the ebony liner, it turns out that I had used up all my tolerances on the stainless and it was just a little too small to fit the bow correctly. (Rats!) That left me two choices:
Modify the bow to fit the stainless tip plate, (which would be dumb) or
Go make another tip plate and be more careful this time. (sigh…)
So I will do that later. (This is not a new thing for me– I have a long history of trying to make something a perfect fit, and finding out that I went just a bit too far…thus proving the wisdom of the adage, “measure twice, cut once.”)
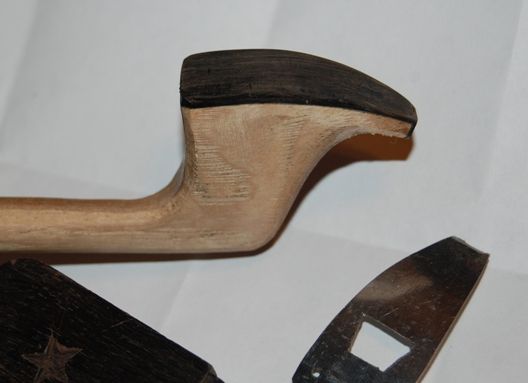
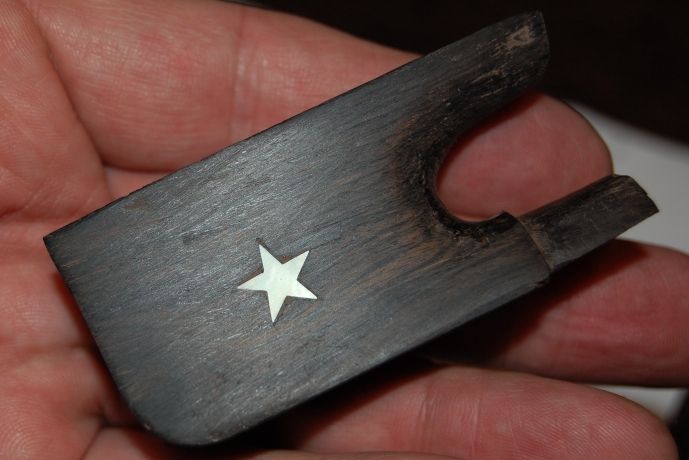
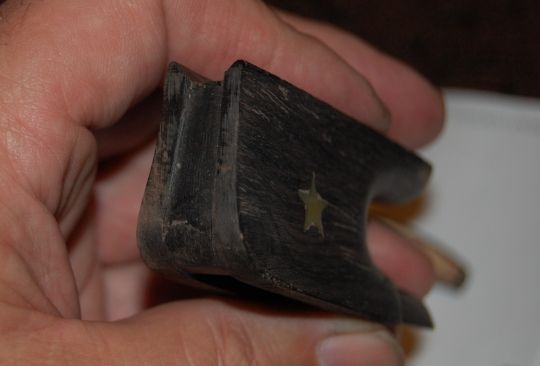
Gold Star Inlays for the African Blackwood Frog
I decided to work on inlaying the little (10 mm) gold stars I had bought from Andy DePaule. I laid out the locations as accurately as I could, then lightly glued the stars in place with a tiny dot of superglue. When the glue was hard, I used an X-acto knife to scribe around the stars, cutting as accurately as I could, into the African Blackwood of the frog. Then, using a small flat gouge, I popped the mother of pearl stars back off, and began to carve out the cavities for the inlays.
Inlay in progress
I cut around the perimeter as deeply as I could with a tiny chisel, then scooped out the excess wood with an even tinier chisel, and finally used the tip of the X-acto blade to clean out the sharp corners. When (many attempts later) the star finally dropped into place , I put gel-style superglue under the shell, and pressed it into place. One has to be gentle with the shell. It will not stand much pushing around before it snaps–it is quite brittle. So one has to simply try and try again until the piece fits as deeply as if needed, with hardly any pressure.
As soon as the superglue gel hardened I added some ebony dust to the very small grooves around the stars where I did not get a perfect fit, then dropped a drip of water-thin superglue into the area, and sanded it flat.
Finished inlay of Gold star on Bass Bow Frog
It is interesting to see how the different light reflects differently. Those gold stars can just look pale, or they can shine like real gold, in the right light. Here’s sort of an end-view of the frog:
End view of unfinished Bass Bow Frog.
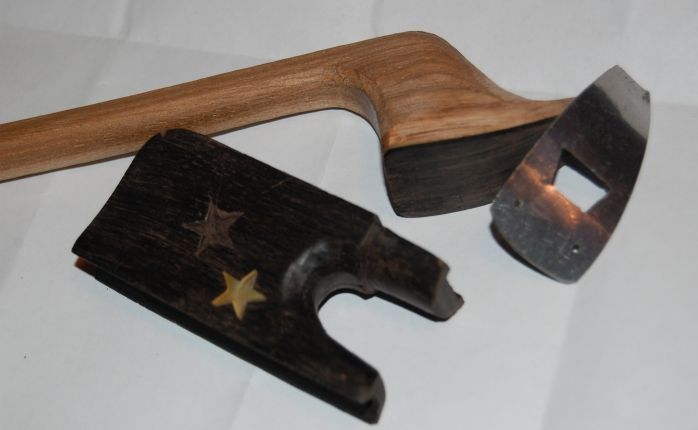
So– that’s the progress report: I will install the second star, make a new tip plate, and complete the frog and button, then I can hair the bow and see what I have got. Here’s the pile as it stands:
A work in Progress.
I will post more photos when I get a little further along.
Thanks for looking.
If you found this post helpful, please share with your friends!

 Follow