
 Follow

Step #3 Build a collapsible mold :
(You Can Also UseThis Mold on Five-String Cellos.)
Interior Mold: Cheap, Plywood, Collapsible
The mold holds the shape of the ribs until the luthier installs the front and back plates. It also holds the blocks rigidly in position until the Luthier can finish assembling the entire corpus. The plates actually derive their respective shapes from that of the mold and ribs. Therefore, it is very important to get the mold as accurate as possible.
Planning Cello Block Attachment–and Removal
In small molds (violin, viola, etc.) we simply glue the end and corner blocks into the mold. We break the glue line later, in order to remove the mold from the body of the violin or viola. (Remember that the blocks are a permanent part of the instrument– the mold is temporary. It has to be right, but it can be “cheaply right,” or “expensively right.” I went with “cheaply right”.) In larger instruments, it is possible to secure the blocks using screws from the inside of the mold. That way, it is not necessary to break any glued joints in order to remove the mold.
Collapsible Molds
Furthermore, it is desirable to be able to remove the mold piecemeal, so as not to stress the rib structure when trying to pry it free from the mold. (I have broken more than one rib, trying just a little too vigorously to remove the interior mold.)

As you can see above, I simply built up the main body shape with layers of plywood. I had a pile of scrap plywood in my shop, so I traced out individual sections from the mold template (from step #2), cut them all out, stacked them, and secured them with glue and drywall screws.
What you may not be able to tell from the photo is that the left and right sides of the main part of the mold can be released from the center blocks on each end. This is to facilitate mold removal. I attached them with screws, not glue. The front and back sections are one-piece each, but are easily removed before the linings are installed. (The linings are a part of what makes mold removal tricky. We will talk about linings later on.)
How the Collapsible Mold Works
Essentially, I made the whole mold in six pieces: left and right, top and bottom end blocks, and front and back sections. After they were all assembled, with extra room left around all edges, I checked one last time. I used the mold template to establish the final shape. Then I cut the mold out on a bandsaw, and smoothed the sides on an oscillating spindle sander (like a drum sander). The sander keeps the edges at a right angle to the front and back. It is a very handy tool, which has paid for itself many times over.

Above, you can see that I secured the front and back sections of the mold with screws only. That way, I can easily remove them after I bend and install the ribs. That leaves sufficient space to install the linings. I used about eight screws each, front and back.
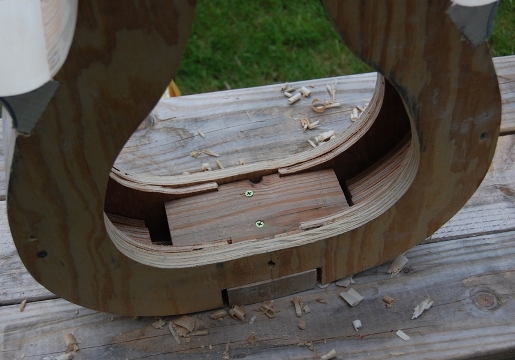
See how the deck screws pass through the end block of the mold to secure the end block of the cello. You must use short enough screws that they will not protrude all the way through the block. You only want the screws to penetrate the blocks by 3/4″ or so, and right along the center line. (If you ever run into one of those screws with a cutting tool, you will be shocked at the damage it will do to your expensive tool.) Also, in reality, I installed the blocks in rectangular form and shaped them afterward. Notice that in this photo, I have already shaped the blocks. See the next picture.
Tracing the Template Shape Onto the Blocks

This is how you use the mold template to trace the shape of all six blocks. You trace one half, then flip the template over to trace the other half. Be very careful to do this step accurately, as the shape of the blocks will determine the final shape of the cello.
Shaping the Blocks
Using a bandsaw, I cut the inner curve of the center corner blocks very close to the traced line. Finally, I used the spindle sander again to bring the blocks exactly to my lines. I usually wait until after the C-bout ribs are installed to trim the outer part of the center blocks. I’ve never had a block fail, but I have been told that if you cut them too soon, they can be fragile and flexible, and you may end up either bending or breaking them.
Next, we’ll talk about bending ribs.