
 Follow

Bending and Installing Cello Ribs the Traditional Way
Bending iron, bending strap, clamping caul, International Violin Co.
Proper tools
The best tool for this job is the traditional bending iron. You could make one that would be quite functional, for very little cash outlay. But the nice thing about the “traditional” ones is the variety of curves available. You can buy them at International Violin Co. and many other sources,
The Iron (by the way, they are no longer iron, but rather, aluminum. The name has stuck, though.) They usually have an “egg-shaped” cross-section. On the small end, they have a tight enough curve to form the tight bends at the corner blocks. But at the center, they are flat enough to gently curve the flatter areas. For instance, the portions of the ribs where they span the lower bouts of a large instrument such as a cello.

The Bending Iron MUST be hot!
One key to successful cello rib-bending: You MUST heat the wood all the way through before commencing the bend. If you don’t do this, you can almost guarantee you will break the rib. How hot? Good question.
I used to use a clothes iron and wooden molds, around which I would bend my ribs. I rigidly fixed the clothes iron in position with the hot side up, and the thermostat control set on “linen”. At that temperature, if you are not careful, you can scorch the wood. Also, if you dribble water on the iron, it dances and bounces, as it boils away to nothing. It can’t just sit there and steam. So that is my test on the commercial bending iron as well. I want the water to dance and boil instantly, not just sit there and simmer. On the commercial bending iron, it takes 20 minutes or so to get hot enough…maybe longer. Be patient: this is critical. The iron has to be hot.

Bending Strap
Of course, you can buy a bending strap, but if you can secure a thin strip of aluminum (aluminum roll roof-flashing is almost too thick, but it will work) you can affix wooden handles, and it will be fine. For small instruments (violins and violas,) I cut up a large beverage can in a spiral (similar to a cardboard tube.) This will produce a strip about 40mm wide, and long enough for a bending strap. But, for a cello, you need a strap that is more like 100-120 mm wide.
The bending strap accomplishes several things. The most important, in my mind, is that it supports the outside of the curve and prevents the wood from “stress-relieving” through fracture. Especially in heavily figured woods, it is very common for an unsupported rib to break along the curl. (Rats! Your beautiful rib just became beautiful firewood!)
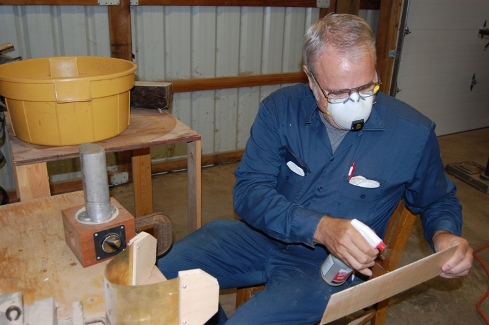
The second thing is that handles allow you to put pressure on the whole part of the rib you are bending without endangering your fingers. The wood gets hot enough to really hurt you if you touch it. It is a good idea to put handles on the bending strap. (By the way, some people use cloth, instead of metal, for their bending straps. Brass or aluminum are the most common metals used, though.) Metal transfers heat pretty rapidly, so wooden handles are very helpful. Thin gloves aren’t a bad idea either, but I usually think of that after I am well into the bending process, and it is too late to stop and put them on.
How Much Water?
Some folks bend their wood dry. Some soak their wood. I use just enough water to get the wood wet on the outside (spray it on; no soaking) and enough to produce a little steam while I am heating the wood. I want it completely dry when I remove it from the heat.
Bending the Ribs
Method
Press the wood against the flatter portion of the iron while it is heating (count off at least ten seconds.) Then slide it toward the end with the curve that most closely approximates the bend you need, and slowly, firmly press the wood into shape.
Use the bending strap to hold the rib tightly against the bending iron. Hold it another ten seconds or so, and then let off a little, to see if it will hold that curve. If it springs back, pull it tight again, and hold it some more.
Pay attention to smells, at this point. It should smell like something baking in an oven. You do not want to scorch the wood. (Try this with wood you can afford to lose, a few times, before using the nice, expensive rib-stock you bought.) I broke and/or burnt a number of ribs, while trying to learn this skill.
Bending Options
But I know a guy who uses an old piston from a diesel engine for his bending iron, and heats it with a propane torch. Others have used water pipes, curling irons, charcoal briquette lighters, and the like. I finally got a “real” bending iron only after I had made 15 instruments.
Specific to cellos: I made my thickness 2mm, and used a large bending strap, as shown. You can’t see the mold in the photos (I forgot about the camera until the real cello ribs were done and installed.) But, what I did was to set the cello mold nearby, and bend a rib, then check the bend against the actual mold, to see if it was close to correct. Then, back to the bending iron, to correct it. When a rib was satisfactory, I immediately clamped it in the mold, to hold that curve while it cooled. Once it was cool, it would hold that curve permanently.
Sequence
The reason we do the inner c-bout ribs first is that there is frequently a fair amount of pressure put on the ribs during the gluing/clamping process, and if the corner blocks were cut to their final shape, they could flex, and permanently change the shape of our corners.
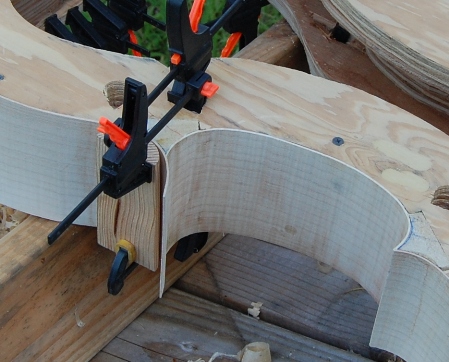
After the c-bout ribs are glued with hot hide glue, and thoroughly dried, I shape the outer sides of the corner blocks. The black lines you can see below are ink, where I accidentally allowed the template to move as I was marking the corner blocks. Those marks were removed when I leveled the garland, which we will talk about in a later article. The curve of the outer side of the blocks is extended through the C-bout rib, so that the upper and lower ribs overlap the C-bout ribs.
Clamping and Gluing
I cut clamping “cauls” (curved wooden blocks) to help hold the ribs tightly to the blocks while gluing. The holes in the mold are positioned in such a way that the clamps will be pointed the right direction to achieve maximum hold while gluing. Do four or five “dry-runs” before actually applying the hot glue. In fact, it is a really good idea to have things clamped in place, and just remove the clamps on one end long enough to apply the hot hide glue and re-clamp immediately.
Clean up around the joint, immediately, with hot water and a rag or brush. Let the glue dry overnight. If you have to re-work a joint, a teakettle’s steam, as close as possible to the spout, will un-glue a joint in about 20 seconds. Watch the fingers. Steam is hot. (Close to the spout, where the steam is invisible, is where you want to be.) You can get a serious burn if you are careless.
How I Do Things…
I use a $3 “potpourri heater” from the Goodwill store for my glue heater. Put an old yeast jar in it, and fill with water around the jar. I keep the lid on the jar when I am not actively using the glue, to keep it from drying out. It seems to work pretty well. I am told that 145 degrees F. is the correct temperature for hide glue. You can get good glue from a variety of places. I’ll talk more about glue, and the glue-pot, in a later article.
After the glue is completely dry, I cut off the excess upper and lower ribs at a right angle, exactly at their intersection with the C-bout ribs, so that the glue lines follow the inside corners of the upper and lower rib ends, and are essentially invisible. (I do NOT “miter” these corners–I hide the joints by putting them right on the corners of the squared-off ribs.)