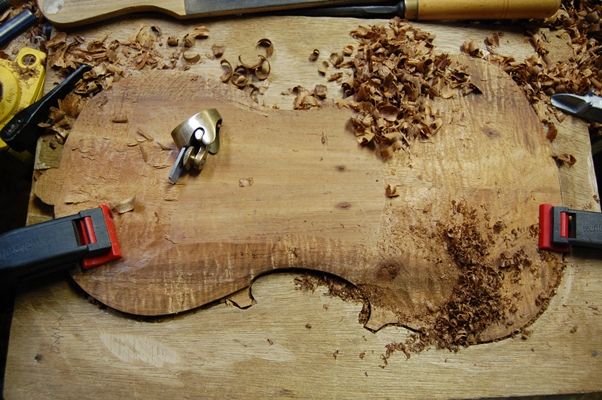
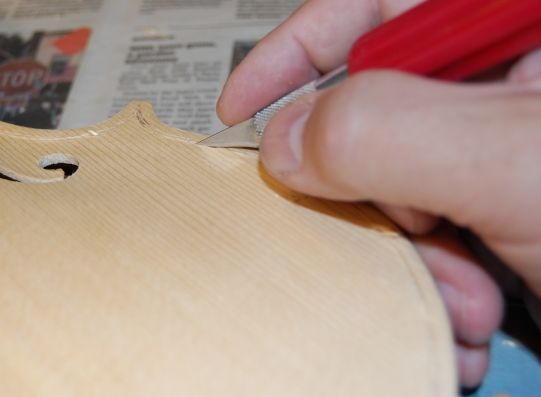
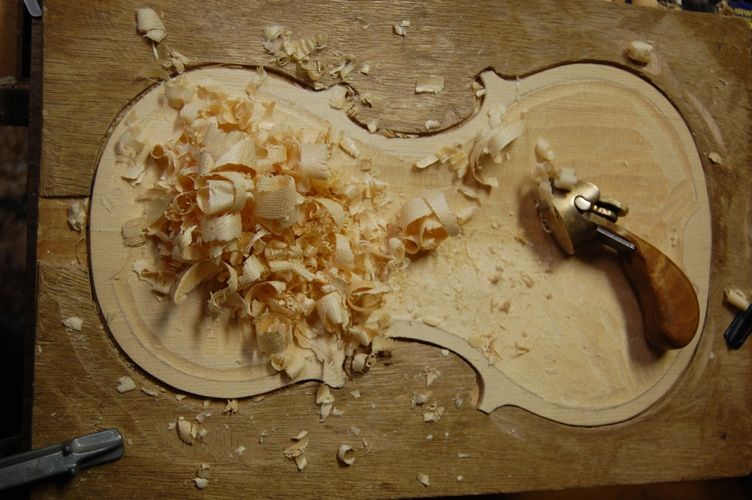
When I left off, last time, I was too tired to continue carving, so I took a break and completed other responsibilities for a few days. Saturday, I came back and spent some time carving and scraping:
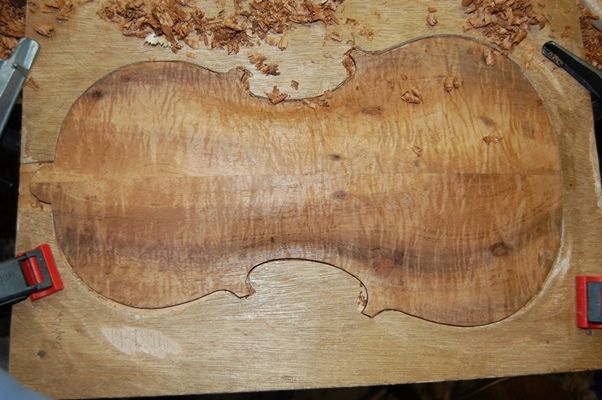
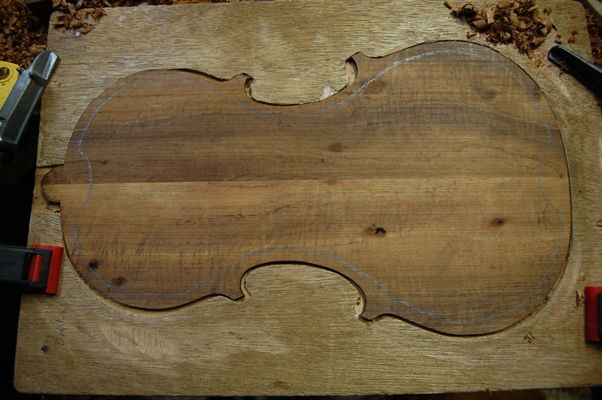
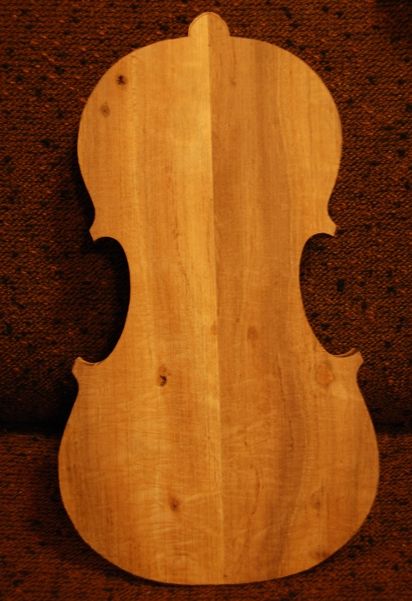
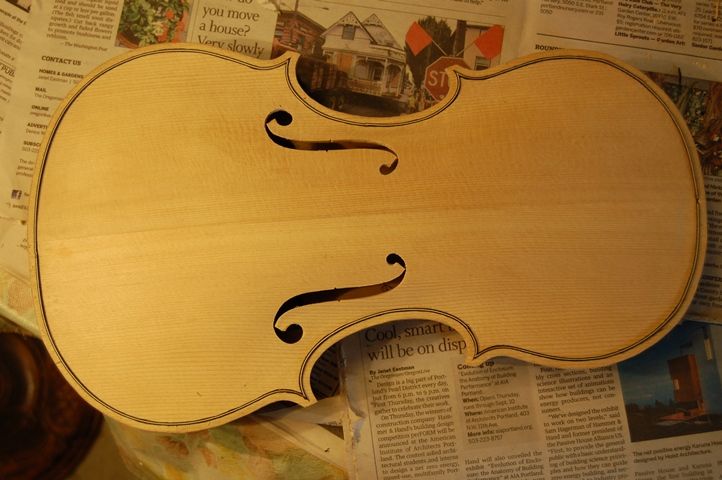
Final outer carving complete–beginning scraping.
As you can see, the basic shape is complete. Scraping will be the method of moving wood from here on, on the outside… the inside is still a flat, rough plank. But I continued scraping for a while on the outside before beginning the inside.
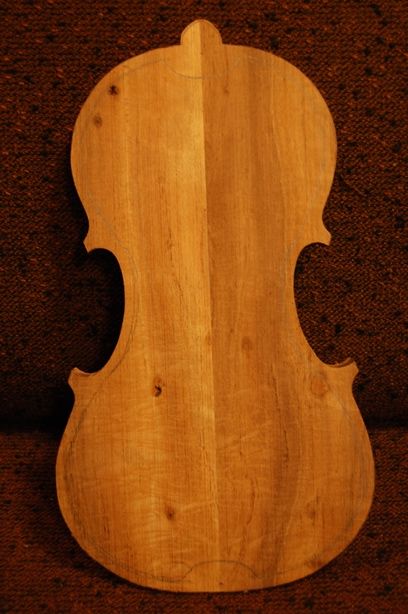
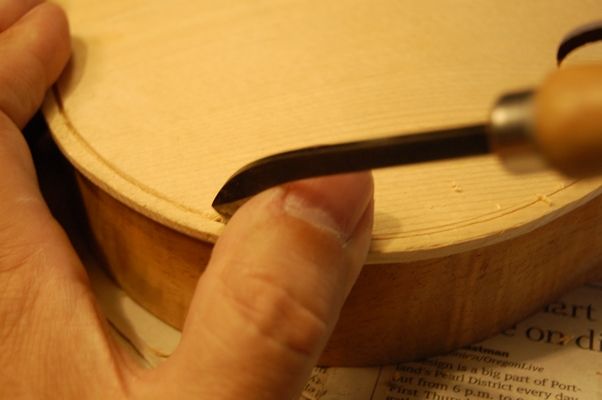
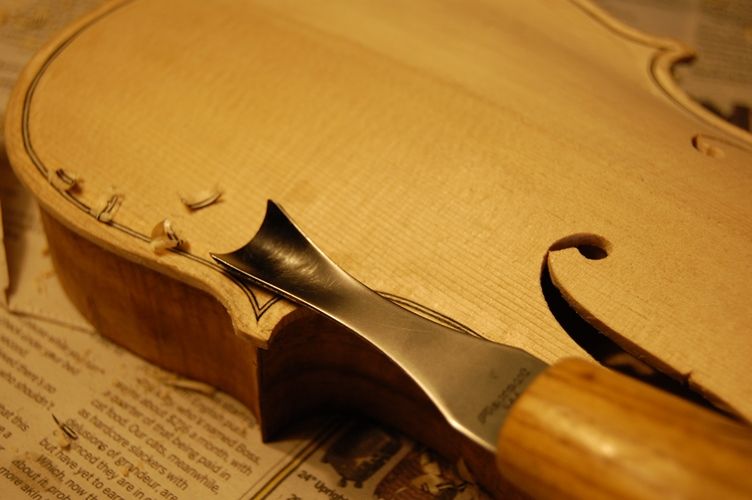
Back plate with scrapers: I used the “shmoo”-shaped scraper to clean around the inner bout edges and the others to establish the final shape of the outer curves.
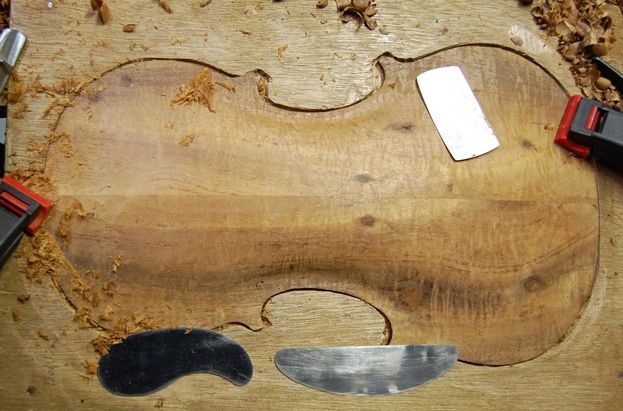
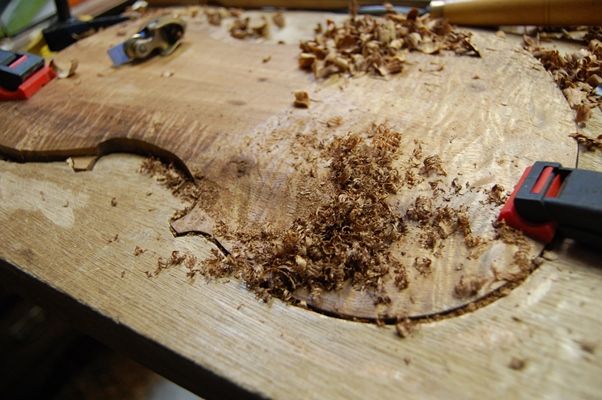
Once the plate is essentially the exact shape I want it, (checking with low-angle lights, etc.) I move to finer scrapers– sharpened at 90 degrees, and used gently, flexing the blade to match the curvature of the plate.
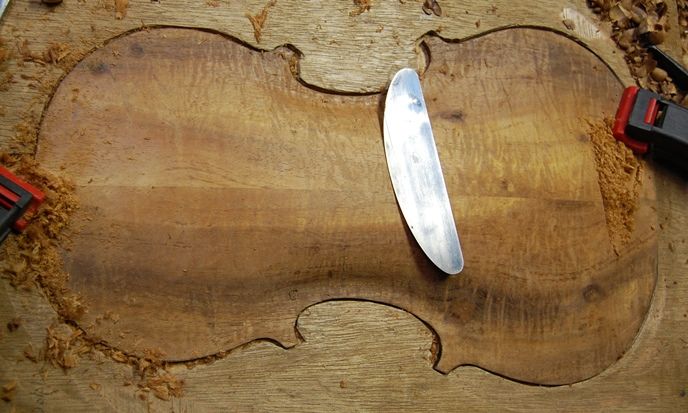
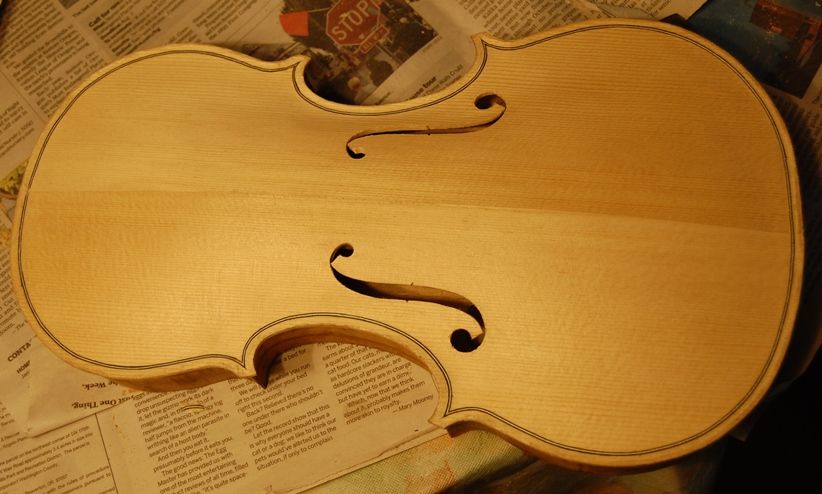
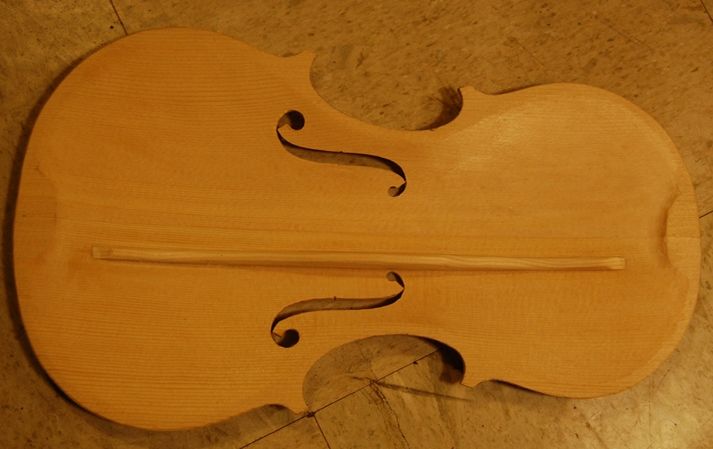
Final scraping: this is not to say that more scraping will not be done later, but that will be after the purfling is completed. This is about as far as I will go until then.
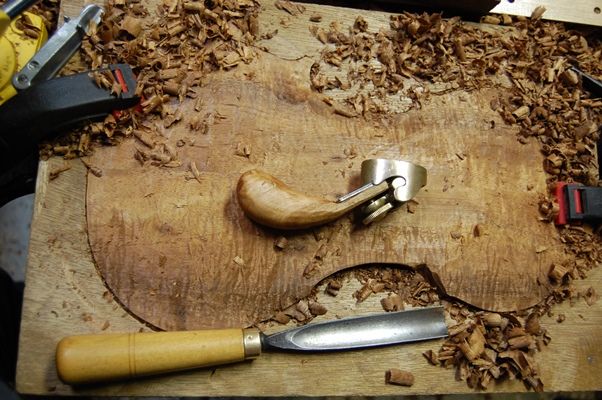
Beginning the inside arching and graduation
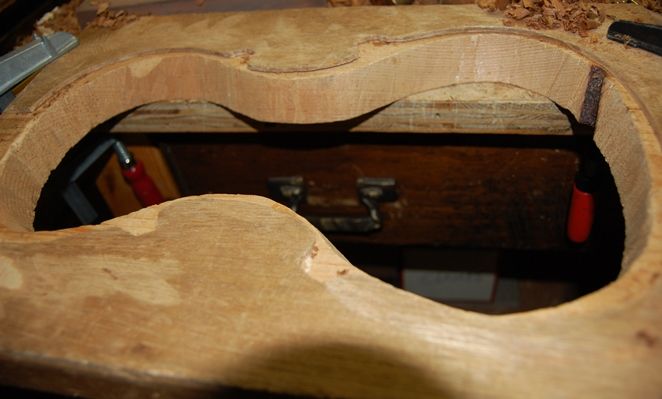
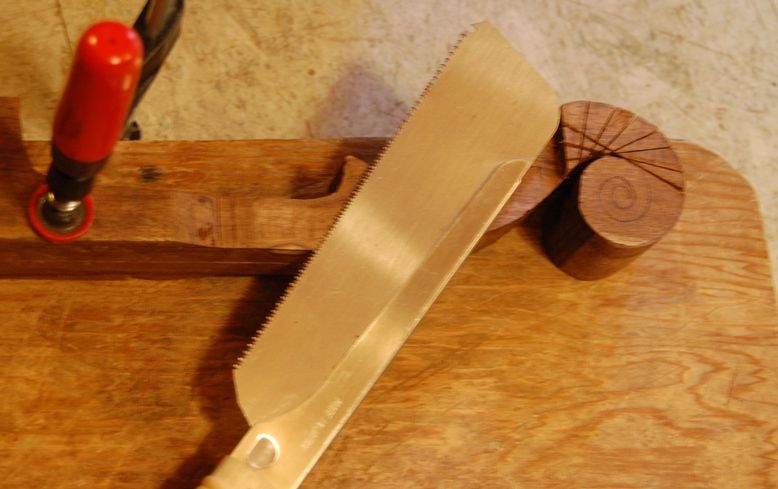
Now I can flip the plate over and begin carving out the inside of the back. Here is the cradle without the plate. Notice that the plywood cutout matches the shape of the plate fairly closely, while the thick pine board simply supports the plate while I am carving. The plywood is what holds it still, laterally. The spring clamps prevent the plate from flipping out of the cradle.
Working cradle for violins and five-string fiddles. The hollow shape allows the cradle to be used on both sides of the plate. The full-thickness cutout allows chips to drop through and not obstruct the work.
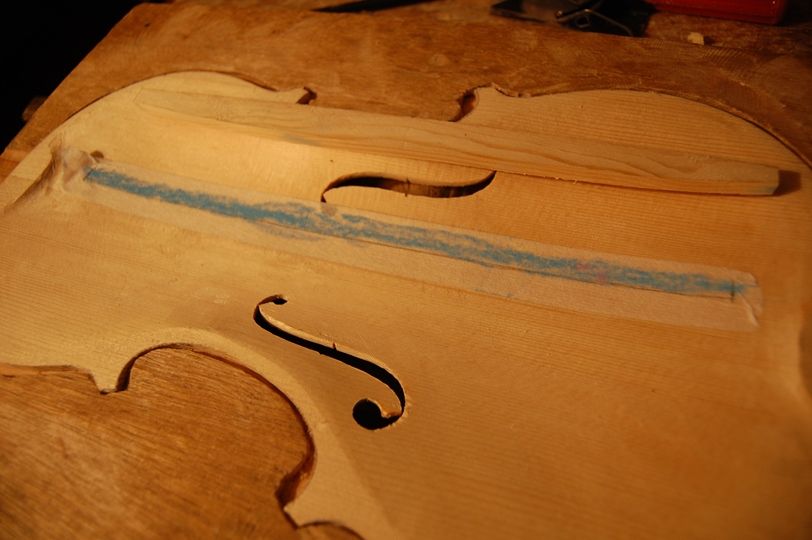
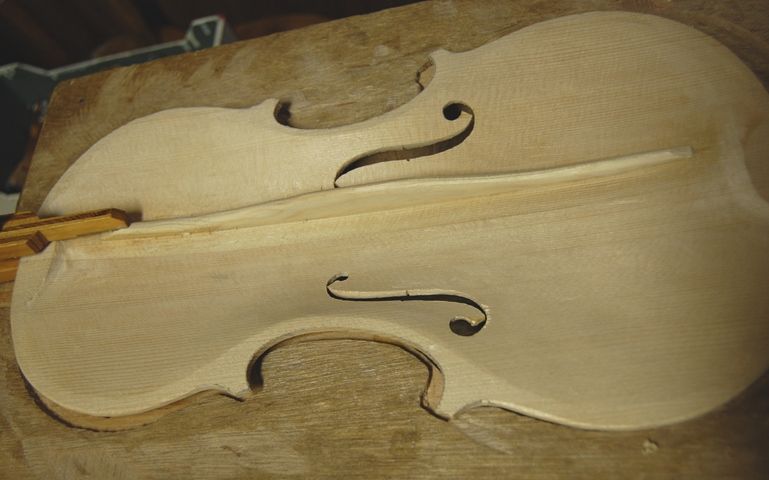
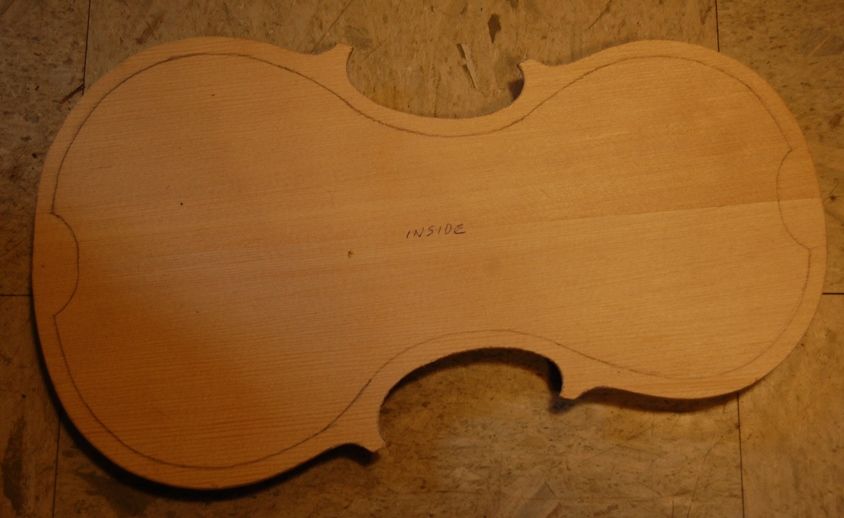
The back plate has already been marked for inside arching. I will have to monitor thickness constantly, but here it is, ready to carve:
Back plate ready for carving. Notice the lines mapping out the general shape to be “excavated.”
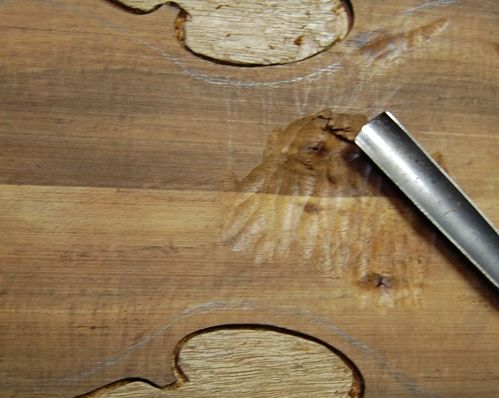
And, the “fun” begins again. This Koa wood is by far the most difficult wood I have ever used on a back…but it has to be done, so, chip by gouged-out chip, here we go:
Beginning the inside arching, using a gouge again.
I will post again when I am ready to install purfling.
Thanks for looking.
If you found this post helpful, please share with your friends!
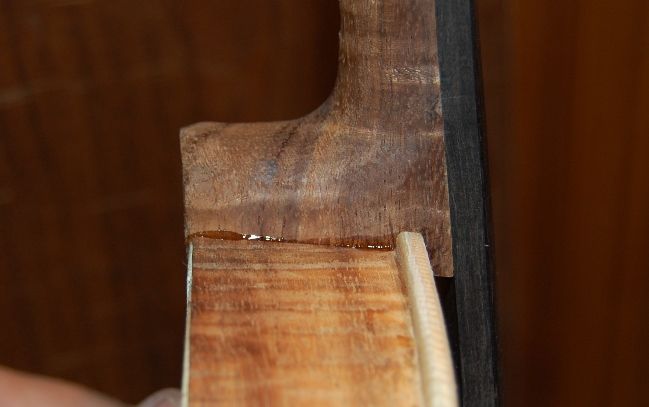
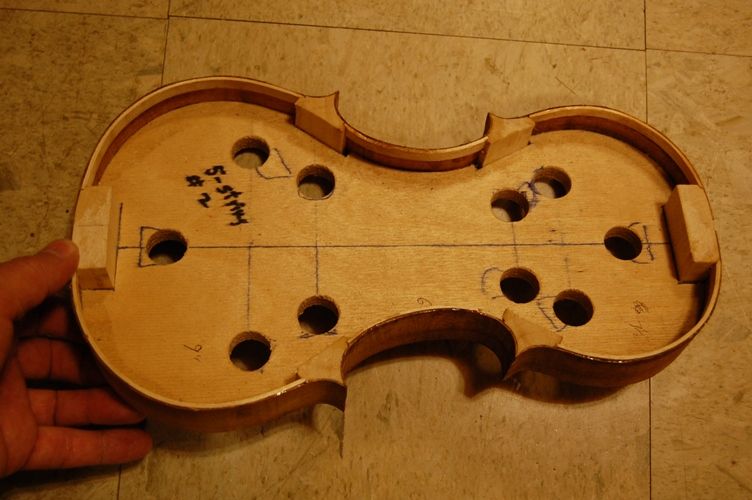
After the glue was completely dry, I removed all the clamps from the linings and cleaned up the interior: that is to say, I tapered the back linings, so that they faired smoothly into the ribs, and I shaved and scraped the blocks to their final shape.
Then I rubbed the back surface of the garland (rib and block structure) on a “sanding-board” to level the back of the garland, and to ensure that the back of the neck heel was completely level with the back of the garland. That way, I can fit the back plate absolutely flat against the garland, and trace the shape.
I didn’t take a picture of this procedure, this time. Here are some taken when I was building a cello:
Sanding board with cello garland
Flattening a cello garland on a sanding board.
I make pencil-marks on the edges of the linings, ribs and blocks, all around, and scrub until the marks disappear. When all the marks are gone, the garland is flat. It gets pretty vigorous and physical, but it is quite effective.
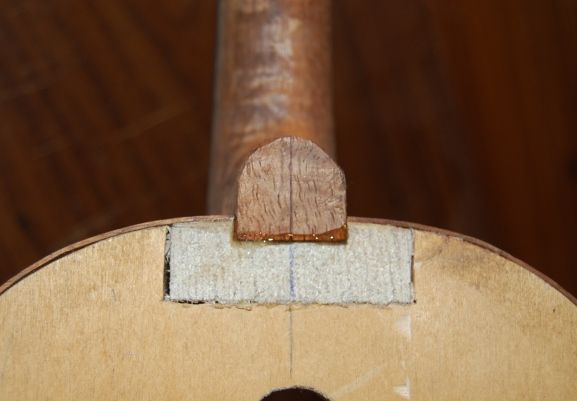
Here is the flattened garland, ready to trace the back plate:
Flattened garland. Notice that the neck heel is dead-flat level with the back of the garland.
As you can see, the blocks are quite smooth, now, and the linings taper gently into the ribs. After this point, there will be no more changes to the interior of the corpus, except as it directly affects the back plate.
Tracing the plate
I clamped the plate to the corpus, carefully centering the glue-seam of the back plate on the centerline of the neck and the end block.
Garland centered on the back plate
Garland clamped to the plate.
Then I traced around the garland using a ball-point pen and a flat washer whose flange is exactly 2.5 mm wide, so that my line will be 3 mm from the ribs, all around. I watch carefully to make sure the washer stays flat on the plate…they have a tendency to flip up and follow the pen. I work along the perimeter, giving several strokes to every part, so that the line will be visible against the dark wood. Notice that this procedure makes “round” corners. I will modify them before cutting them out, so that they are the correct shape.
Tracing the shape of the plate, using a washer and a pen. (Yep, that is a Gunderson pen!)
And, there is the plate, almost ready to be cut out:
Traced plate, almost ready for cutting out.
One thing I do, that I forgot to photograph, is that I re-shape the corners. I use a straight-edge to connect a line from the end of the rounded corner where the pen circumscribed the corner of the rib to the center glue line at the location where the purfling will cross the far end of the plate. (Or, you can just use a 30/60/90 triangle to lay out a 30-degree angle off the center glue line on the end of each corner. But I do it with the straight-edge.) Then I continue the curves of the inner bouts to connect with the straight lines I just scribed in, and the corners are complete. I use a sharp scraper to remove any ink lines that are not part of the perimeter outline, and then I really am ready to cut out the plate.
Cutting out the plate
I use a band-saw to cut within a millimeter of the line, and then use an oscillating spindle sander to perfect the edge, right up to the lines. These and my drill press are pretty much the only power tools I use, though I have occasionally used an angle-grinder with a coarse sanding disc to remove rough excess wood, on larger instruments.
I run my fingers around the edges looking for lumps, and work those out as well, using a file as needed. Here is the completed plate blank:
Plate cut out and ready for arching.
At this point I also sketch in the interior graduation plan–just the outline of the inside boundaries of the plate, so that I know where I am going to carve. There is no reason it has to be done at this point, but it helps me remember which side was outside and which inside…and that really does matter, as the plates are vitually never exactly bilaterally symmetrical. If I forgot and arched the wrong side, the completed plate would never fit the garland (ask me how I know…).
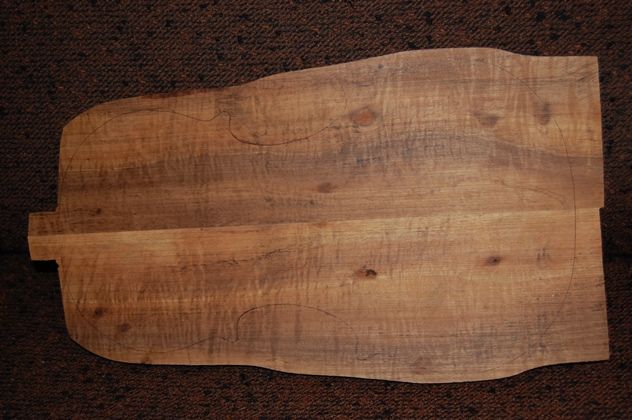
Interior Graduation boundaries sketched on correct side.
You can see that there are numerous bark inclusions in the wood, which I will fill with matching wood…but I will wait until the arching is complete before I attempt to fill the holes, so that I do not plane away my plugs. It is unsusual to use wood with holes in it like this, but it is also unusual to use anything other than maple for a violin back. Five-string bluegrass fiddles are not burdened by the same 300+ years of tradition as violins, though, so exotic woods can be used. This wood has amazing flame and figure in it, and the plugged holes will not detract from the beauty of the wood.
Before I begin arching, I establish the edge-thickness all the way around, using a “wheel-style marking gauge“, set to 4 mm. It has a tiny sharp wheel that does the marking, and it makes very cleanly scribed lines.
Edge thickness marked on correct edge. (Notice the bark inclusion on the other edge)
Beginning arching
I used a Japanese-style pull-saw to cut the approximate height of the plate thickness on each of the corners, so as to avoid unnecessary stress on the corners while carving the arching. It looks a little odd until the arching is complete, but it avoids the possibility of breaking off a corner. I use a large, sharp gouge to reduce the edges and begin the arching; then a toothed finger plane to continue the curves until I am very close to the desired shape. at that point I will switch to a smooth, curved-sole plane and bring the arching to nearly exactly the desired shape. From that point on, a variety of scrapers will be my only shaping tools, for fear of tearing out wood along the figuring .
Here are some photos of the progress. This is very hard, difficult wood to carve, and my hands are giving out, so this is about as far as I am going tonight:
Beginning arching: notice the saw-cut corners, and how the one has been carved almost to a normal curve.
Different viewing angle: The cradle is thick pine, with a plywood door-skin, to secure the plate. Inside, it is cut away, so that the plate can fit arched-side down. The plywood is right at 4mm thick, same as the finished plate.
Continuing arching. Still quite a way to go, but I am getting tired.
So…that is it for today. Pretty fancy wood, isn’t it? The customer bought it in Hawaii 33 years ago, or so, and has dragged it around all these years, until he decided that he wanted a five-string fiddle. Probably the only opportunity I will ever have to make a fiddle out of curly Koa, but it is really going to be a beautiful instrument.
My hands are getting too tired to work effectively. I will try to get more done later this week.
Thanks for looking.
If you found this post helpful, please share with your friends!
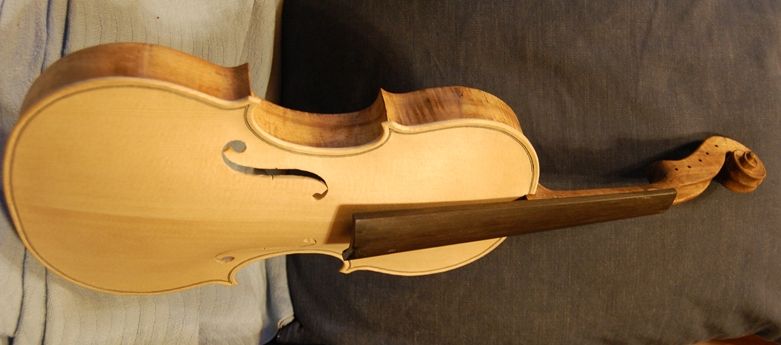
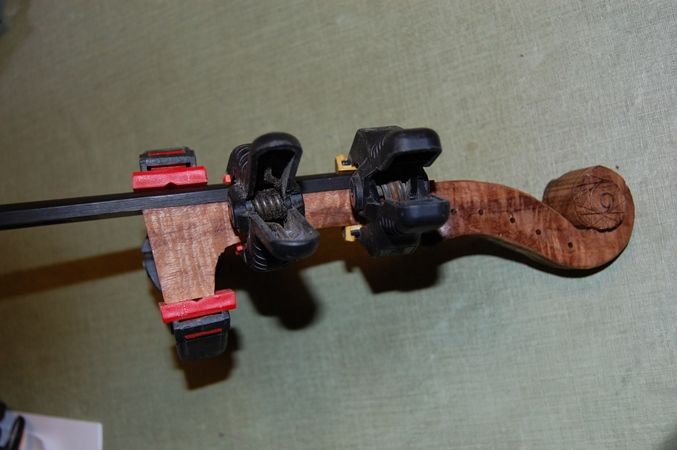
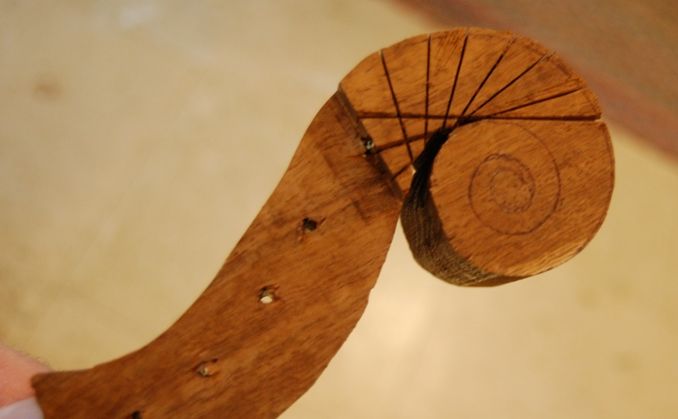
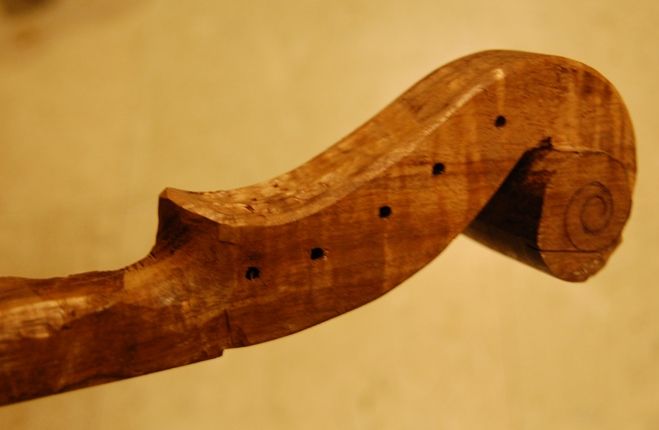
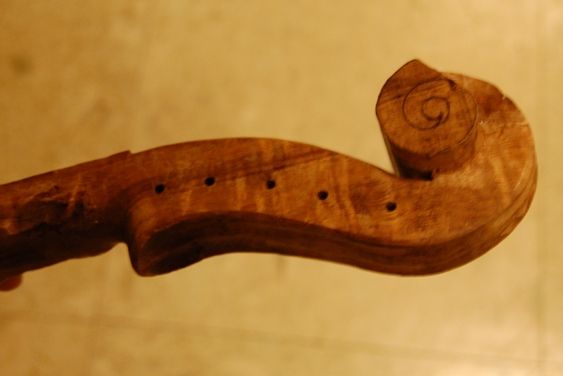
Last week, I had left the scroll nearly finished, but still lacking the outer fluting under the neck, and still pretty rough. (Honestly, I continue “fine-tuning” scrolls right up ’til I begin varnishing.) So, the first thing was to get the scroll and neck completed well enough that I could set the neck.
Completed scroll and neck
Completed pegbox
I am never fully satisfied with my work, but I have to decide at an appropriate point that it is OK to move to the next step. However, scroll and neck carving is much more difficult after the neck is set, so I want to have them pretty close to how I want the finished product to look, before I begin setting the neck.
Setting the Neck
Setting the neck begins with careful layout of the heel “footprint” on the neck block of the violin body (often called “corpus”). I already had the centerline of each laid out, so it was a matter of transferring lines accurately, and then cutting along those lines so that when the wood was carved from between the saw-cuts, the heel of the violin neck should fit, snug and straight, into the prepared neck-mortise. I always leave a little extra, so that the mortise is too small to begin with: it is much easier to take off a little more, than to replace wood.
I did not take pictures of this procedure– simply wasn’t thinking about photographs, and I forgot. It went very smoothly, this time, though, and I think I had it ready to fit in around 30 minutes, or a little more. (Usually it takes me longer.)
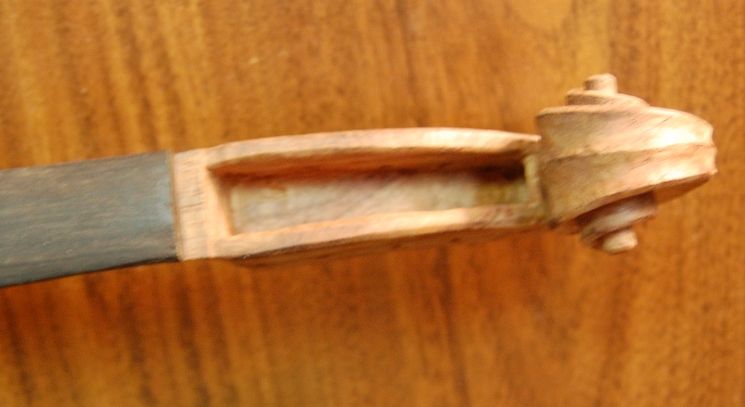
Here’s the neck mortise, ready to receive the neck:
Completed neck mortise
Side view of neck mortise
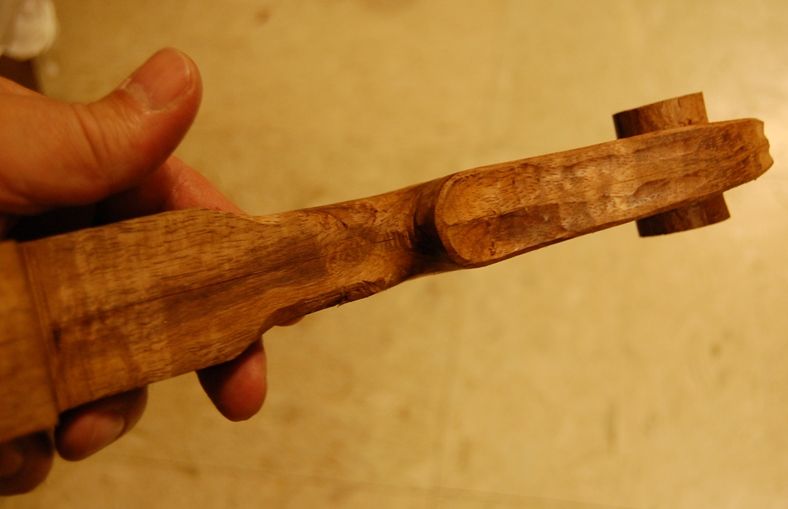
And here is the neck, dry-fitted into the mortise:
Dry-fit neck
Once I knew that everything fit the way it ought, and that it was going to be straight, tight, and at all the correct angles, I was ready to glue. The things I have to check are five points of measurement:
The distance from the upper end of the fingerboard (where the nut will be) to the upper edge of the top plate (both sides) has to be 130 mm.
The neck has to be measurably straight, so that the centerline of the neck and scroll are a continuation of the centerline of the corpus.
The neck can’t be twisted (rolled side to side)…it should be level with the plane of the ribs, side to side.
The height of the upper edge of the heel of the neck (underside of the fingerboard) should be 6 mm above the top plate.
The height of the end of the fingerboard above the top plate should be between 19 mm and 23 mm, with 21 mm being optimum.
I realize that there are different ways of approaching virtually everything in lutherie, and there are sure to be experts reading this, who are shaking their heads, but: this is the way I was taught, and it has worked well for me.
I prepared the hot hide glue, and brushed it into the mortise, and onto the bottom of the neck-heel, and along the edges of the heel. Then I quickly rammed the neck heel home in the mortise, and checked to make sure all my measurements had held (primarily the height of the fingerboard above the plate.) All was in order, so I set it aside to dry. Here is the completed neck joint, with the glue squeezing out around the joint:
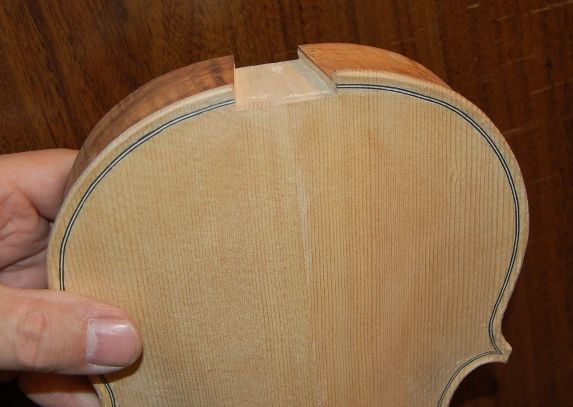
Glued neck-joint
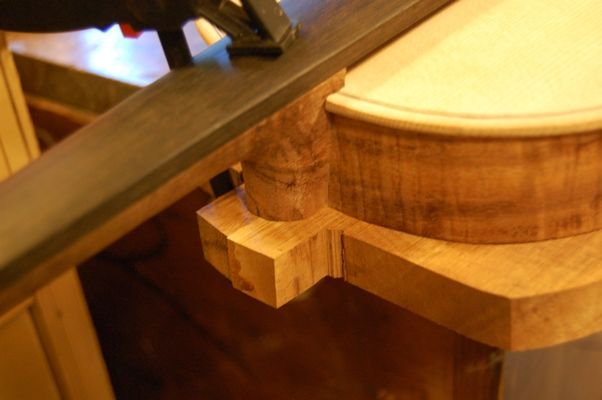
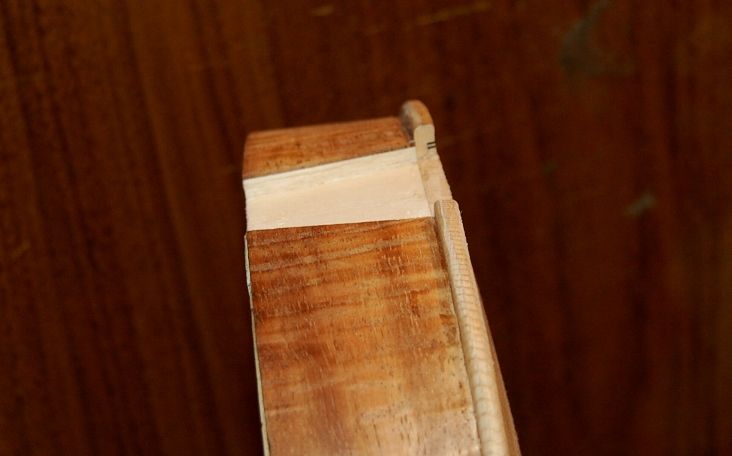
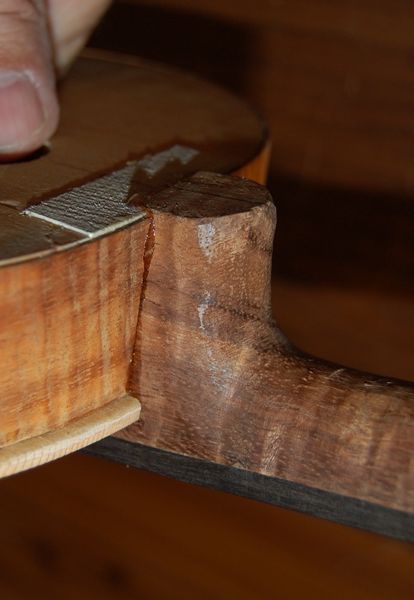
Side view. You can see that I will have to plane off the back of the neck-heel so that the back plate will fit.
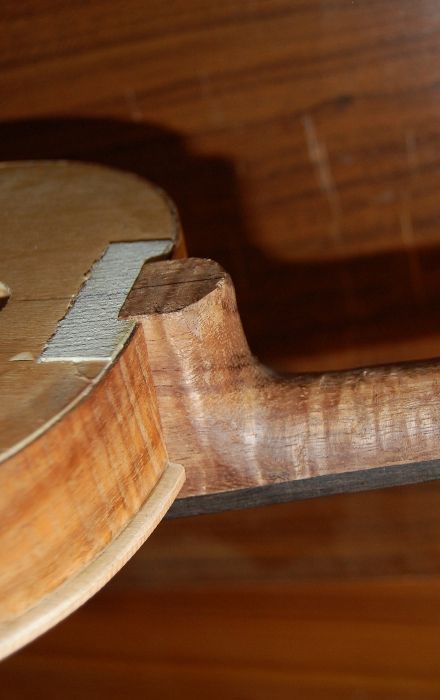
Back view. When the glue is dry, I will remove the mold and trim the blocks.
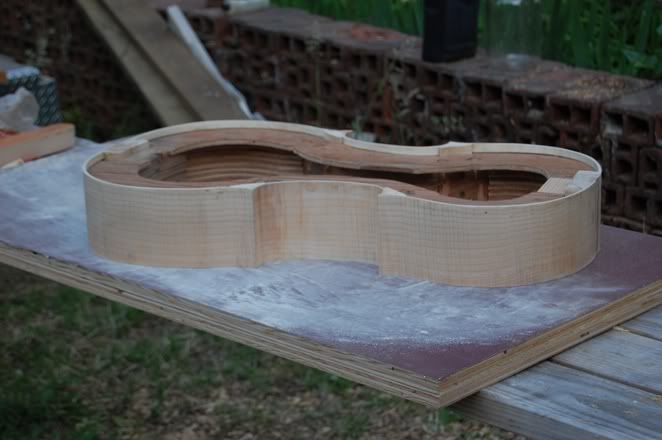
After the glue dried, I planed the neck heel flat, then removed the mold by breaking the glue-joint at each block (six places) and simply lifting out the mold. Then I trimmed the blocks and was ready for the back linings.
Inside view, ready for back linings.
Exterior view: Looks good, doesn’t it? But it still has a long way to go.
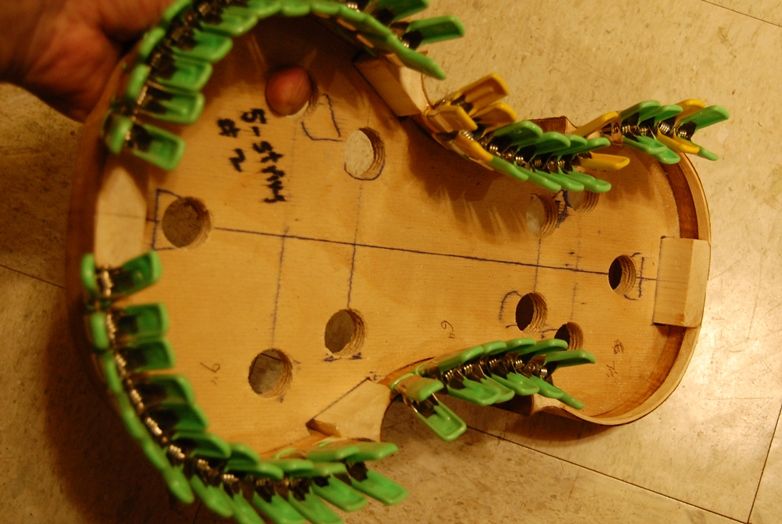
Installing the Back Linings
The first thing I do to prepare for installing linings is to cut mortises in both sides of each block, into which to insert the linings. I use a thin knife and a very small chisel to cut the mortises.
I make the linings by first sawing the chosen wood to about 2 mm thick, in 2-3″-wide “planks”, about 18 inches long, and then using a wheel-style marking gauge to cut off strips 7 mm wide. I wet each strip and bend them around a hot bending iron, until I can fit them into the corpus. I want them to fit tightly. The center bout linings are bent in such a way that without clamps they would tend to buckle away from the ribs, so I use small spring clamps to dry-fit them. The upper and lower bouts will stay put on their own.
Linings, dry-fit.
Then, one by one, I remove each lining and brush hot hide glue along the portion of the rib that will receive it, as well as on the lining itself, making sure the ends are liberally coated, as well as the full length and width of the gluing surface. I quickly re-insert the rib, and clamp it in place with as many small spring clamps as I can fit along its length.
Linings glued and clamped in place.
That is it for today. I’m tired, and 3:45 AM will come all too early (back to work tomorrow).
The next step will be to level the back surface of the ribs and neck heel, and then trace the back plate from that pattern, so that it will fit perfectly. (The neck heel is still not in the correct finished shape, but the back plate button and the neck heel will be shaped as one piece, after the back plate is glued in place.)
Next time we’ll start carving the back.
Thanks for looking.
If you found this post helpful, please share with your friends!
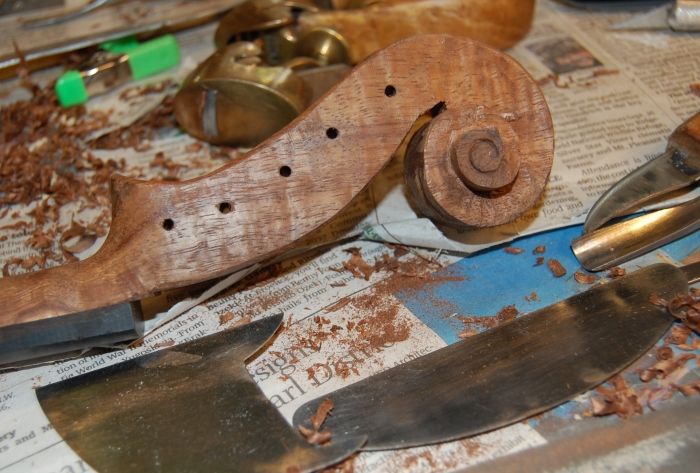
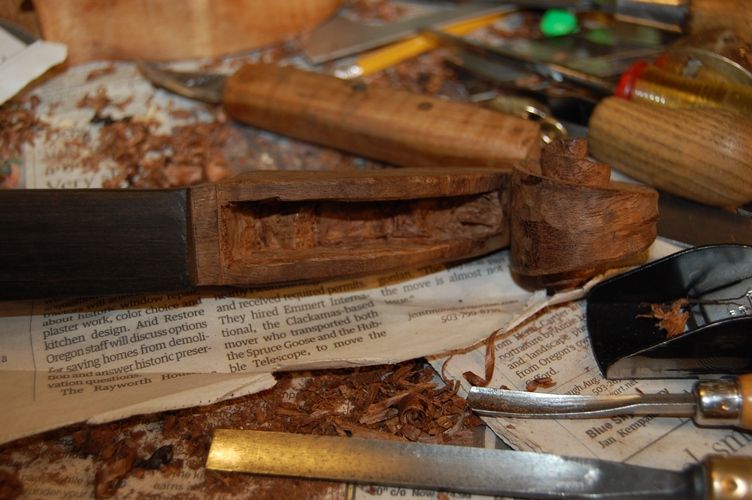
I finally got back to the five-string. Things have been hectic. The boys are in New Jersey, this week, and the daughter is back in Switzerland, so I spent today trying to carve this scroll. This is the hardest wood I have ever carved for a fiddle scroll– not in the least like Maple, which is tough, but not so difficult to carve.
I had left the scroll partially carved, and the neck roughly shaped. Pilot holes are in place. rough-cuts made to outline the scroll.
Scroll beginning
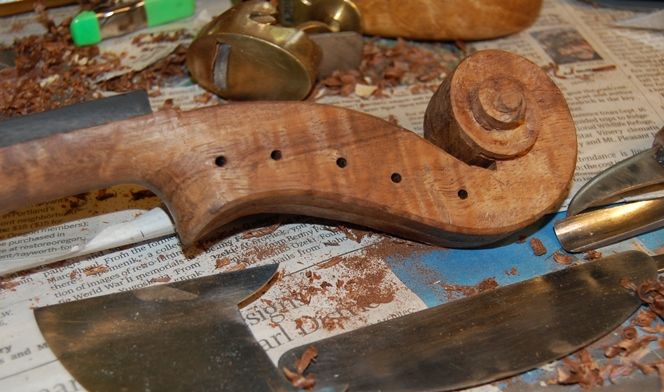
So I completed most of the neck shape and temporarily glued the fingerboard to the neck.
Fingerboard temporarily glued to neck
Then I went to work, shaping the neck and fingerboard as a unit, and continuing to shape the scroll:
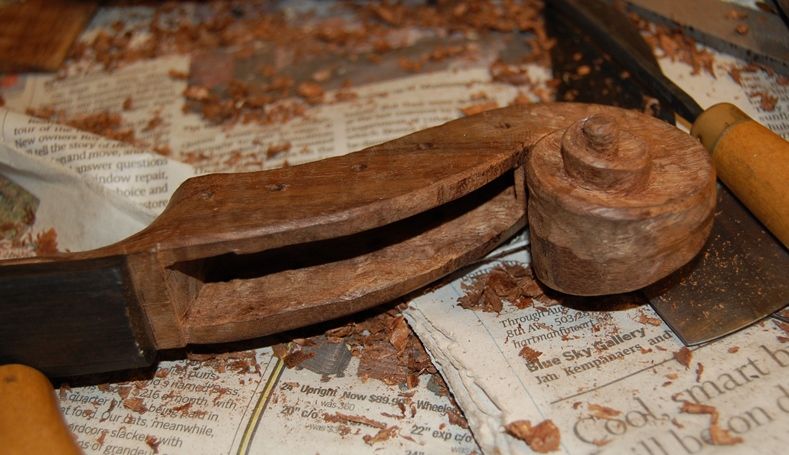
Carefully carving away the excess wood around the eye of the scroll.
Trying to work both sides the same way, so that the finished result will be symmetrical.
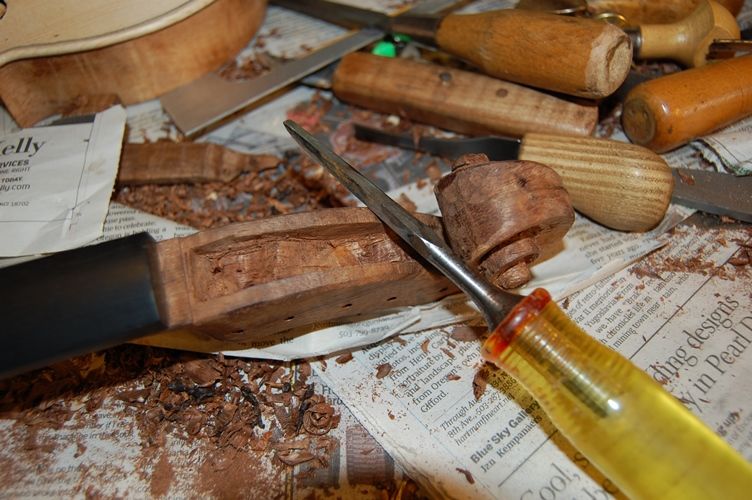
Beginning the pegbox. The narrow gouge gives me more control and better penetration into the extremely hard wood.
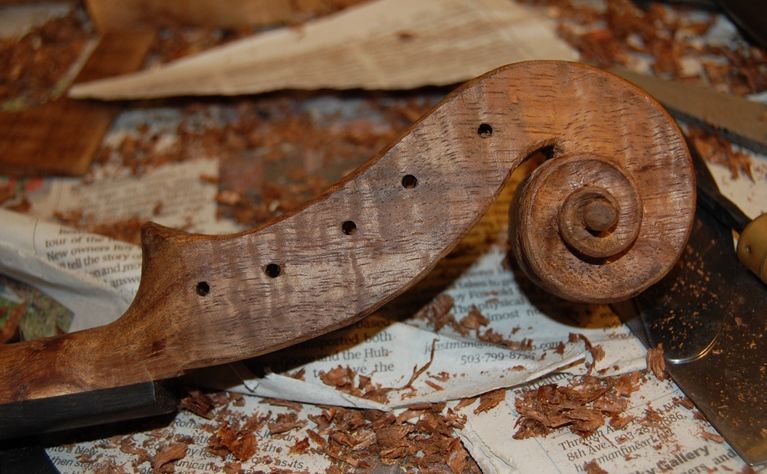
Deepening the pegbox and beginning the outer fluting.
Pegbox is nearing completion.
And that is as far as I got, today.
You can see that I have begun undercutting the turns of the scroll, and chamfering the edges, but there is a long way left to go. Monday is a holiday, and I intend to spend it working on this instrument, so perhaps I will have more to show next week.
Thanks for looking.
If you found this post helpful, please share with your friends!
It was fun working on the Sawmill, and just as we got that done our daughter came home (from Switzerland) for a visit, so, between that and all the overtime at work (teaching print-reading classes), it has been hard to get going again, but the fiddle has been patiently waiting on the dinig room table for me to get back to work.
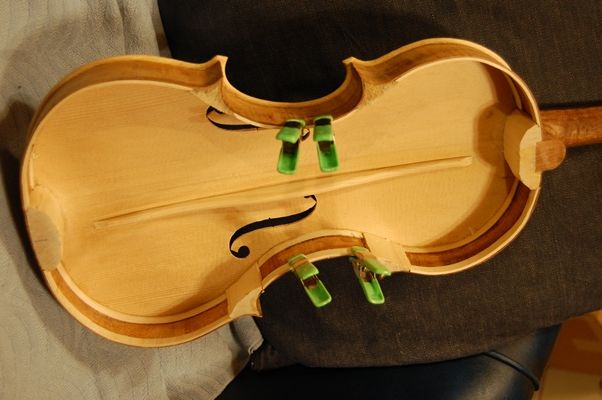
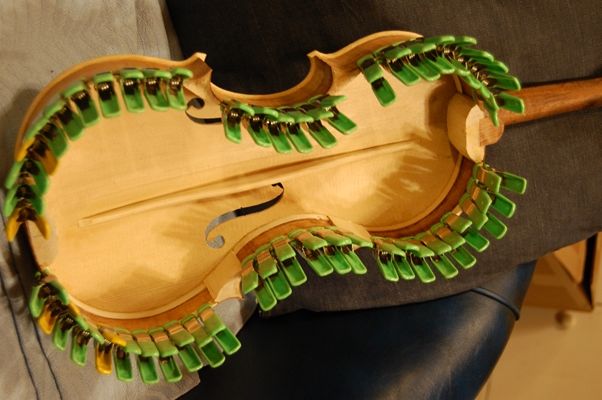
Installing the Front Plate
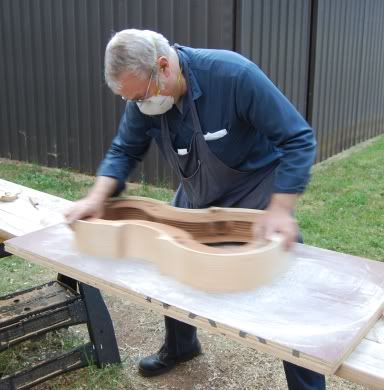
I levelled the garland by scrubbing it back and forth on a sanding board, then aligned the plate on the garland and clamped it with spool clamps. After heating up the glue, I removed a few clamps at a time and inserted the glue with a thin pallete-knife, and re-applied the clamps. In this way, I can work my way around the perimeter, accurately and easily gluing the plate in place without fear that the glue will gel before I can get the plate clamped in place.
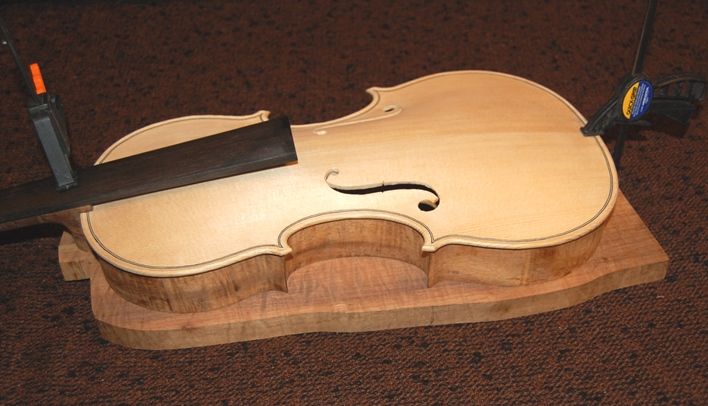
Front plate glued in place
Ready to begin Purfling
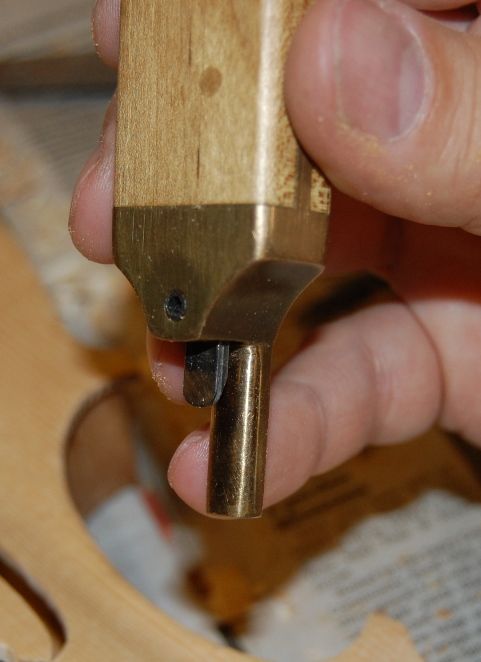
The purfling is an inlay that is partially decorative, and to some degree a protection against cracks and splits– an edge reinforcement. There are some (usually very cheap) instruments that have the purfling simply painted on, so that it only looks good, but has no other function. They are usually seen as sub-standard, though, and I will not consider making an instrument that way…so, here is the beginning point: the purfling marker. Two blades set apart by the exact thickness of the purfling to be inlaid, and the distance from the edge set, as well.
Purfling marker
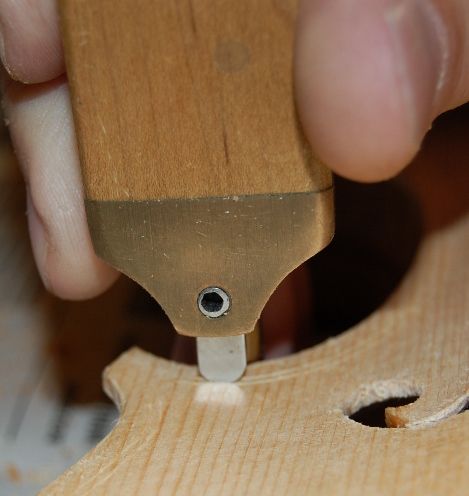
Some people call this a purfling cutter, but it really does not workwell if you try to use it to cut the slot. I mark the slot with this tool and then cut the slot with a sharp, thin knife. In use, the purfling marker should be held exactly perpendicular to the plate, and tightly against the plate edge.
Purfling marker in use: see the double lines.
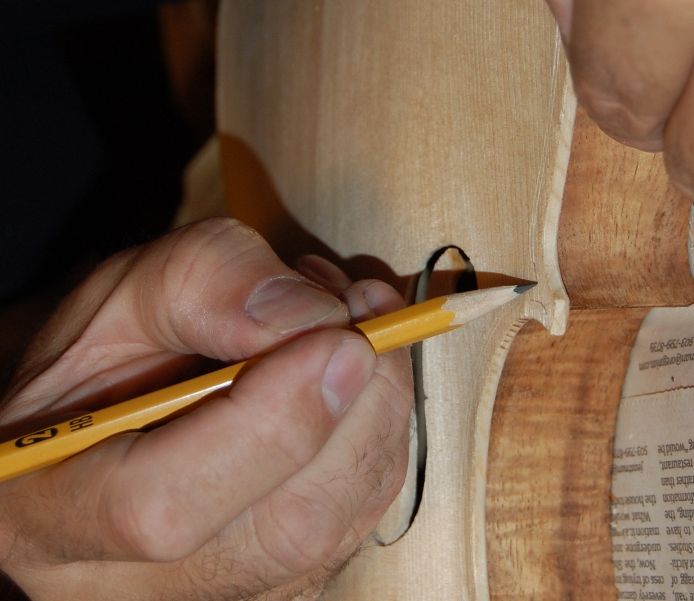
The purfling marker will not complete the corners, and they are fairly critical to the overall look, so I carefully sketch them in with a very sharp pencil.
Sketching the corners
Cutting the Purfling Slot
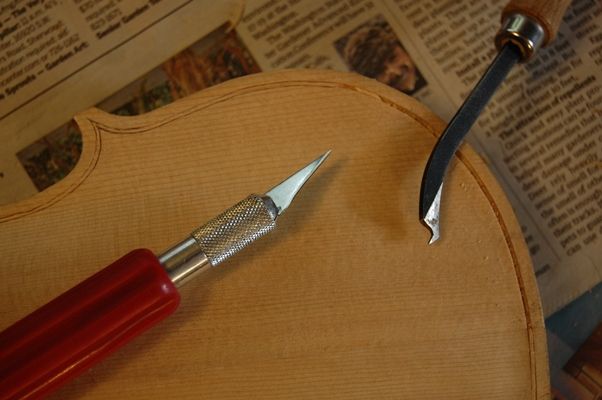
I usually use an X-acto knife to cut the slot, and pick the center out with one of several tools made for that purpose.
Purfling tools.
The first trip around the plate it is important to go lightly but very accurately, so that I am barely deepening the marks left by the purfling marker: after that I can cut more deeply.
Incising the Purfling Slot
Cleaning the Purfling Slot
After I am satisfied that the cuts are the correct depth all the way around, I carefully pick out the center of the slot and clean the slot, using a purfling pick. I have some that I made myself, but this one was given to me by Jake Jelley, and it works very well.
Purfling Pick in UseReady to Install Purfling
Installing the Purfling
Some people make their own purfling…maybe I will try it someday, but for now, I buy mine in three-ply strips. The strips are too brittle to bend, so I use a bending iron to make them flexible and to bend them to the correct curvature for the tight corners.
Purfling strips with prepared front plate
I try to install the C-bout purfling first, then force the mitered ends of the upper and lower bout purfling against the mitered ends of the c-bout purfling. It takes practice to get good at this: I do not claim to have “arrived”. But it does seem to be getting easier. (I read the other day that someone asked Pablo Casals why, at 93 years of age, he was still practicing the cello for three hours a day. He said, “I think I am seeing some improvement!”) (Good one, Maestro!)
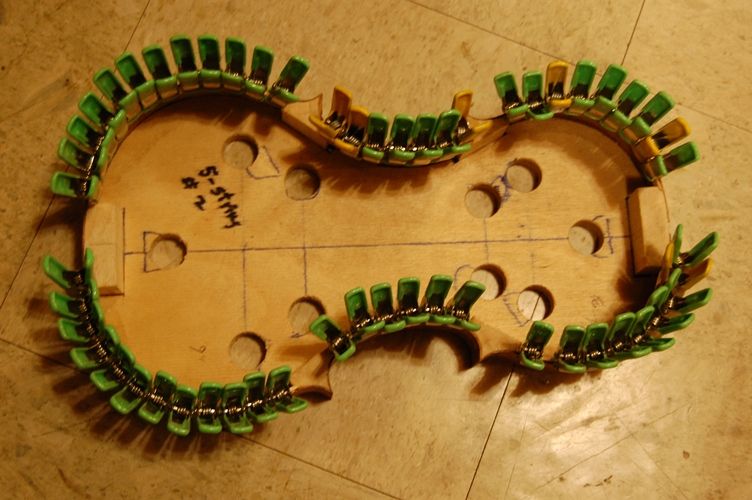
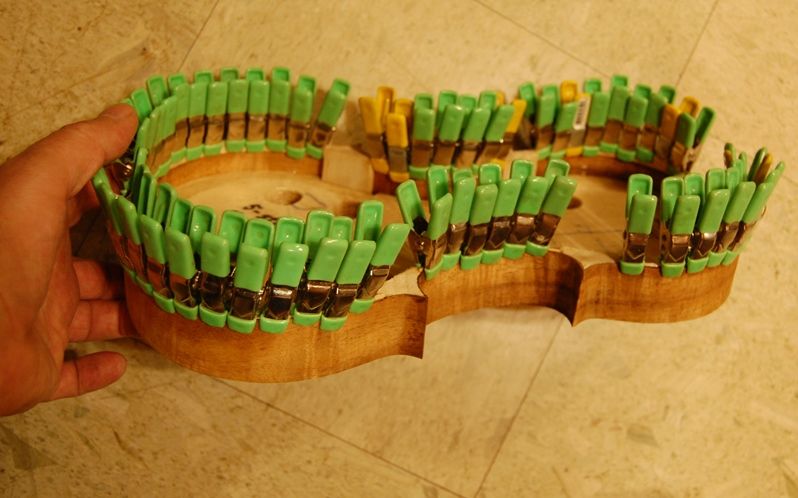
C-bout Purfling installed dry
Then I install the rest of the purfling strips: I want the slots to fit snugly, but not so tight that I will struggle to install them once I apply the hide glue.
All Purfling installed dry. Spliced in some places, but after gluing the splices will be invisible.
Gluing and Trimming the Purfling
I lift each section up out of the slot, one at a time (tilting them, so as to try to leave the mitered ends in their places), and use the palette knife to slip thin hide glue into the slot, then press the purfling back into the slot, all the way down. I use a roller made for installing the rubber trim around window screens to force the purfling all the way home. The glue squeezes its way into the mitered corners, and secured them. The plastic roller is easy to clean afterward with hot water.
Once the purfling is glued in place, I mark a line around the margin of the plate, using a compass, with the pencil set to about 1.6mm (1/16″ or so), so that I have a guide to follow as I cut the “channel” (trimming the purfling below the surface into which it has been glued.) I want the wood surface and the purfling to make a smooth curve that begins near the edge of the plate, cycles down through the purfling, and sweeps back up to join the curve of the violin plate. I carve the channel with a gouge, then scrape to complete the curves. The faint pencil guide line can be barely seen in this photo.
Trimming the purfling and cutting the channel.
And there is the finished work, ready for the next step.
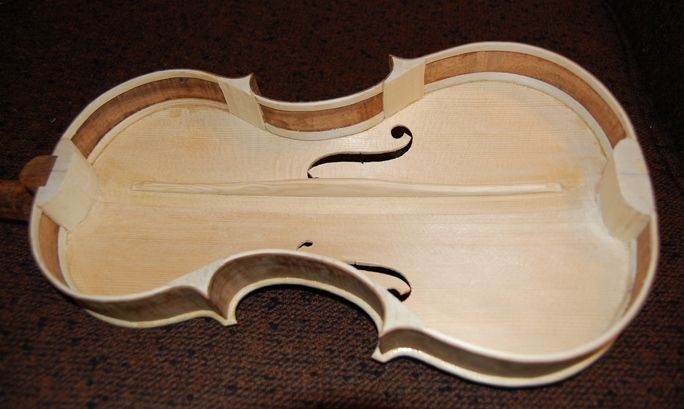
All the purfling is trimmed, the channel is cut, and the scraping is complete.
The outer edgework will be completed after I install the neck. I used to wait and install the neck last, but I eventually decided that I prefer to install the neck and fingerboard while the front plate and rib garland are still on the mold, then trim the heel of the neck to be in plane with the back of the rib garland so that the back plate can be installed last. But that is a subject for another post….
If you found this post helpful, please share with your friends!
We had just completed the graduation in the last post; Usually, by this point, I am beginning to see the interior of the f-holes, too, because, as you may recall, I had incised them pretty deeply. In this particular case, I could just barely see some portions. I guess they were not as deep as I thought they were.
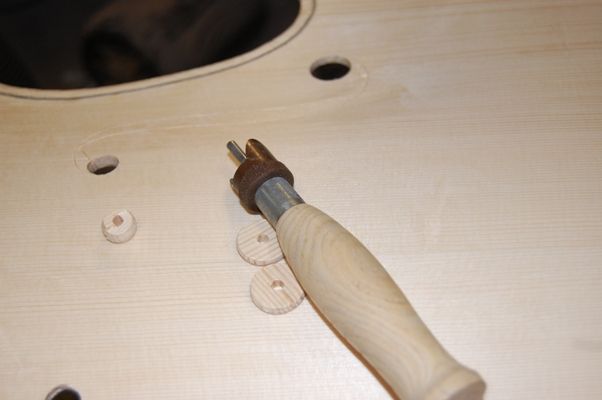
Once the inside is complete, I finish cutting the f-holes. Many people use a jeweler’s saw, a fretsaw, or a coping saw to cut out the f-holes. I generally just use the knife, except that I do have a special tool for cutting the round upper and lower eyes. I didn’t take any photos of it this time…here is one from an earlier instrument:
F-hole drill being used to cut the lower eyes on a cello.F-hole drill with completed eyes and cut-out plugs.
F-holes Completed and Clean
Just getting the f-holes cut is only part of the job…they need to be clean, and smooth, and relatively symmetrical. I will keep touching them up and tweaking them until the day I begin the varnish, most likely, but here they are; close to being complete, if not completely done.
F-holes essentially complete.
By the way, you may have noticed that on this instrument (and the last one) I purfled after installing the plates. I was taught to purfle early, but I always had trouble getting my overhang even, and my purfling parallel to the ribs. So I tried purfling after closing…works fine and looks better. Diff’rent strokes, I guess….
Bass Bar
When the f-holes are complete, and clean, I can fit the bass-bar. The bass-bar is a spruce brace supporting the bass-side of the bridge, and providing for a good sound on the low strings.
I lay out the location of the bassbar, 1/14th of the width off center, at both upper and lower bouts. It usually ends up about 15 mm off center at the lower bout and 12 mm off center at the upper bout. (Those were the exact measurements this time: the upper bout was 168mm wide and the lower was 210 mm wide. So 1/14th of each was 12mm and 15mm respectively.) When I lay the bass-bar blank along that line, the side of the blank should just about “kiss” the upper eye on the bass side. I make slight adjustments as needed to make sure it does not obstruct the f-hole at all, then scribe the line in with a flexible steel ruler and a soft pencil. The line ends 40mm from each end of the plate, so the bassbar is just under 11″ long, (and about 7mm thick where it contacts the plate, tapering to 5mm along the free edge.)
Bass-bar layout lines complete.
Chalk-Fit Trick
Then I do something a little unusual: lots of luthiers chalk-fit bass-bars…in fact, probably most of them do. I have only known one or two who can successfully “eye-ball” the thing in. But I do not like the looks of chalk-residue mixed with hide-glue, either. I can’t see the white chalk clearly enough to use it, and the others leave an ugly residue– expecially the green or blue chalks.
So… what to do? Someone, years ago (can’t recall who…probably my friend Jake Jelley), pointed out that the paper gauze tape sold in pharmacies will stick securely, you can see the line through the tape, and it holds the chalk very well. The tape (3M Micropore) is so thin and fragile that you get a very good fit, but when you take the tape off after the fit is perfect, all the chalk comes off with it. (Careful! It can pull splinters off, too!) Hey, Presto! Clean wood, and you are ready to glue in the bass bar!
Pre-Fitting the Bar
I pre-fit the bass-bar by eye, using a compass to mark the contour from both sides, then trimming with knife and plane until the fit is close.
Bass-bar pre-fit by eye, using a knife and plane to trim the wood to a close fit. Chalk-fitting is next.
Then I apply the paper tape, darken the line on the tape as needed, and begin the chalk-fit process. It is important to learn to JUST plane or scrape away the portion of the bass bar with chalk on it, on each try. Don’t plane off whole sections…it is possible that only that one little place with the chalk was high.
There is the paper tape…you can still see my layout lines.Beginning chalk-fit.Chalk-fit complete, and tape removed. Notice the arrow on the upper end of the bar: that is to keep me from forgetting which end is which.
Final Check and Installation
I check the fit by clamping the bar in place, dry.
Dry fit and clamped for final check. Seems to fit acceptably…
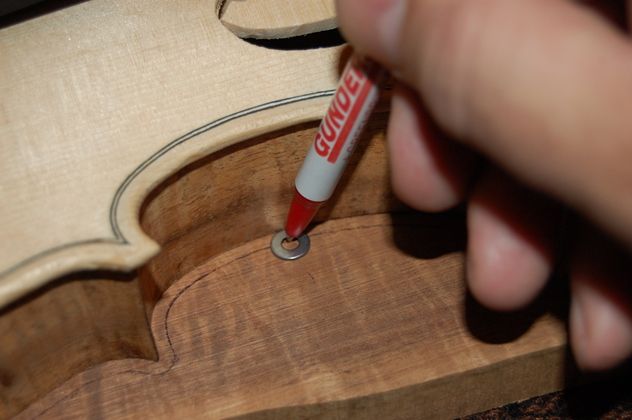
Then I remove the clamps, and slather on the hot hide glue–carefully. I quickly re-position the bar and clamp it securely, then clean up, using hot water and a brush. The small amount of watered-down glue soaking into the wood around the bar doesn’t seem to hurt anything, so I don’t worry about it.
Bass-bar glued, clamped and brushed down with hot water.
Shaping the Bass Bar
When the glue is completely dry, I remove the clamps and shape the bar…”just so”.
The glue is dry… see the sketched-in proposed shape of the finished bass-bar. The dark area beside the bar is just a shadow, not glue.
I do not have a “scheme”, here, and I do not measure it beyond occasionally checking the center height. I am just going by feel, by eye, and by experience. I know if the bass bar is too weak, it will affect the sound of the bass string…so I err on the side of a tall bar. I am certain that many will frown upon this. I am not telling you how you should cut a bass-bar; just sharing how I handle mine.
So; I use gouges and finger-planes initially, to shape the bar, finishing up with scrapers, files, and even sandpaper. (Yes, I know…but it’s OK, honest!)
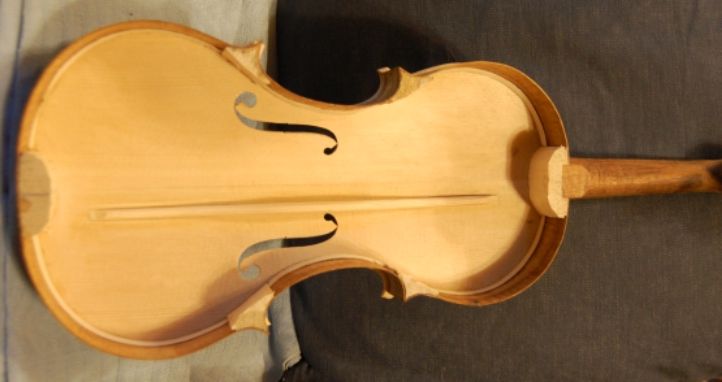
And…there’s the plate, completed and ready to install! Well…sort of….
The glue was a little too thin on one end of the bar and it popped off for about a 2″ section. So it has been re-glued and is drying.
Bass-bar nearly complete. One end popped loose, and needed re-gluing.I will do a little final shaping before calling it done.
Besides, the inner edges of the plate will have to be rounded and smoothed before I can actually install it. But there are probably less than 30 minutes of work left before I can glue the front plate in place. So it’s almost done. I hope to install it tomorrow, but I have some other things to do, as well.
Some of you may wonder why I install the front plate first; I was actually taught to do the back plate first, and to install the neck last, but it finally occurred to me that I could fit the neck before installing the back plate, and before removing the mold, and get a perfect neck-set, then trim the back of the heel flush with the rib plane, and install the back last, after removing the mold and cleaning up the interior. It worked very well, so I have continued the practice. Again; different ways of doing things result from different skill-sets and different problem-solving methods. There is nothing wrong with either way. (I even knew of a fellow who set the neck before installing either plate…but I can’t see that one. On the other hand, that guy made over 1000 instruments before he died, and sold every one of them; he must have been doing something right.)
So, the next post will involve completeing the neck and fingerboard assembly, installing the front plate, and setting the neck. Could be a week away; I am going to be working a lot of overtime on my day-job, for the next several months it seems.
Later the same evening:
Bassbar is finally complete!Side view…lighting is difficult, but you can see the profile.
Thanks for looking.
Chet
If you found this post helpful, please share with your friends!
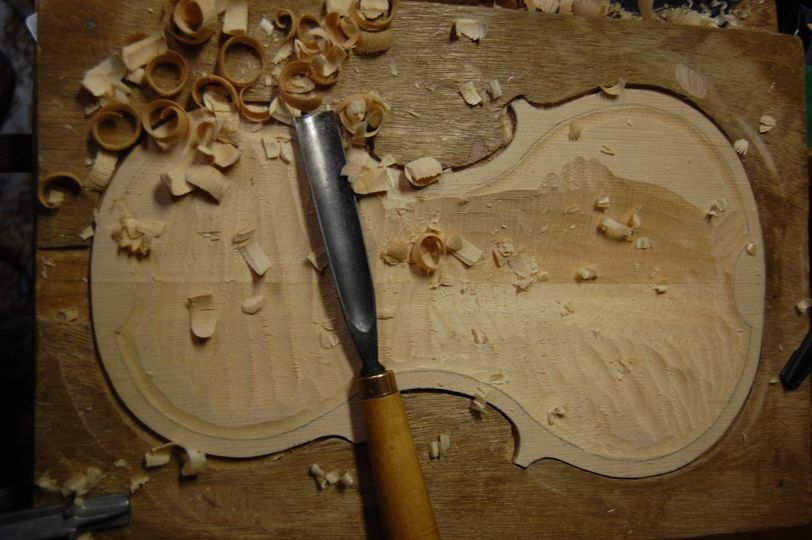
Graduation begins with measuring in the spots where it already feels a little thin, so as not to make a fatal mistake and carve right through the plate. (It happens!)
Once I know where I am free to carve, and where I need to take it easy, I begin by carving cross-grain with a medium-large gouge. I check periodically with a caliper. When it begins looking closer to the right shape inside, I measure again, and double check those special spots.
Beginning graduation, using a gouge.
Then I go after it with a toothed finger-plane. This is really just an Ibex 18 mm finger-plane with a toothed blade, and a wooden handle added to save my fingers. I originally added that handle to keep from blistering my forefinger and thumb, as I had done so on every single instrument up to that point. (That was my #16 instrument– a cello.) I was surprised to discover that it also gave me much more power and control so that I was able to set the blade deeper and carve much more aggressively, taking off much thicker shavings.
Using a Toothed Finger Plane to further the Graduation process.
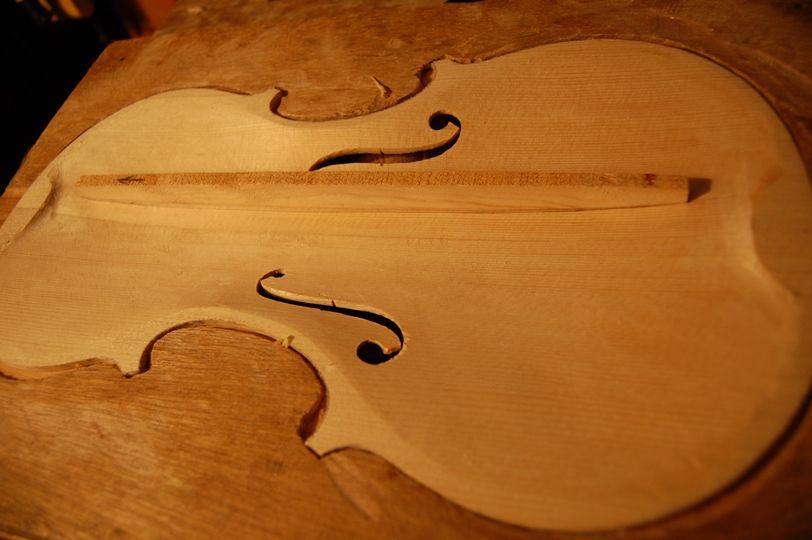
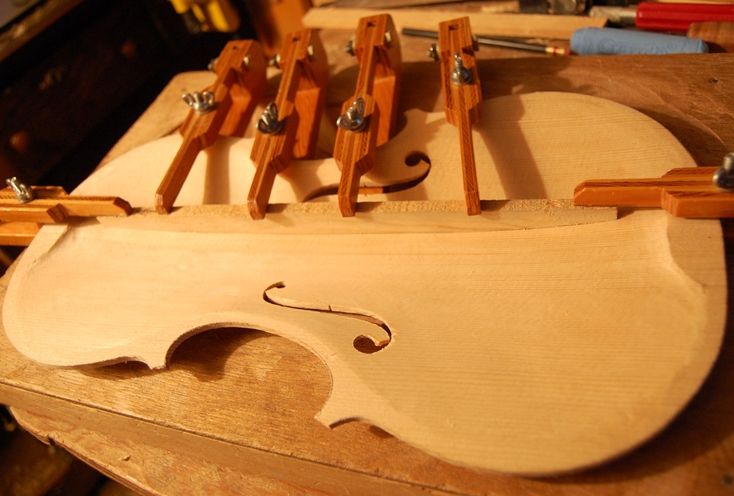
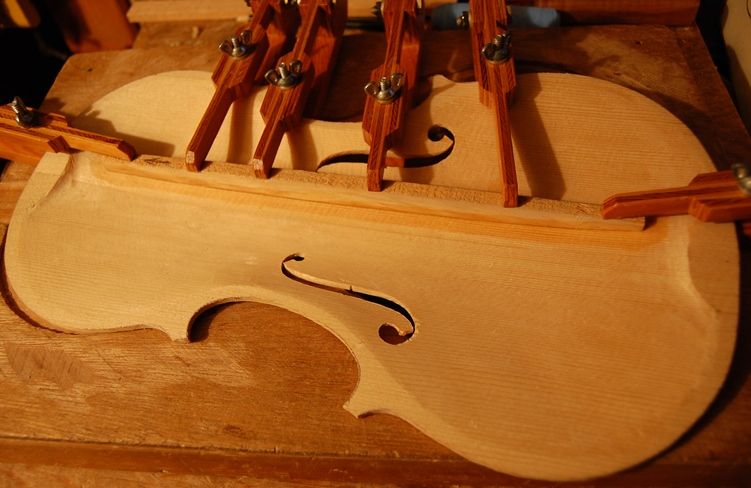
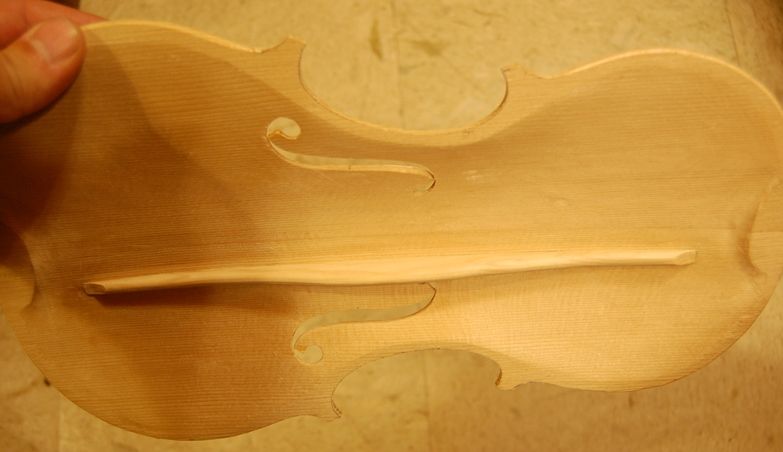
Once it is smooth inside, and within a millimeter or so of completion, I switch to a smaller finger plane and cut more gingerly, until it is all within a few tenths of a millimeter of the goal thicknesses, and then I finish with scrapers. Here is how the plate looks at that point:
Graduation nearly completed– the skewers are only there to create shadows so that the contiour will show in the photograph.Another view, at a lower angle. There are still a few lumps to smooth out, but the graduation is essentially complete.
Usually, by that point, I am beginning to see the interior of the f-holes, too, because, as you may recall, I had incised them pretty deeply. Once the inside is complete, I finish cutting the f-holes. Many people use a jeweler’s saw, a fretsaw, or a coping saw to cut out the f-holes. I generally just use the knife, except that I do have a special tool for cutting the round upper and lower eyes.
And that is what I will show in the next post…which, hopefully will be sooner this time.
Thanks for looking,
Chet
If you found this post helpful, please share with your friends!
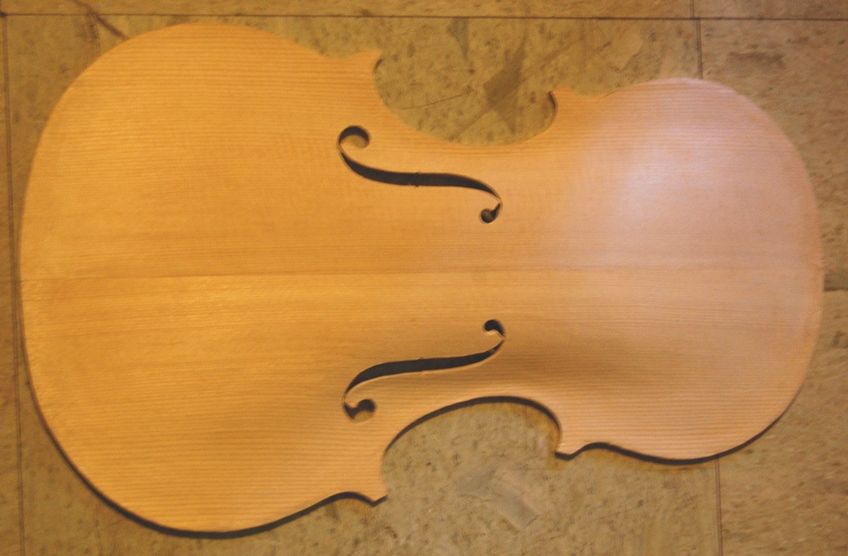
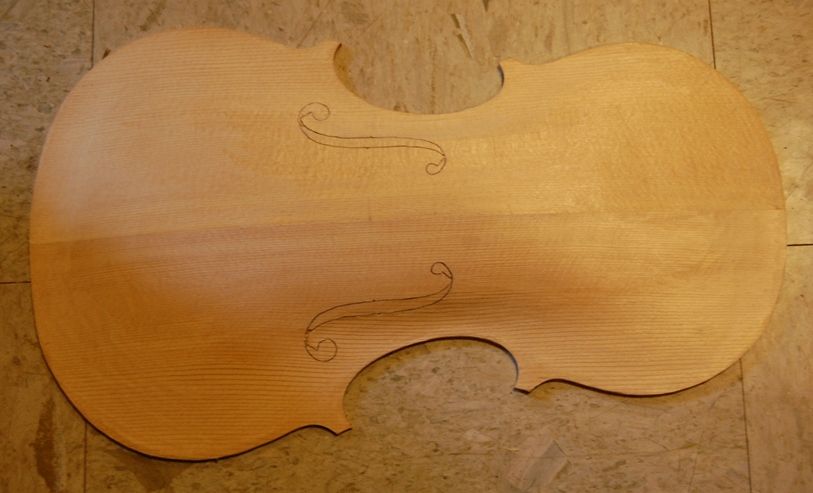
Last time, I had traced and cut out the top plate, and actually, I began the work on it, thinning the plate to the desired arching height– but that is when I discovererd that there was a bark inclusion that extended right through the upper bouts. So, for those “sharp-eyed” among you, who notice that the grain has changed; Yep. It surely has! Too bad…I liked the grain of the spruce in the plate I first chose, but it turns out it was just a little too interesting.
So, on this plate, all I have done is the outer arching and the layout and incision of the f-holes. After completing the arching, but before final scraping, I laid out the distance from the upper edge of the plate to the “stop” line (where the bridge will stand) at 195 mm, then laid out the distance between the upper eyes at 42 mm. I used a plastic template that I made years ago (cut out of an old flexible face-shield– the kind welders use when they are grinding steel) to lay out the shape of the holes, then incised them deeply with a thin knife. They would have been virtually invisible in the photos, so I traced them again with a sharp pencil after incising them, so that you could see them in these photos.
Arching complete, f-holes laid out and incised.
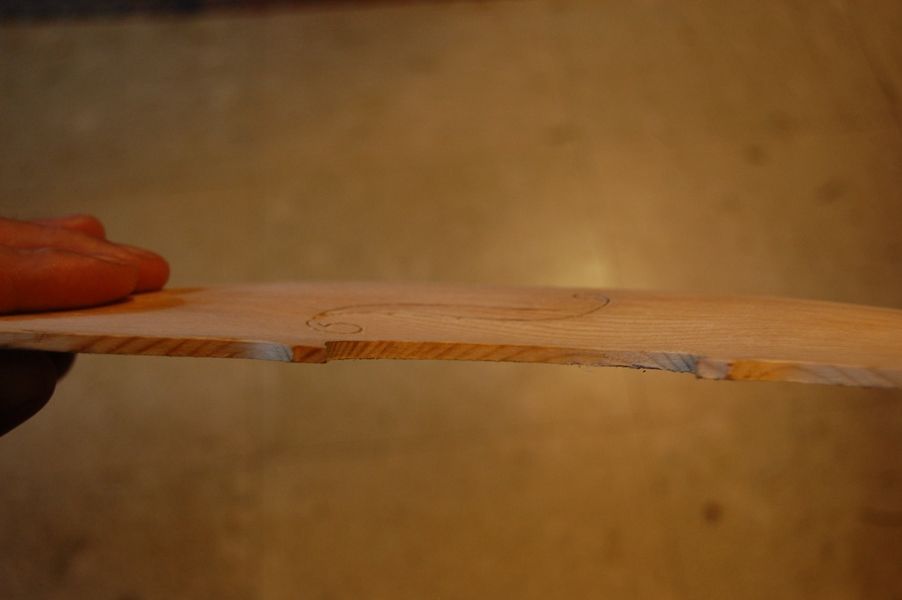
Arching: Final Check
Next I checked the arching by sighting edge-ways at the plate, to see whether the main stem of each f-hole is fairly parallel to the rib-plane. Usually I find that I have left the arching a little too “puffy” around the lower stem and lower eye area of the f-holes and need to plane away a few more strokes to get the stems lined up. I don’t think the looks of the f-holes are the main issue, here– the shape of the arching is fairly critical to the sound, as best I can understand, and this is just a “marker” for me to check.
Checking to see that f-holes are aligned with rib-plane.
Obviously, this alignment is something I have to do before I try to complete the inside carving, or there might not be sufficient thickness left to do the final adjustment. I try to estimate and get this area as close to correct as possible before laying out the f-holes, but I have had to adjust them at least a little, every time, so far.
After I am satisfied with the overall shape of the arching, I use scrapers to reduce all the lines and ridges left by the finger planes into a smooth continuum.
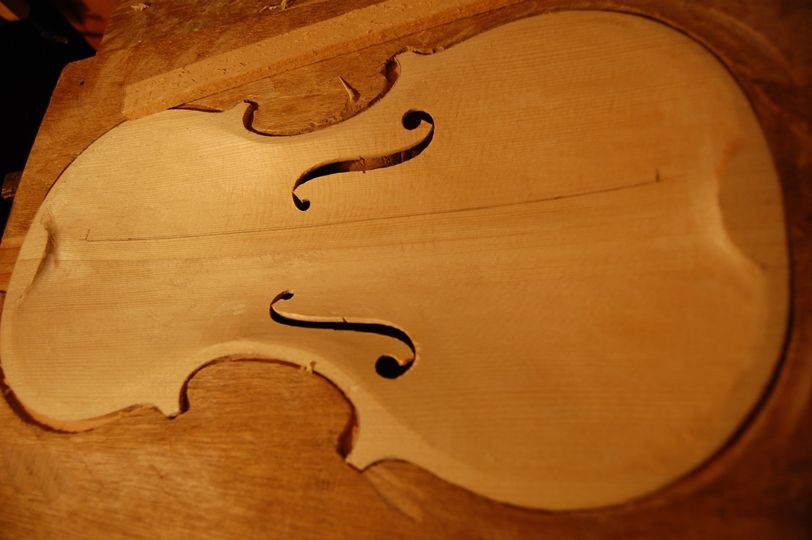
Graduation: Beginning the Interior
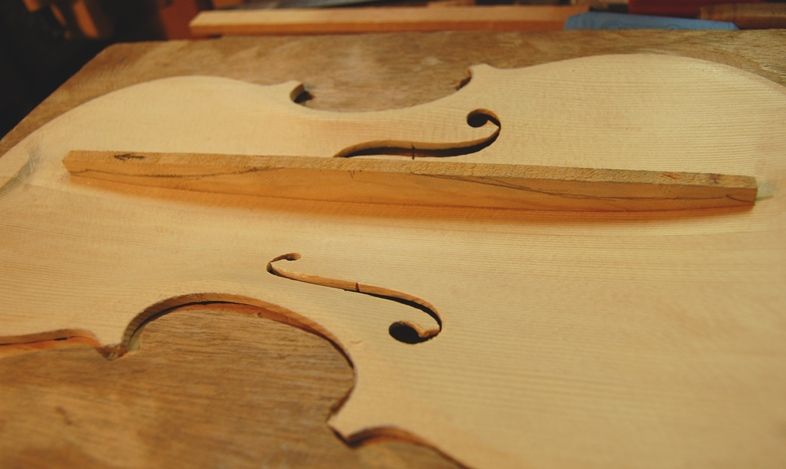
Once I have the outside arching the way I want it, I can start on the inside, and the final graduation of the plate. I hold a pencil in my fingers so that about 9 mm protrudes onto the plate, and then run my fingers around the edges…nothing precise about it: it is just a guideline for carving. I want to leave this area untouched until the last bit when I am scraping the inside, before installing the bassbar. I use the same template that I use for the final shape of the end blocks to scribe the shape of the area to be glued to the blocks. I scribe in the corner blocks with a curved scraper that just happens to fit the shape I want. All this outer perimeter area will be left flat until the last step before installing the bassbar, and/or installing the plate on the ribs. I want just the gluing surface flat when I am ready to install the plate.
Inside carving plan.
Preparing for Graduation: Measure First!
It pays to use a caliper and check the thickness all over before beginning to carve. I do have a mental image of the desired shape of the interior, but I do not have a mental map of the thickness of the plate, so I measure at least the areas that already feel pretty thin to my fingers, and decide how much should come off in each area. As it turns out, this time, no areas are really borderline, but some are within 1.5 mm or so, so I will be careful around those places. I am aiming for about 3.5 mm down the middle, fairing down to 2.5 in the upper and lower flanks. and a few places 2 mm, very likely. I will try to leave some areas a little thick, where there is a likelihood of cracking, but in general, I expect this will be a pretty thin plate…the spruce is a little dense (which I have had good results with in the past), so it can stand to be a little thinner than usual.
After the inside is carved and scraped to my satisfaction, I will complete the cutting out and shaping of the f-holes, then chalk-fit and install the bassbar. I will post photos of all that.
Thanks for looking.
If you found this post helpful, please share with your friends!
I got up at 5:45 AM (usually I get up at 3:45, so this was luxury), had breakfast, watered some fruit trees, checked e-mail, and got to work. I knew the outbuilding shop where my power tools are was going to get hot very rapidly today (99 deg. F predicted, I think), so I did all I could do out there while it was still cool, then worked in the basement shop for the rest of the day.
I took those rough-sawn ribs and thinned them to 1mm all over, using a fixture I made for my oscillating spindle sander (one of the few power tools I use), and cut out the neck block using my small bandsaw. I have a large bandsaw for cutting up large pieces of wood, etc. That is what I used to divide the back block into the two pieces to be joined at the back center seam (next.)
I then cut out the back and front plate pieces, and joined them, book-matched, so that the grain is nearly symmetrical bilaterally, both front and back. It wasn’t easy this time. I don’t know why. I use a small hand-plane to flatten the edges until they fit nearly air-tight– definitely light-tight. I have a larger plane but this wood was so wild it required a very low-angle plane, set very light, or it tears out at all the curly grain.
I glued the two halves of the front plate together using hot hide glue, and, while it was drying, I cut the ribs to the correct widths and lengths for each of the six pieces, planning as best I could to get the grain to line up appropriately at all junctions.
Once the front plate was dry enough to remove the clamps, I glued up the back plate, in the same manner. Some people get a great center-join using a rubbed-joint method. I have done it that way, but I am more comfortable if I add three clamps after I do the rub.
While the back dried, I planed the front plate to get it more or less level across the inner face.
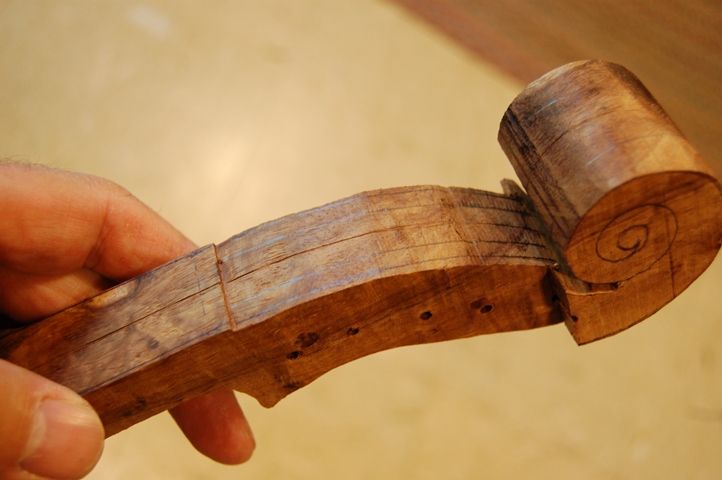
I took the neck blank and laid out all the measurements on it, and began shaping it a little while I was waiting for other things.
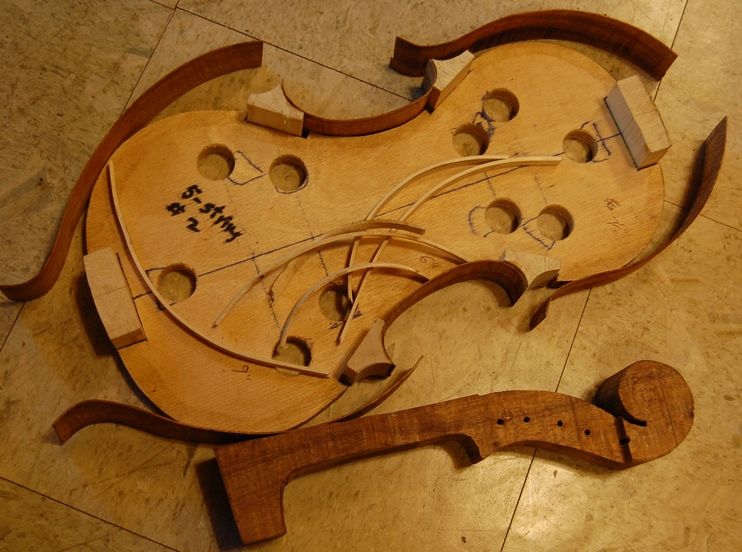
About 11:00 AM I decided I was hungry, so I had a salad and some coffee, and took a picture of the work as it stood:
All the wood in progress.
Back to Work!
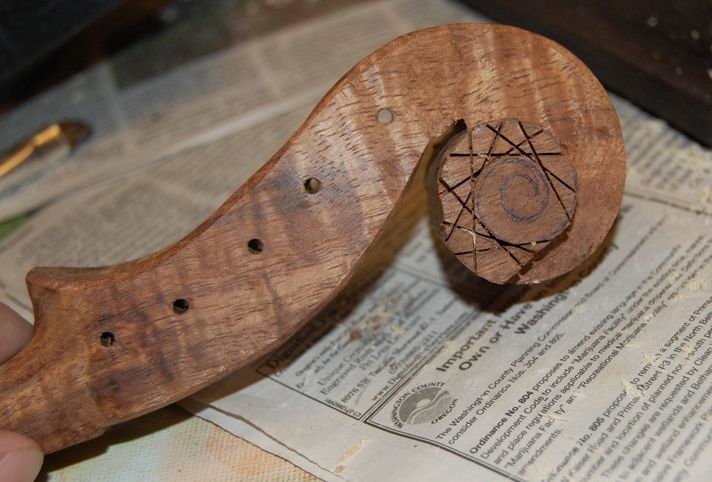
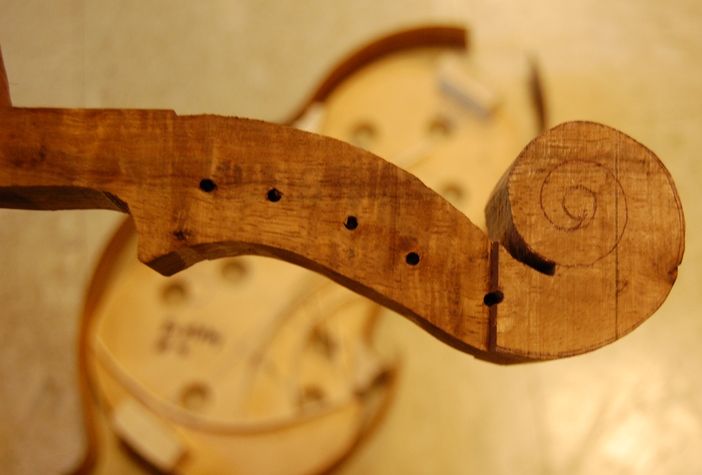
I drilled 1/8″ pilot-holes in the scroll block for the pegs. When I drill them early like this I can use the drill press and get the holes perpendicular to the center line. My teacher does not do them this way– he says it risks sags in the varnish, and advocates drilling after all varnishing is complete. (He is probably right, but I can never seem to drill the holes correctly by hand, so I will risk the varnish issues.) I was right about working early in the outside shop– it is really getting hot out there now.
I used the small bandsaw to cut the side cheek excess wood off the pegbox, and trued up the heel where it was too long. From here on out the scroll will all be hand-work.
I used the electric bending iron to bend all six ribs, as well as the front linings. I will have to make some more lining stock– this was all I had for the moment. Fortunately they are easy to make. The linings add strength to the edges of those 1mm ribs, which are otherwise extremely fragile. They also triple the gluing surface of the rib edges, so the joint between the ribs and plates are much more secure. I try to get as much done as I can while the iron is hot, and then turn it off; for one thing, it takes about 20 minutes to heat up: but also, if you forget and leave it on, and then forget it is hot, you can get a bad burn. I keep mine at about 400 degrees F.
I installed the C-bout (center) ribs, and glued them in place with hot hide glue, using wine-cork clamping cauls (donated by a friend) for the small-radius upper corners and broom-handle cauls for the lower corners. (This is really going to be a pretty instrument. The wood is gorgeous. I hope it plays well.) The upper and lower surfaces are an even larger radius, so they will be clamped using a section of large wooden closet rod. Sorry I didn’t take photos of these steps. Wasn’t thinking about pictures…I was just working.
More Pictures
Ribs and linings bent; Center ribs installed; Upper and lower corner surfaces shaped; Scroll begun.
As you can see, the ribs sprang back quite a bit after being bent. I should have thought ahead and prepared a block to which to clamp them while they were waiting to be glued in place. I have such a block–I just didn’t expect the springback to be so severe.
Close-up photo of the Scroll…pretty rough-looking, at this point, but that is how they start out…at least when I carve them.In this photo, you can see some of the layout lines of the pegbox. The wood is so dark that the pencil lines are hard to see.
As you can see above, after the glue was dry on the center ribs, I worked the final shape on the upper and lower surfaces of the corner blocks to ready them for the upper and lower ribs. Then:
I installed the upper ribs, and, while the glue was drying on those ribs,
I worked some more on the scroll. At this point the simplest way to begin removing excess wood is by cutting from the sides in to very near the layout lines for the scroll volute (the back of the scroll.) I do this by clamping the neck to a work-surface (in this case a lap-board.) and carefully starting the cuts, one at a time, spiraling up the scroll from each side. Usually I can then remove the waste wood with a knife or a flat wood-carving chisel, but the grain in this wood is too wild, so I had to try to follow the cuts around the scroll with the saw, then do the final cutting with sharp gouges and small planes.
Pull-saw and clamp.Wood Removal.
Meanwhile, the glue was dry enough that I could remove the clamps from the upper ribs and install the lower ribs. When the lower rib glue was dry, I installed the front linings. These little spring clamps are really handy. I got them on a sale once, at Home Depot, for about 37 cents apiece, if I remember correctly. They are just right for this sort of work, and I bought over 100 of them…cleaned ’em out at Home Depot.
Ribs and linings all installed…waiting for glue to dry.
I had been working on the scroll between other tasks, so it is coming along, too, but I am getting pretty tired, so this is about as far as I expect to get tonight. Here are a few more photos:
Side view of lining clamps holding the linings while the glue dries.The glue is dry enough to hold, so I am removing the clamps. Here you can see the linings contrasted against the dark wood of the ribs.All front linings visible, here. They will still need to be shaped (tapered and scraped smooth) before the violin is closed up.This is difficult wood to work, but the scroll is progressing in satisfactory manner.Other side (Treble side.)And, the back; barely begun, but you can see the Volute beginning.
And that is it for today! Too tired…gonna call it a night. It is 11:45 PM
Thanks for looking.
Chet
If you found this post helpful, please share with your friends!

 Follow