Current and new Projects

Please share with your friends!

Current and New Projects
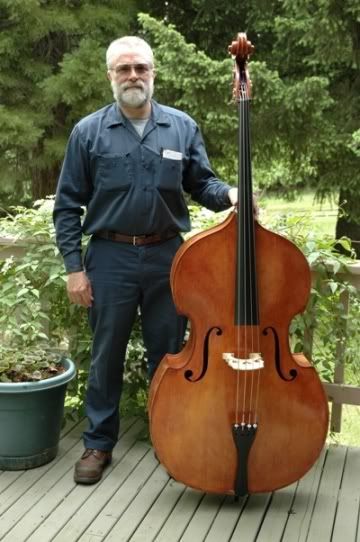
A Double Bass

That Double Bass I began (quite some time ago) has sat in the corner of my shop, sneering at me every time I look that way. That has to stop…but the only way to stop it is to finish the project. (sigh…)

One of the things that was holding me back is that my old home-made bending iron simply wasn’t good enough. So, the first step toward completion is to make a new, hotter, smaller diameter bending iron. The old one was heated with a propane torch, but it was quite large, and it took a long time to get it barely hot enough to function. This one will have an electric element for heat, and much smaller diameter, as well as much less mass. I hope it works well. Another maker shared how he made his bending iron, and I am attempting to emulate his example. If that works, I can get moving and complete the bass this fall.
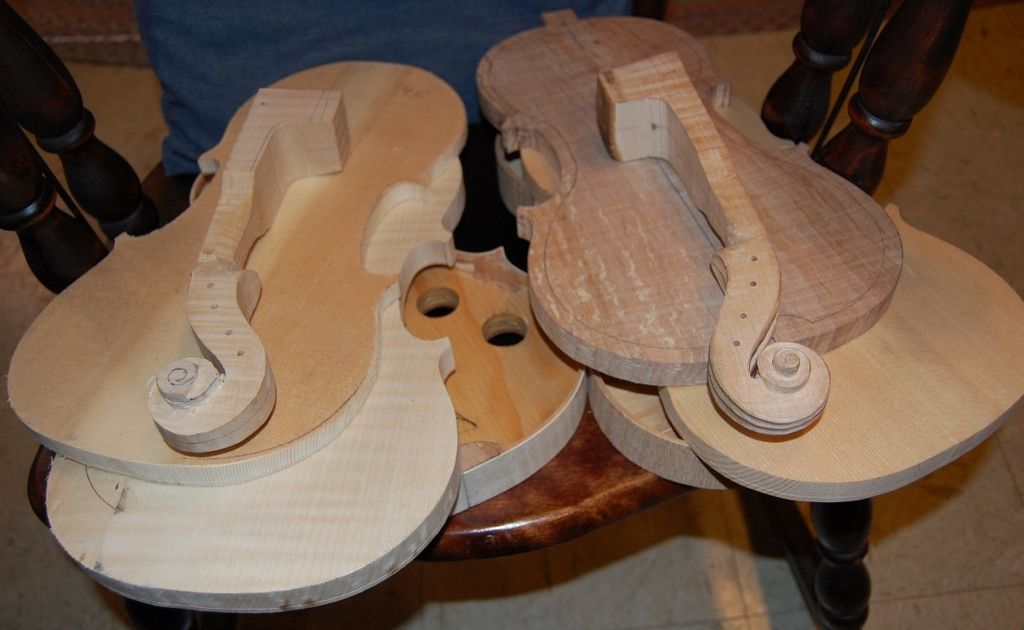
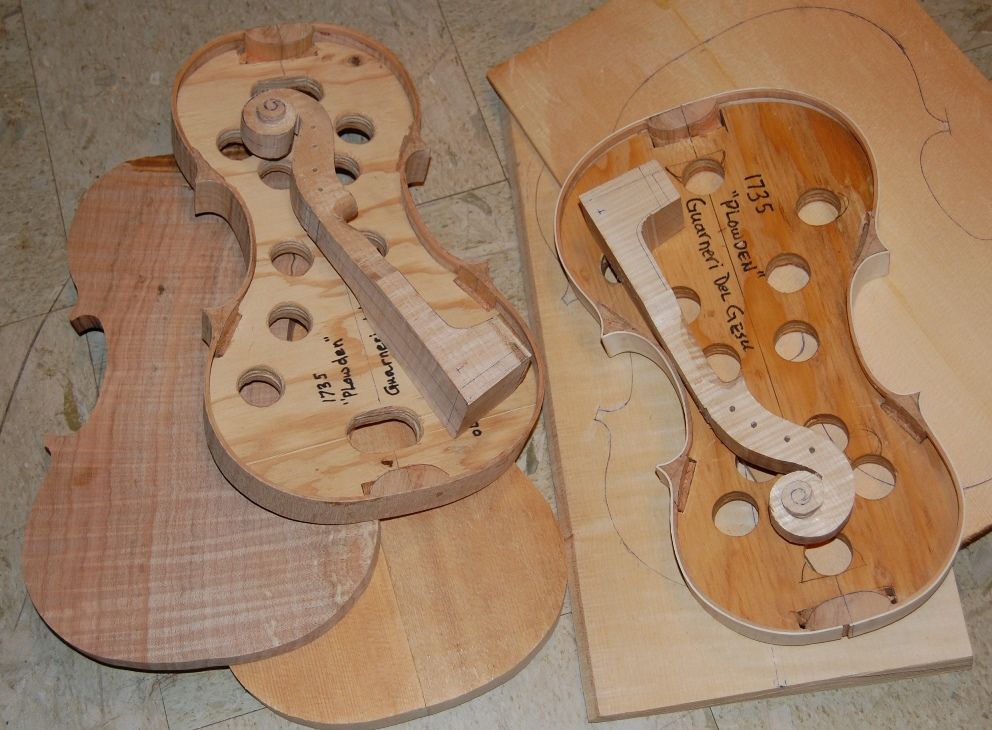
Another Cello

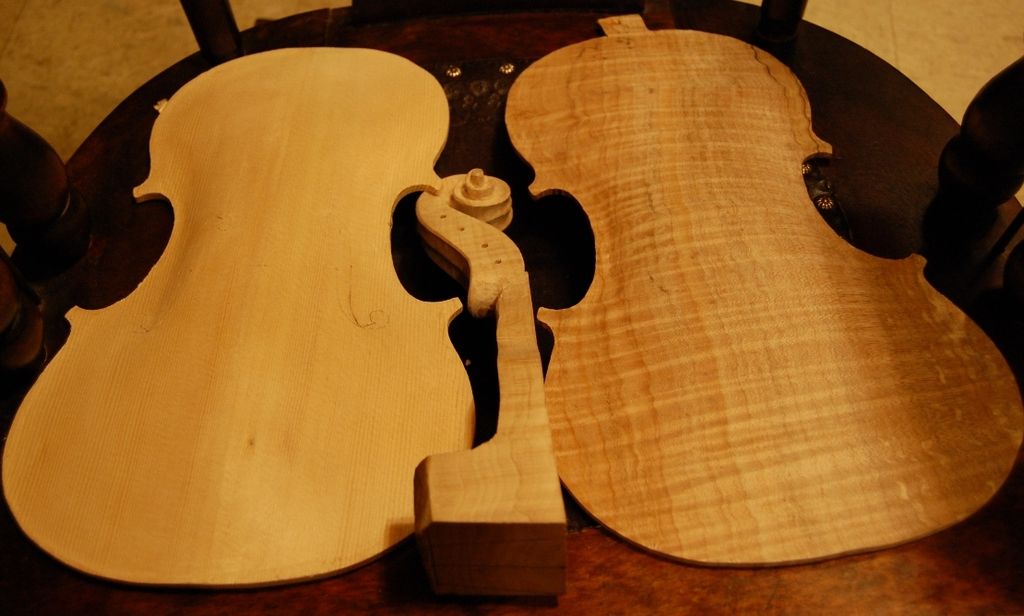
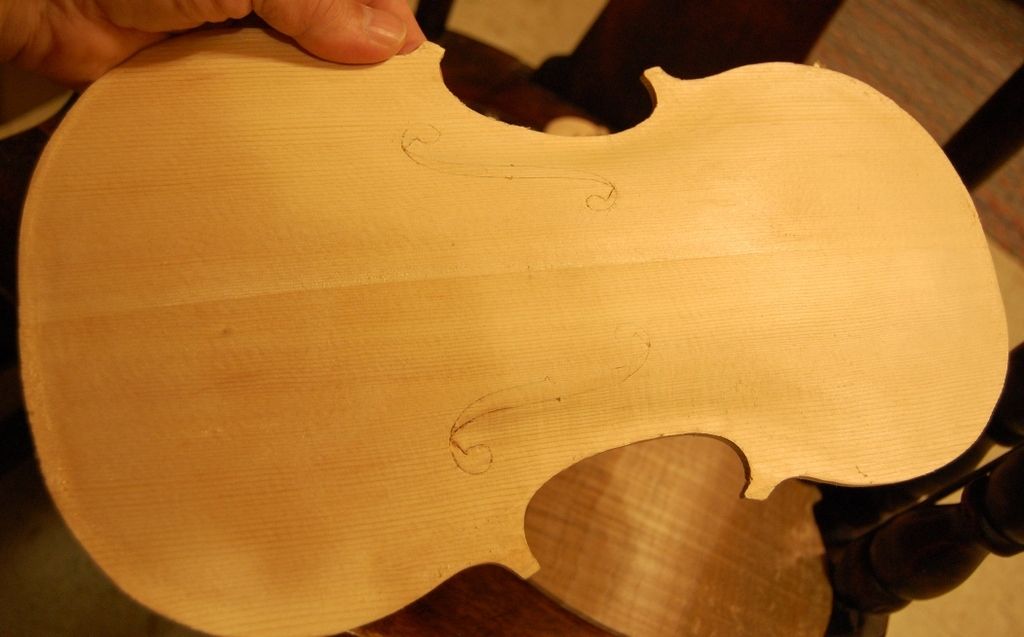
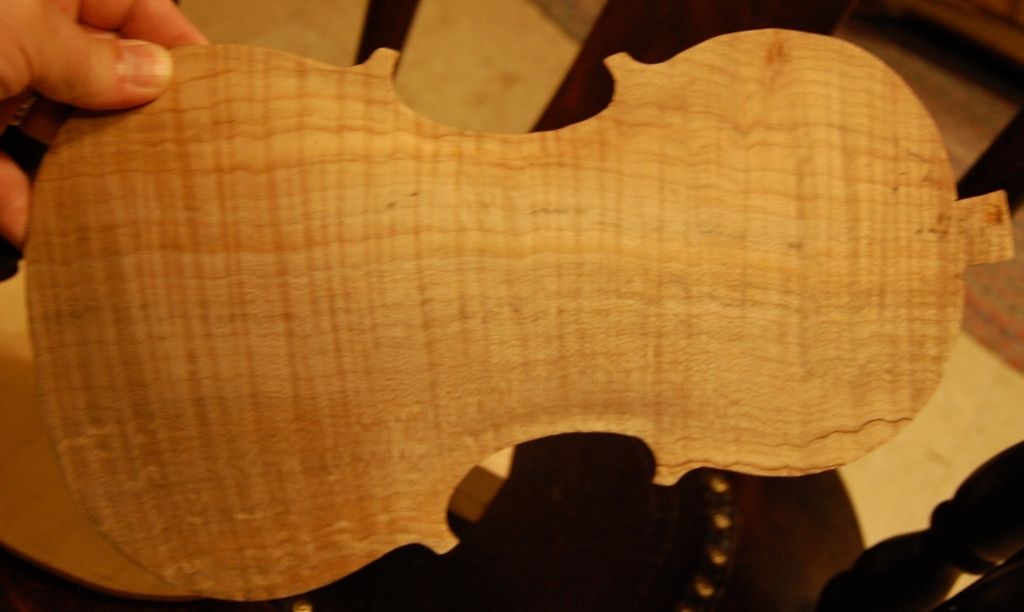
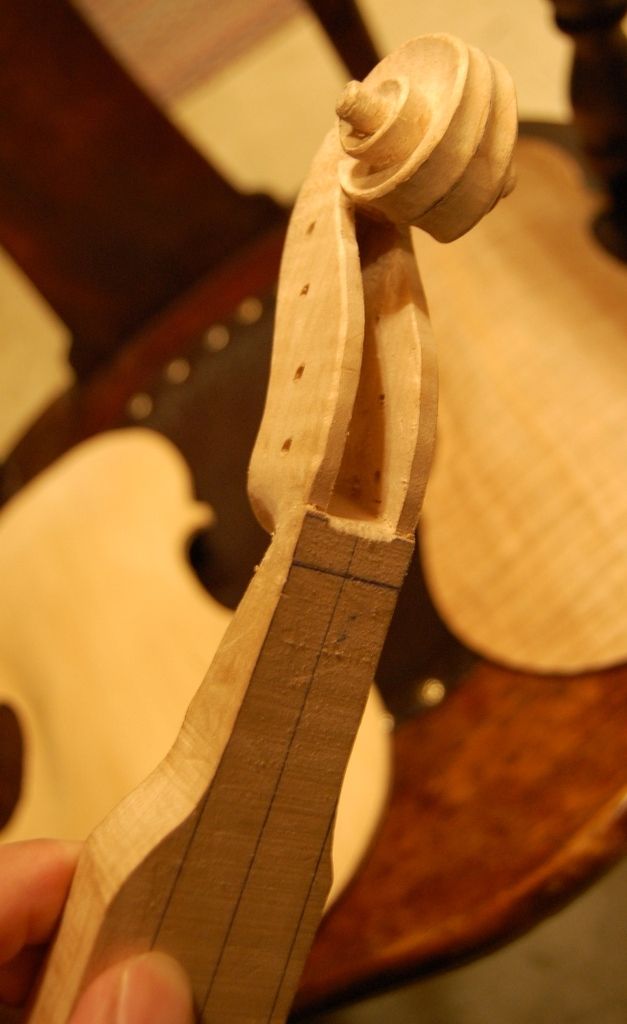
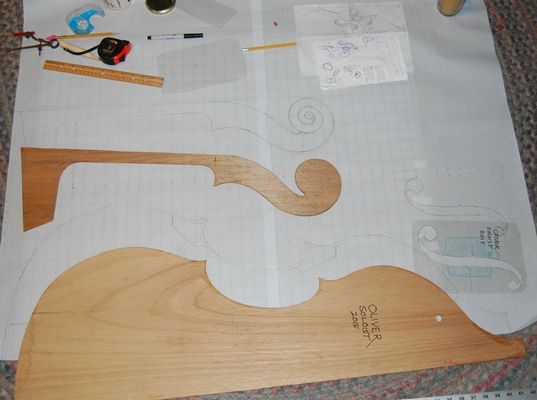
A few years ago, I had salvaged some curly Big Leaf maple from a very large tree that was being removed from my wife’s childhood home. I promised I would build her a cello from the wood, so she would have a treasure from her childhood. So, the wood is fully dry and seasoned, now, having sat out in my shop for several years. It has humidity-cycled through the changing seasons, and should be quite stable, now. A friend (Steve Stevens, now deceased) had given me a cello top set of Red Spruce, so that will go into the mix as well, making it a treasure to both of us.

What I hope to do, is to give special attention to getting good pictures of every step of the construction and finishing of this cello, so as to post a running commentary and tutorial as I work. On every project thus far, I have had a tendency to get engrossed in the work and forget all about pictures. So, I may recruit Ann to take the pictures, so that I can keep rolling.

A Large Viola…or maybe a Viola da Spalla

I haven’t decided just how large, yet…the largest violas I have made in the past have been 16-1/2″ on the body, which is pretty good sized, and already too big for some folks. But I am considering either a 17″ (or larger) viola, or a “Viola da Spalla”, sometimes called a violoncello da spalla, or a small Violoncello piccolo. The Viola da spalla is played off the right shoulder, so that the chin is over the bass lower bout, but not on a chinrest. A strap holds the instrument up under the player’s chin, and the bowing hand reaches up from beneath, to access the strings. Frequently they are made as a five-string cello, and that is how I would approach it. Tuning, then, is in the same range as a cello, but adding one higher string: C, G, D, A, E.

Either way, I realize I am probably building something I will never be able to sell, as there isn’t much market for either instrument. (Ah, well… some things we do out of love.) Anyway, this one is not a very high priority.
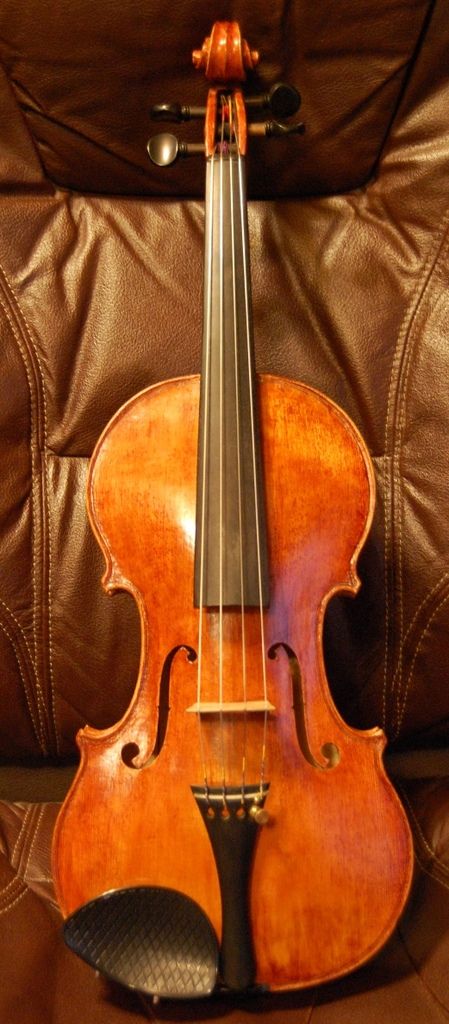
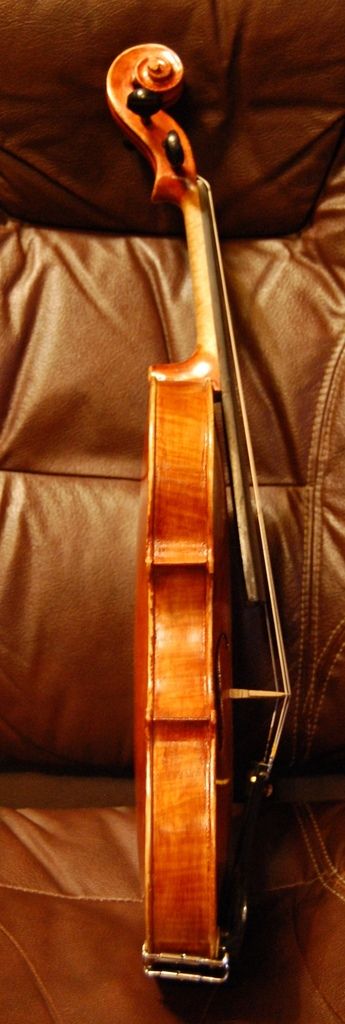
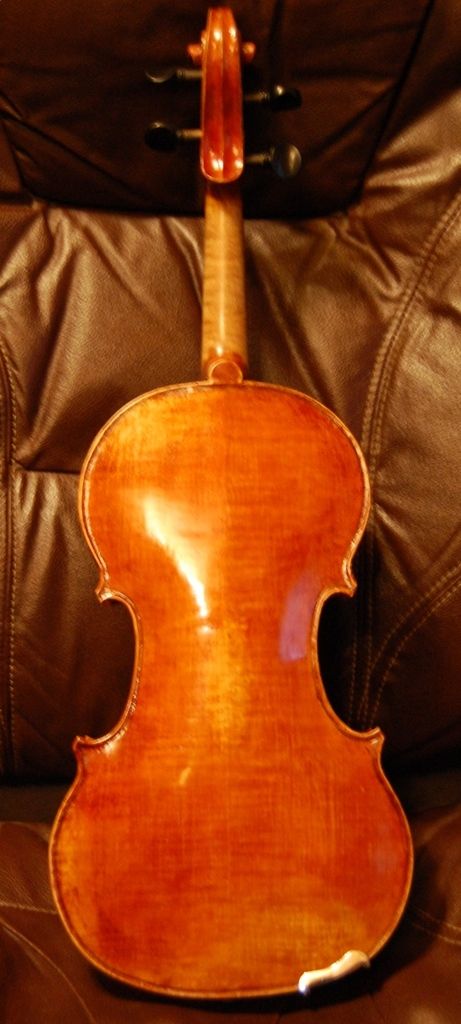
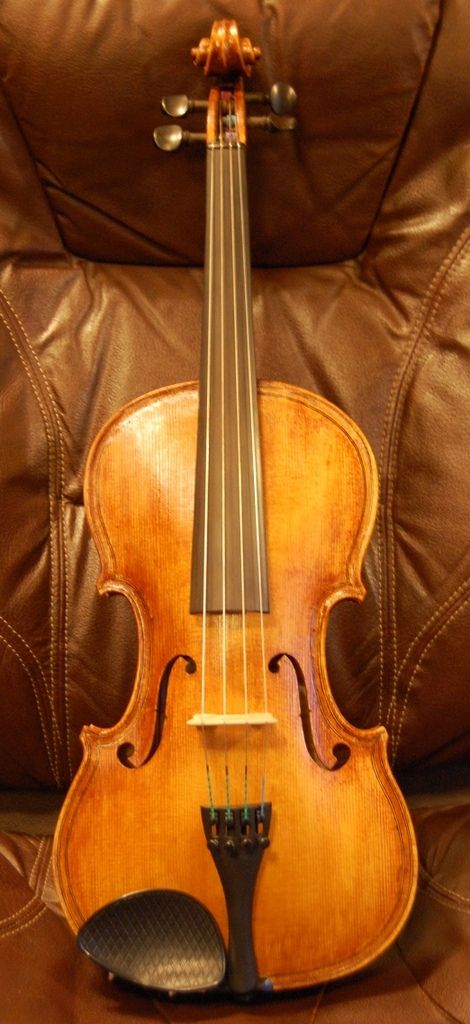
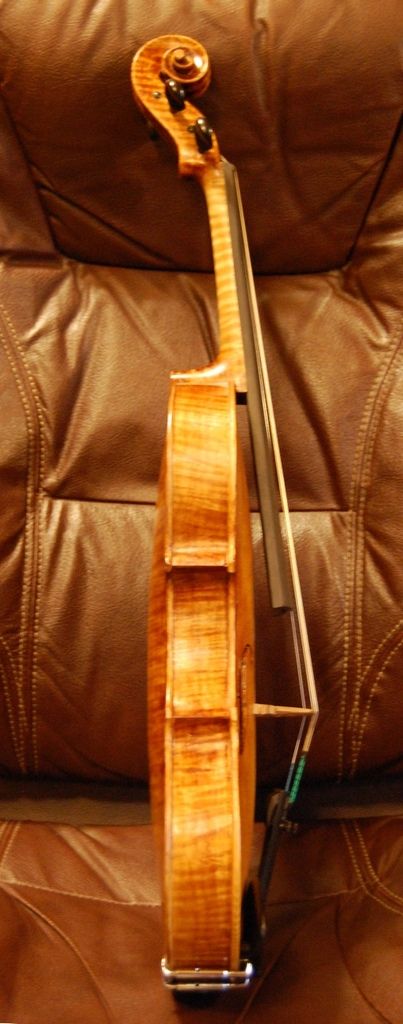
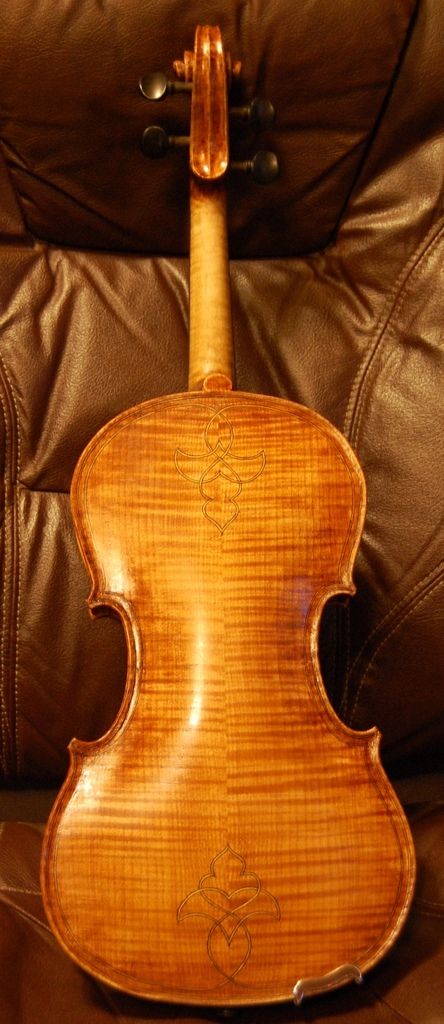
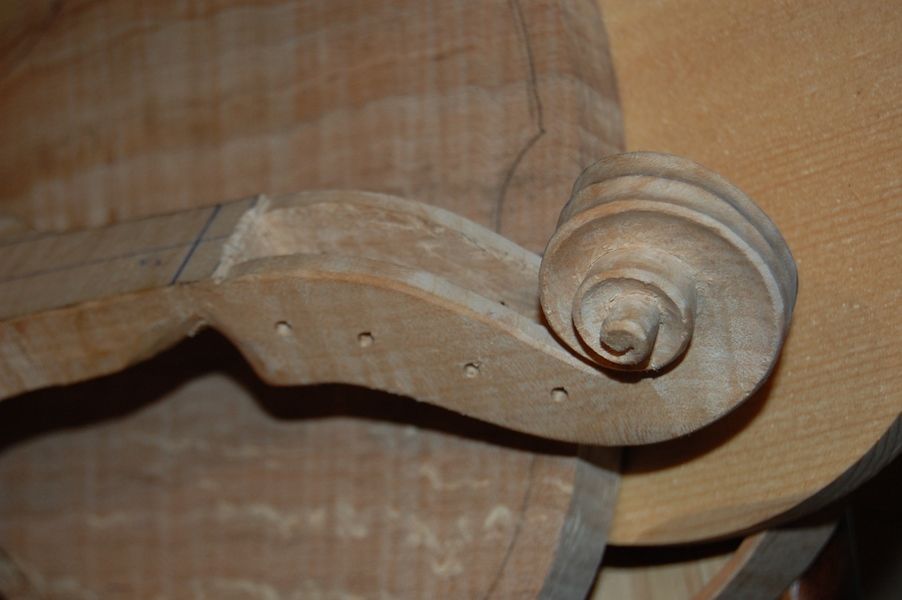
Another Violin

The last violin I made received good reviews, but I can see things I could improve, so…I will probably make another one soon. (This lutherie stuff is addictive!)

Coming Soon

I hope to begin at least two of the projects soon, and begin posting photographs.


Thanks for looking.

If you found this post helpful, please share with your friends!

Two Violas from Obscurity

Please share with your friends!

Violas in Obscurity

Unsung Heroes

These two violas never had their photos shown, though both have been played by professionals; sometimes in public recitals. I was just starting to put together a website at the time, and had no clue about a weblog, as that was not much of a “thing” back then. When I built this site, I came to realize that it was in fact, a weblog, and that I should be entering posts on a semi-regular basis. So I began to do so.

But, the other day, when I was trying to update the “Chronology” page, I realized that one instrument was completely missing (The Forgotten Violin), while a few others had very poor pictures, or none at all.

So: this post will be an effort to remedy that condition.

My First Really Small Viola (14″):

My #5 instrument was actually intended to be a violin, modelled after the 1728 “Milanollo” Stradivari violin. But I was pretty ignorant about arching, and did not follow the arching of the original instrument at all, but bulged it outward, allowing the arching to rise almost directly from the purfling, with very limited “recurve.” I thought I was increasing inside air volume and thereby increasing the size of the resonating cavity, and (hopefully) increasing the sound output of the violin. In fact the results were very perplexing: every person who played it, and who knew anything about how violins were supposed to sound, got an odd look on his or her face, and said, “This sounds like a viola!” I was too ignorant to understand what they meant, so I was puzzled and frustrated, thinking, “It is the size of a violin, the shape of a violin, and it is strung with violin strings…and tuned to violin frequencies! How can it sound like a viola??” But they were right: there is a difference in the sound, just as there is a difference between most men’s voices, and most women’s voices. Much later, I learned more about the physical differences between violins and violas, and even learned to hear some of the difference in timbre. I realized that I had simply, inadvertently built a 14″ viola. So, despite the label inside that proudly says it is a violin, it really is a viola…and sounds like one. So I re-strung it with viola strings, and it turned out to be an astonishingly good viola for its size.

It still has a lot of “marks of the beginner”, in terms of workmanship, but it plays quite well, and, the reason it looks like the work of a beginner is simply… that it is.


My first very small viola (14
My first very small viola (14″)


14
14″ Viola side view


14
14″ Viola Back

I made the little Viola from “European Maple and Spruce” that I bought on the internet, so I have no idea of the Country of Origin, nor even a way to find out, since back then I was buying on eBay, not from a reputable source (ignorance again…). The few professionals who have played this instruments were really surprised at its open, easy responsiveness and power.


A 14-7/8″ Viola–The “Brian”

This is my third small Viola, and the second from this mold. It is the same mold as the first instrument I ever made, a viola for my son, Brian, hence the name of the mold. All the violins off this mold bear the label of “Brian”. When I began this viola, I was helping a young man by coaching him through his first instrument, a 15-1/2″ viola modelled after the 1580 Gasparo da Salo  “Kievman” viola. It had a charming purfling weave on the back plate, and double purfling, which I liked, so I decided to incorporate those two features into my viola that I was building while he worked on his own. (As it turned out, he took an exceedingly long time to complete his instrument, while I pressed on and completed mine the next summer. His turned out very nicely, by the way.)

The viola took a little while to “wake up”, so to speak: The lower frequency notes were a little flabby, at first, but with continued playing, and soundpost adjustments, it opened up very well, and is a easy-to-play, good-sounding viola today.

So, here is the Brian viola:

14-7/8
14-7/8″ Brian Viola


14-7/8
14-7/8″ Brian Viola Side


14-7/8
14-7/8″ Brian Viola Back


The wood for this instrument is Big Leaf Maple and Englemann Spruce, both from John Tepper, at Tepper Tonewoods.

I updated the “Chronology” page, and added the photos that were missing, there, as well as here.

Thanks for looking.

If you found this post helpful, please share with your friends!

More Fiddle Progress

Please share with your friends!

Progress on the Small (14-inch) Viola and the “Plowden” Guarneri model violin

Here are some photos of what is happening with these two fiddles. I decided to add a third instrument to the bench, so to speak, a 3/4-size violin (separate notes on separate thread), so it is slowing me down just a little.

Progress Checklist

Both the viola and the violin are moving along:

  • Arching is complete on the front plates of both instruments.
  • F-holes are laid out on both instruments, cut out and complete on the violin.
  • The bass bar has been fitted, installed and trimmed in the viola.
  • Graduation is nearly complete on the viola, complete on the violin.
  • The scrolls are partially carved…still a fair way to go.
  • The back plates are arched, but there is still some work to be done on each before I would call them absolutely complete.
  • The top plate has been installed on the violin, and purfling installed.
  • The violin top plate and rib garland are nearly complete…the edgework is done, but some refining will still happen.
  • You can see that I trimmed a couple of millimeters off the corners of the violin front plate. I will do the same on the other three plates as well.

Here are some photos:

July 3rd status of Guarneri-model violin.
July 3rd status of Guarneri-model violin. (Wood for back, sides and neck is European Maple. Wood for top is European Spruce.)


July 3rd status Guarneri-model violin back
July 3rd status Guarneri-model one-piece violin back. Arching and graduation are nearly complete.


July 3rd status of Oliver 14
July 3rd status of Oliver 14″ Viola.


July 3rd status Oliver 14 inch Viola front plate
July 3rd status Oliver 14 inch Viola front plate. Arching and graduation essentially complete. F-holes laid out and deeply incised. (Wood is Sitka Spruce.)


July 3rd status Oliver 14 inch Viola back plate
July 3rd status Oliver 14 inch Viola back plate. Arching and graduation nearly complete. (Wood is spalted, highly figured Big Leaf Maple, harvested about five miles from my house.)


July 3rd status Oliver 14 inch Viola scroll and neck.
July 3rd status Oliver 14 inch Viola scroll and neck. (Wood is spalted Big leaf maple…from the same log as the back plate.)

Prognosis:

So…you can see that progress is happening. Not at a very exciting pace, but I hope the wait will be worthwhile.

My goal is to produce three very good instruments this summer/fall:

  • the 14-inch viola,
  • the Guarneri-model violin, and
  • the 3/4-size violin,

and then show them, along with a larger viola, to orchestra directors and teachers in the Greater Portland Area.

My rationale is that good small violas are hard to find, and so are good fractional sized instruments. If I can demonstrate to the teachers that I can produce very good instruments in smaller sizes, as well as the larger sizes, then perhaps they will recommend their students to me.

All I can do is try….

Thanks for looking.

If you found this post helpful, please share with your friends!

Current “State of the Fiddles” report.

Please share with your friends!

Slow Progress, But Moving Along!

Scroll-carving

I spent most of Saturday working on carving the viola scroll. I am not as fast as a lot of luthiers seem to be. It takes me more than eight hours to carve a scroll, and I can’t go at it for eight hours straight, anymore, anyway. So, between the heat and my other responsibilities, this is pretty much all I got done. It is still not complete, of course, but it is looking closer to complete, and it feels encouraging, to look at it.

This is a Big Leaf Maple scroll and back, on top of a Sitka Spruce top plate. It is interesting to carve domestic maple in close proximity to European maple. They are not the same at all. The big leaf maple is much softer, and feels almost fuzzy, under the scraper. Much lighter-weight, too, and has a different ring, when I tap it. European seemsto be  superior for violins, though domestic maples seem to work fime for larger instruments (or possibly it is the lower tones involved.) This instrument will be a good “experiment” in that regard. If  this instrument is very good, then the lower tone is the issue– if it is questionable, I may repeat the experiment immediately with European Maple and see if that corrects it. If it does, then the size of the instrument may be what is the problem.

But I suspect it will be a very good viola. I have made other very small (14-7/8″ on the body) violas using the same woods, before, and they were very good. This will be the smallest I have made, using domestic woods.

Partially completed scroll for the 14
Partially completed scroll for the 14″ viola


Planing and flattening the plates

Actually, come to think of it, I did do a little more– I went and used my son’s tools and planed the two violin plates to appropriate thicknesses to start working them.  I was shooting for about 17mm thick, to begin with, so that my finished arching will be close to that thickness, after everything else has been carved away. Then I laid-out the shapes of the plates by tracing them from the completed garland, and cut them out at home. So, here is what the whole pile looks like today. Last week, some of the plates were still square and flat, and very thick…this week they are all the correct thicknesses, and one scroll is nearing completion.

The lines on the right-hand maple plate (the viola back) are sketching in where the carving will happen on the inside of the plate: I will carve the outside first, to get the exact arching I have planned, then carve the inside to a similar shape, to get the exact thisknesses I hope to achieve (called “graduations” because the thickness is different in different areas, and changes gradually from area to area.) Both the arching and the graduations are critical to the final resulting sound. In my opinion,  the arching is probably more important, but I can’t prove it.

do know that when I accidentally arched some of my early violins the way (I later was taught) a viola is supposed to be arched, those violins sounded like violas, in spite of everything else about them being “violin.” It was very perplexing to me, at the time, as my ear was not well-enough trained to hear the difference, and all I knew is that it was a violin! And these crazy players kept telling me it sounded like a viola! They were right! The arching was the issue that decided the character of the sound. Good learning experience.

Current State of the Fiddles

The wood on the left is European maple and spruce I bought from International Violin Co., in Baltimore, MD. I have used their wood before, and it has worked well. Both have linings and blocks made of weeping willow.

As you can see, both instruments have one-piece backs, and two-piece, book-matched fronts (sometimes referred to as tops, or bellies). In both cases the ribs and necks/scrolls are of  wood matching the back plate.

I will keep you all posted.

Thanks for looking.

If you found this post helpful, please share with your friends!

Progress report on two new fiddles

Please share with your friends!

Progress Report on the 14″ Oliver Viola, and the Violin Modeled after the 1735 “Plowden” Guarneri.

“Life is what actually happens while you are making other plans.”

Well…company came and went, and the week didn’t happen exactly as I wanted it to; There were other things to do, and people to spend time with. My only daughter was here all week, which was nice– she flew in from Switzerland, with about a week’s notice. We went to the beach, Monday, and spent the day infiltrating all the art and clothing stores in Cannon Beach, then had fish and chips and headed home. 🙂

My younger brother dropped in for a surprise visit today, with my young neice. That was a nice visit. While they were here, a neighbor couple showed up, too. We ate and visited, and had a nice evening. Afterward, I helped Ann trim a hedge and haul the branches to the burning pile. All good things.

So! Progress report:

I am trying to keep the two instruments on parallel tracks for completion…hoping to keep them no more than a few hours apart in terms of progress.

Progress in building 14” Guarneri-model Viola and Violin:

(Hand-carved instruments begun on May 25th, 2016)

  1.  Cut and install the blocks. (May 25th)
  2. Prepare the ribs, by sanding (using a plywood jig I made to use with my spindle sander). (May 25th )
  3. Bend the ribs, using the bending iron, and install them on the blocks (several steps). (May 26th, 27th)
  4. Prepare, install and shape the front linings. (May 27th, 28th)
  5. Use the sanding board to flatten front of garland. (May 30th)
  6. Prepare the plate stock (book-match and flatten inner side) (Front only—one-piece backs on both fiddles.) (May 30th)
  7. Use the completed garland to establish the shape of the plates. (May 30th)
  8. Cut the front plate exactly to size, including filing and sanding. (Only got the viola cut out. I will cut out the violin tomorrow night if it isn’t too hot when I get home. )
  9. Lay out and cut out scroll and neck. (May 26th)

(Began carving both scrolls using gouges and small finger-planes—spent a good part of May 28th doing that, while waiting for bending irons to heat up, etc. More time as time and strength allow. That maple is tough stuff, and my hands tire quickly anymore.)

Here is the photo-evidence: Handmade in Oregon 🙂

two instruments in progress-viola and violin
May 30th Progress Report.


The instrument on the left is the 14″ viola, and is made of Oregon Big Leaf Maple, and Sitka Spruce. The one on the right is the violin, and is made of European Maple and Spruce. Both have blocks and linings of weeping willow.

I ran out of time and energy, so the cutting out of the violin plates will have to wait until later. Once they are cut out, I can begin arching the front plates, and get these things looking more like fiddles.

As you can see, I am trying corners that are a little longer, this time. I may end up shortening them after all, but I left extra in case I wanted them longer. Usually I make pretty short corners.

Vacation is Over– Back to Work!

That’s all I have to show, for today. I go back to work tomorrow. Classes are over for this term, but I still have to prepare certificates, and arrange make-up tests for those who need them.

(For those who don’t know, I teach Welding Supervision classes at Gunderson, Inc. where I have worked for the last nearly 30 years. I began there as a welder, but nowadays I mostly lecture. Print-reading classes, remedial Math classes, Welding Inspection classes, Safety, Metallurgy, etc. It is not as fun as making fiddles, but it is steady. :-))

Thanks for looking,

Chet

If you found this post helpful, please share with your friends!

New Instruments Beginning

Please share with your friends!

What’s New?

I had a fair amount of positive feedback on two particular instruments at the Maryhurst show: a “1735 Plowden” Guarneri model violin, and a 14″ Oliver viola that has pretty amazing sound. So I decided to see if I could repeat the successes, and am building a new one of each model.

1735 Plowden Guarneri model

This is a very powerful instrument, pretty classic Guarneri style and sound. I took my measurements from the Strad poster and technical drawings, and copied the archings from there, as well. The first one had a rich powerful tone from the day it was first strung up and playing. So, I hope the second try at the same instrument will be even better.

This one (like the first one, and, like the original) is European maple (one-piece back) and European spruce. I am using willow for blocks and linings. I am always impressed with the difference in how the European wood handles under the knife, gouge or plane. I have been told by all my mentors and teachers that, at least for violins, the European Maple is definitely superior in terms of tone. I am going to take their word for it…they are all very experienced makers who really ought to know. They did say, however, for violas, cellos, and basses, that domestic woods seem to work fine. Must have something to do with the higher-frequency sound or something like that. Although, that last five-string fiddle I made, of Myrtle and Port Orford Cedar, has very good high end tone, as well as good low notes…so I don’t know why one is better than another. The Myrtle is definitely harder, heavier wood…maybe that helped.

14-inch Oliver Viola

This will actually be off the same mold as the Guarneri violin (a duplicate of it), so it will have exactly the same “footprint”, but the arching and graduations, as well as the rib-height and other differences will definitely make it a viola, not a violin with viola strings. It is comparatively easy to make a large viola that sounds great, but much more difficult to make a very satifactory small viola. Fortunately, I fell into (quite by accident) an arching pattern that worked very well, and later had it confirmed by one of my teachers, so I had early (accidental) success with small violas, and have gotten better as I learned to understand what was happening with them.

I like the viola sound, and I am big enough to play my largest viola model (16-1/2 Guarneri model) comfortably, but I can see where a professional player could encounter some problems holding his/her arm out at that distance for hours of practice or orchestral performance. So, the small violas have a special attraction in terms of comfort…and if they can sound comparable to a larger instrument, so much the better. I also make a 14-7/8″ viola, but the 14″ viola is the smallest I have made.

This one is Big Leaf maple and Sitka spruce. Willow linings, same as the other new instrument.

Parallel Processes

I will be attempting to complete the two new instruments side by side, step by step, so that whatever stage I am at in one will be where I am on the other, as well (give or take an hour or two.) We’ll see how that plays out.

I’ll post pictures in a few days.

Thanks for reading.

Chet

If you found this post helpful, please share with your friends!

Building a Double Bass

Please share with your friends!

Beginning with the Design of a Double Bass

Baby Steps: Learning to Walk

I knew a few things from having built a previous bass, but I still lacked confidence. So when the International Society of Bassists had their recent convention/competition in Fort Collins, I attended and took a few photos, and tried to observe as much as I could, so as to absorb information I badly needed.

Matthew Tucker was there, which was another reason I wanted to attend. He and I built our first basses simultaneously, but he went on to excel at making basses, while I reverted to smaller instruments for the next ten years. I  kept telling myself I wanted to build another bass, and even bought wood and patterns, etc. but it is such a huge, daunting project that I never got started.

My first bass was a “gamba-cornered” bass, modeled after an instrument by William Tarr. Ironically, when I went to Ft. Collins, that particular bass was there!  Mine was only loosely modeled after that instrument, not a true copy, but I had worked from a book by Peter Chandler, and there were photos in the book of that bass, and, sure enough, it was at that show. I didn’t particularly care for flatback basses (still don’t), so I had modified the plans and made my “Tarr” model a carved-back bass, otherwise very much like his great bass. It was only my sixth instrument, and there were lots of things I wished I had done differently, but it played very well, and was moved to Illinois with the family for whom it was made, so I never saw it again.

Tarr-model bass
That first bass. Notice I didn’t even know what the little white felt things were for… 🙂

That first bass was a nice start, but I was pretty much “flying by the seat of my pants”: I did what the book said, and called the author a few times, to get more specific instructions, but when it was done I was amazed that it actually worked well…there was virtually no planning; just muddling along and plugging away until it was done. It had an “E-flat” neck, but I didn’t even know what that meant, much less how to achieve a “D” neck, which evidently is more popular. But the youngster for whom it was built was thrilled with it, and I am told that he is still playing it today.

Choosing a Design

I had bought several plans for famous basses, and may still eventually copy one of them, but Matthew Tucker filled me in on how to design a neck to be a “D” neck, and the ten years of building smaller instruments (2 cellos, five 5-string fiddles and a host of violas and violins) gave me some practical insight as to proportion, aesthetics, and varnish. So, after seeing all the makers there at the ISB convention, and seeing the prize-winners, I decided to actually give it a go, and design my own bass, aiming for a soloist bass, as opposed to an orchestral bass.

The orchestral basses tend to be big all over, and harder to access for repertoire work, though they sound great. The one I am designing will be smaller in the upper bouts, to make it easier to play, but still pretty full in the lower bouts, and deep in the ribs, for big sound.  I wanted a more graceful scroll than the one on my first instrument, so I designed that as well, and followed Matthew’s instructions to get a “D” neck.

I spent many hours sketching, erasing, and sketching again, using 1/4″ graph paper, so that when I finally came up with something I liked, I could more easily transfer it to “engineers grid paper.” It took two 24″ x 36″ pages taped together to get one sheet big enough to work with. I transferred all my sketches to the big sheet, then used a small, needle-point awl to punch through the paper into the door-skin (1/8″ plywood) of which I would make the actual templates. Then I cut out the templates, filed and sanded them to the exact smooth shape I wanted, and coated the edges with wood-glue to add some stability. (The thin plywood is pretty fragile, but inexpensive, so I tend to use it.)

I made the F-holes a good deal larger than some instruments have, hoping for better mobility of the bridge area, as well as easy flow for air.  The f-hole template was cut from thin clear plastic, flexible so that it can be formed around the front plate to transfer the shape.  Also, this will be a “violin-cornered” bass, as opposed to “gamba-cornered”. It is more difficult to build, but I like the looks better. 🙂

I already have the maple for back, neck and sides, and I ordered European spruce for the belly and bass-bar. All I really accomplished today was the completion of the mold template, the neck and scroll template and the f-hole template:

New Templates with sketches
New Templates with sketches and tools

But– the game has begun! Now I can use the mold template as I build the actual mold, get blocks in the mold, and shape the blocks to receive the ribs. One step at a time! I will keep you posted.

Thanks for looking.

If you found this post helpful, please share with your friends!

New Commission! Five String Fiddle!

Please share with your friends!

Commission Resulting from the Show

One of the results of the Marylhurst Musical Instrument Makers’ show was that a fellow quietly approached me at my table, asking me about building him a five-string fiddle beginning in June (I don’t know why the delay…perhaps he is busy…).

Exotic woods

He had some exotic hardwood he had purchased 30-some years ago, and he asked whether I could build a five string fiddle from it. (Sure!) He asked about a deposit, and I told him that in general it is not needed; that I would rather just build the instrument, and see to it that he is really pleased with it before any money changes hands (see my “Commissions” page).

So…June 9th or soon thereafter, I will meet with him to discuss the particulars that he hopes for in his 5-string fiddle.

In this particular case, the exotic hardwood is one that is no longer legal to cut (or at least was protected for a long time), but he still has the receipt from having purchased it before the cutting-ban, so I am willing to work with it. There are some materials I would be afraid to use, simply because conservationists are essentially making it illegal to own such things, let alone use them in crafts.

Other Five-string Fiddles

I have two other five string fiddle projects in the works, both partly completed: one is a Maple/Spruce combination and the other a Myrtle/Port Orford Cedar combination. I hope to complete the Maple one before I begin the commissioned instrument. I will post pictures of it when it is complete.

Other Instruments

I recieved very good reviews on my newest violin, though it was less than 48 hours old. I know what the differences were in its construction, and can repeat them, so I have ordered more European wood specifically for classical violins, and will be turning out a pair, soon: one modeled after the “Plowden” (1735) Guarneri del Gesu, and the other modeled after the “Dolphin” (1715) Stradivarius. I expect them both to be top quality. 🙂

Cello

I also had reason to begin another “Davidov” model cello: this one will be Red Spruce top with Big-leaf Maple back, sides and neck. I have already begun it as well, but am not far along. I will post photos as it progresses.

So, that’s the news…details later!

Thanks for reading.

If you found this post helpful, please share with your friends!