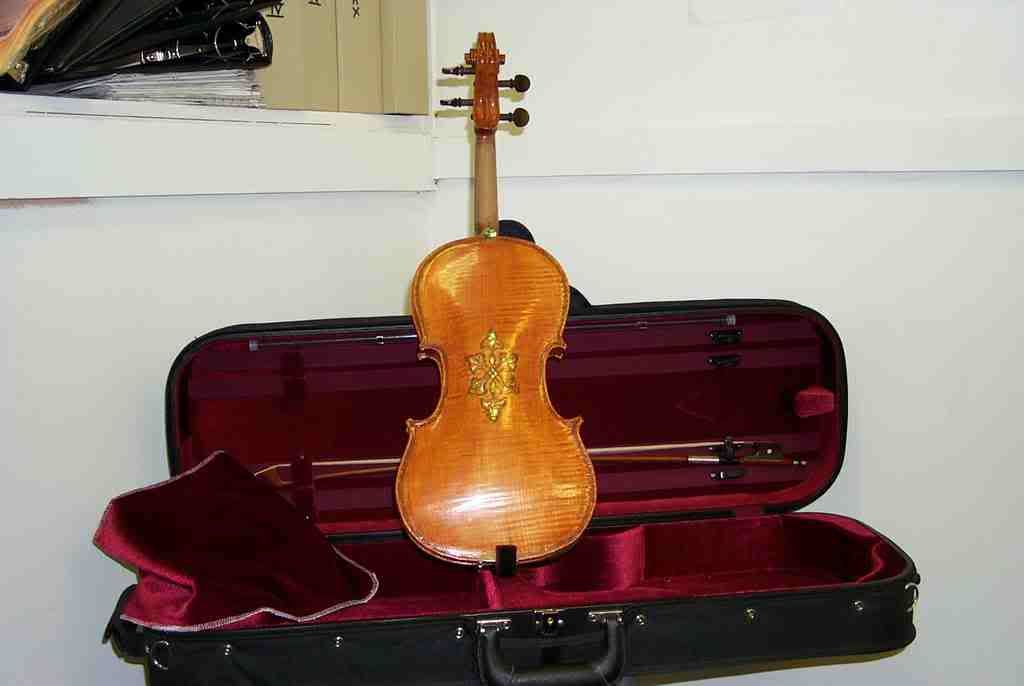
With Christmas around the corner, it suddenly occurred to me that, as the children were growing up, though I had frequently made things for each of them, I had made some fairly nice handmade gifts for my two sons (handmade hunting knives with hand-tooled scabbards for each, and a viola for one), but I had never made anything comparable for my daughter.
Time was running out, so, while she and my wife were out shopping, I hit it hard in my workspace, and made a bentwood box with a viola theme:
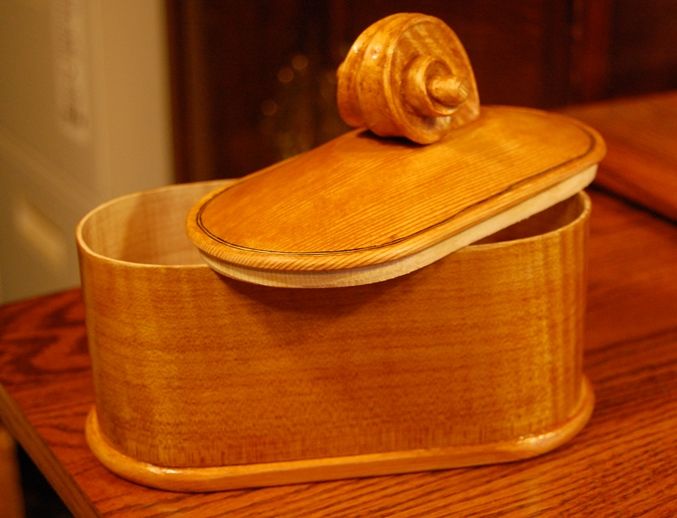
Viola-box, open, showing the bent, figured maple sides, and the violin purfling.
The scroll is one I had begun for a large viola, but it wasn’t working out right. The top and bottom are CVG Douglas Fir, left over from my closet-making project. Inner blocks are Englemann Spruce, left over from some instrument. Bent portion is probably Big Leaf maple, unused, and sitting in my shop waiting for a project. So is the scroll, for that matter.
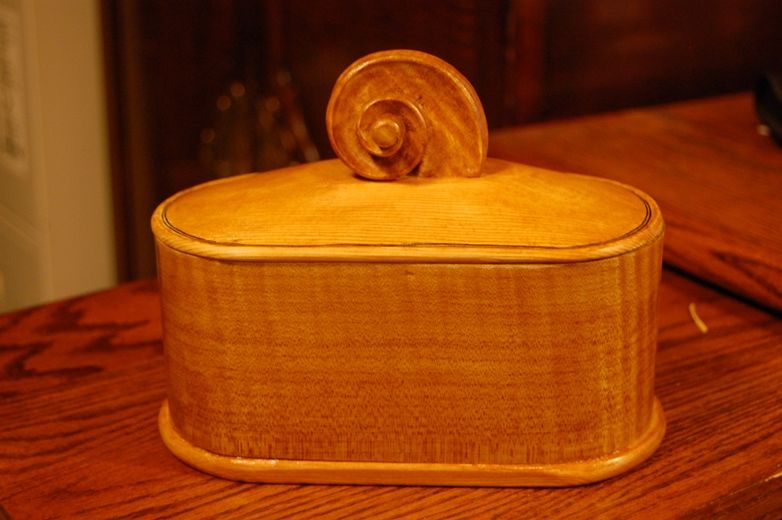
Viola Box, closed.
The stub of a scroll is inletted into the Doug Fir top, and secured with Titebond glue. No fasteners are used. The workmanship isn’t great, but I got it done in one long day…applied the last coat of varnish early the next morning, and it was dry and ready to wrap for Christmas.
Everyone was happy with it, including me.
I had a nice photo of her with the box, but she forbade me to post it. 🙁
Thanks for looking
If you found this post helpful, please share with your friends!
Life is what actually happens while you are planning something else.
I had intended to spend all day working on the commissioned five-string fiddle, today, and had taken the day off from work in order to do just that. Ann and I got up at 3:45 AM, she left for work about 5:45, probably, and I had intended to begin work immediately, but I really was not feeling well (possibly something I ate), and was very tired (short nights) so, about 6:45 AM I decided to go back to bed for a few hours. (Good choice!)
I locked the front door, and toddled off to sleep. At about 9:45 I woke up, and thought I could hear someone moving around in the house. I knew I had locked the door, so I thought this was most peculiar, but… my mother-in-law has a key, and sometimes comes during the day to drop off something for Ann or to complete some other errand. So I got up to see what was going on.
My son Brian also has a key, so I was not too surprised when I went to the front of the house, to find out that Brian was out by the sawmill. It turned out he had been there since 7 AM, so it is nice that the saw engine is so quiet. I hadn’t heard it at all, though it was less than 100 feet from where I was sleeping.
Sawmill Practice
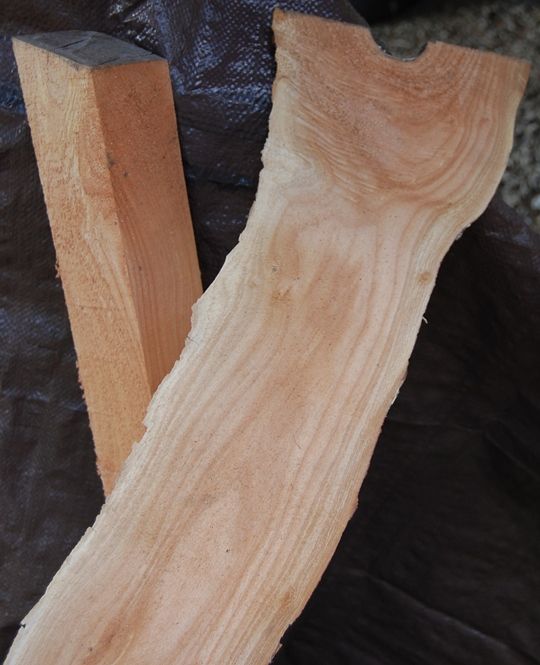
Four years ago, a neighbor had given Brian two small logs of black walnut. At the time he had no way to process them, so they had sat on the ground on a compost heap for all that time, fully exposed to the weather…hot, dry, cold, wet, freezing, and back again. But now that we have a sawmill, Brian had decided to get a little more practice with the saw, by slicing up those walnut logs. He did not anticipate that very much of the wood would be salvageable.
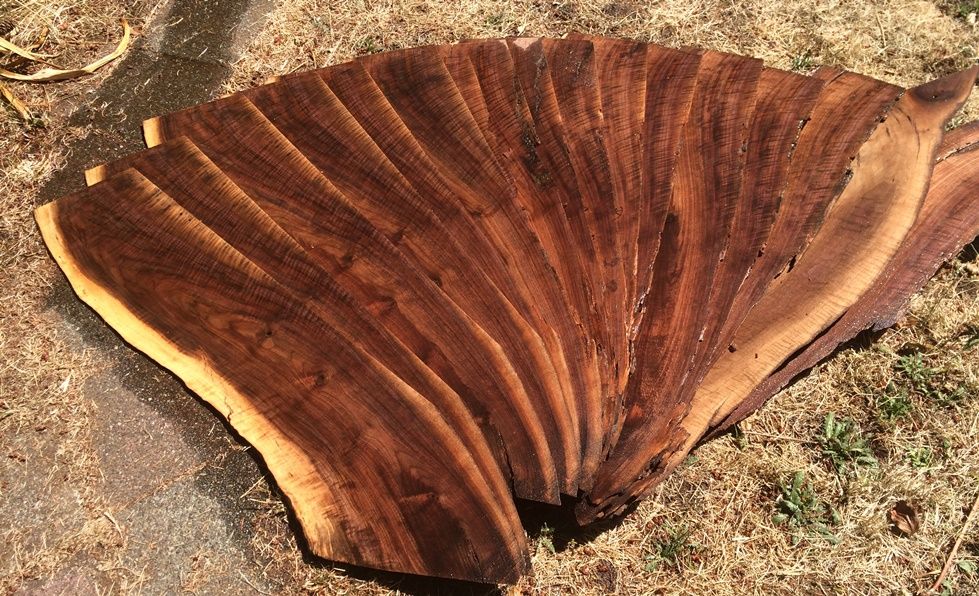
But, even with the crooked shapes (they were limbs that had fallen in a storm), and the cracked ends (the ends had never been sealed against checking) and the rot and ant-damage from neglect on the ground, Brian got between 25 and 30 guitar sets out of those two little logs. They are exceptionally beautiful sets, too, as, when he started slicing, he found out that the walnut was highly figured, not just “plain” black walnut.
Part of the pile of backs and sides cut from a single small log. all bookmatched sets, some good for two sets per pair.
Learning Curve
It took longer than it should have…. We are still learning to use the saw. It took us well over an hour to change the blade, because there were adjustments to be made that were not mentioned in the (extremely limited) manual. Maybe two hours of cutting time, an hour of “head-scratching” time learning the idiosyncracies of the tool, and an hour changing the blade. We stopped and ate, talked, took pictures, and had a good day together. Not what I had planned, but highly rewarding.
Black Walnut Ripple
Yeah, I know, it sounds like ice cream…but have look at this:
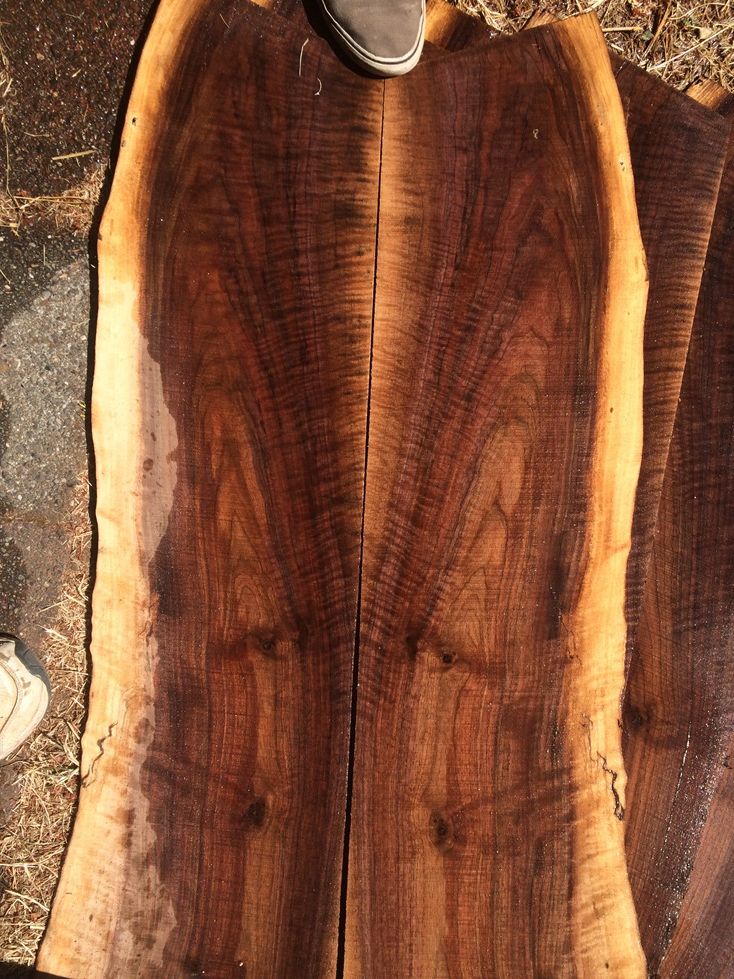
Bookmatched Black Walnut guitar back with water added to show the figure in the wood.
This pair of bookmatched back pieces will make two guitar backs. One exceptional, one just very nice. Some of the sets are not big enough for two guitars but will make one guitar and one or two ukulele sets.
But, Does it Pay?
Some time ago, someone questioned Brian’s wisdom in making all his own bindings, saying “But it is so cheap to buy them! Wouldn’t you be better off to spend your time doing something else?” At the time, the issue was the relative value of his making his own high-quality curly maple bindings for guitars, as opposed to buying them ready made. He figured out that, once the bandsaw and sanding jigs were in place that he could make 100 sticks of bindings in book-matched pairs in a very short time, sand all of them and have them set aside in matched sets of four (the number it takes for one guitar). He figured out that he spent less than three minutes per “stick” in that way, and, the people that sell them (thus saving you so much time) charge $5/stick. Four per guitar…$20 for the maple binding on a single guitar. But if he makes them himself, he spent 10-12 minutes. So, if he saved $20 in 12 minutes of work, then he was “saving” $100/hour. (That is pretty respectable, I’d say.)
And: fairly ordinary black walnut guitar sets (at a well-known supplier) sell for $150 (matched back and sides), so in the two or three hours he spent cutting up two small logs that were given to him, he produced enough guitar sets (extremely high-quality sets; not at all plain) to more than cover the purchase cost of the sawmill. (Yep. It pays.) There is hard work involved, but it is good work, and a good feeling of productivity, while salvaging wood that would otherwise have become firewood.
And… we still have not started milling up the ton (or more) of curly maple for which we had originally bought the sawmill. This was not how I expected to spend the day, but it was pretty encouraging to see Brian driving home with all those guitar sets.
When he makes a guitar of some of that wood, I will post a follow-up photo or two.
Thanks for looking.
If you found this post helpful, please share with your friends!
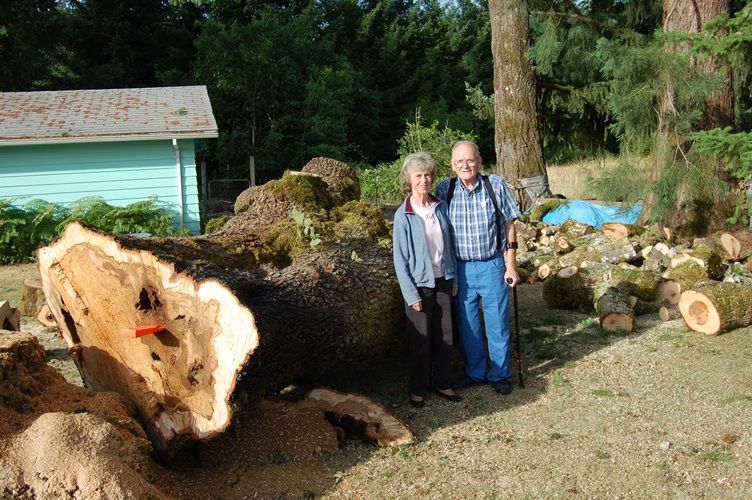
Brian was given a large maple tree, partly cut up, which has a great deal of curly, highly figured wood in it. Ann’s parents had paid to have the tree removed, because it was rotten in the center and beginning to be dangerous. But there was a lot of very good wood, too, especially in some of the larger branches.
The maple tree that ispired the purchase of the saw. For size comparison, that is Grandma and Grandpa with the main trunk.
We did not have a way to mill it, and people who do that sort of thing usually charge a good deal for their services. We had read a number of positive reviews online regarding the Harbor Freight sawmill, so we decided to buy the saw, mill up the wood, and, if we really didn’t need it any longer, then we could sell the saw after we were done. (Rigghht, like that’s gonna happen!) Also, we had to hire a young neighbor who logs for a living to bring his big chainsaw and slice that big log into pieces we could more easily move around. (Still very heavy.)
Purchasing the Saw
All of us did a lot of looking, online. There were many reviews of this particular saw, all stating that “for what it is (a home-owner’s sawmill, not a commercial machine)” it is a great buy. Everyone complained about the assembly manual (it is problematic, yes, but we got it done), and everyone said there were things they would want to improve, or modify (that’s fine, too.) But all concluded that the saw worked amazingly well. And…it was affordable. So we bought it and waited for it to arrive.
Getting it Home
I decided that the best way to get the thing safely home was to meet the truck at the distribution center, so I drove Brian’s pickup to the Con-Way trucking “will-call” center, and they kindly loaded the seven-foot long, 746-lb. crate into the pickup, pallet and all. They gave me a length of bright yellow 1/2″dacron line with which to secure it, and I headed for home.
But, having gotten it home, I realized that unloading it was going to be an issue…no forklift on this end. So, I used an engine hoist to lift the back end of the crate high enough to get the pallet out and insert a sheet of plywood to protect the bed-liner, then three 4 x 4 posts to serve as an off-loading ramp. Then I lowered the crate, and began shifting it inch by inch, using the rope. I threw a bowline around the top rear bar of the ladder rack, then stuck the dacron line through the front bottom of the crate, used a “trucker’s hitch” to cinch the line as tightly as possible, and a few turns around the bar to hold it. Then I threw my whole weight (the “incredible bulk” at work) on the rope, transverse to the tension, deflecting the rope by maybe six inches and moving the crate an inch or so. Re-tightened the rope and repeated.
It took me 2 hours to get the crate off the truck, and on the ground, using this method, but I got it off safely, and without damage to the saw, so all was well. By the time Brian arrived, we were ready to uncrate the saw. We used the engine hoist again, to lift the saw mechanism out of the crate, and set it on blocks.
Uncrated saw, balanced on blocks. (That’s the crate, on the left.)
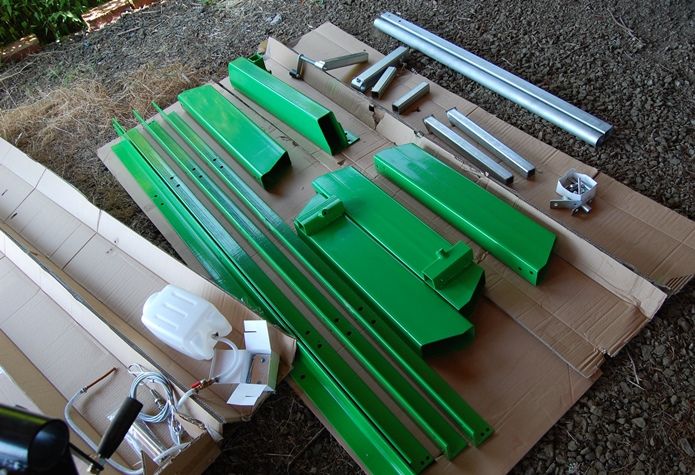
Then we had to sort through all the pieces, look at the manual, and figure out how to put it together. The manual was definitely not the worst I have seen, but could surely be better. All that said, we didn’t really have any complaints. Here are the parts: very heavy duty steel, and a nice finish. (Yes, I do like green!)
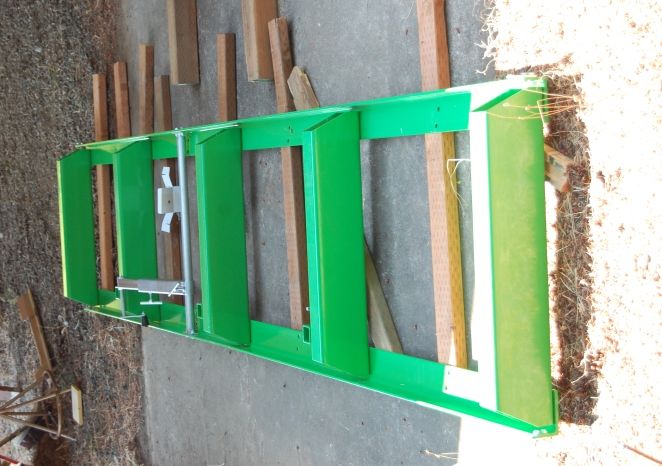
Sawmill track and miscellaneous parts.
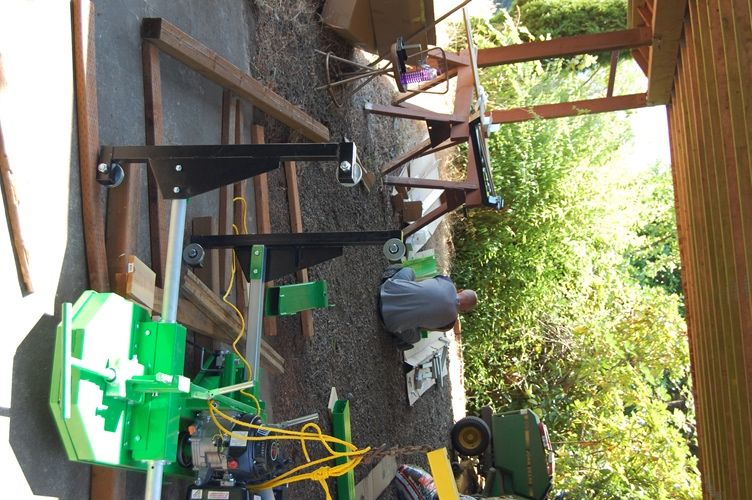
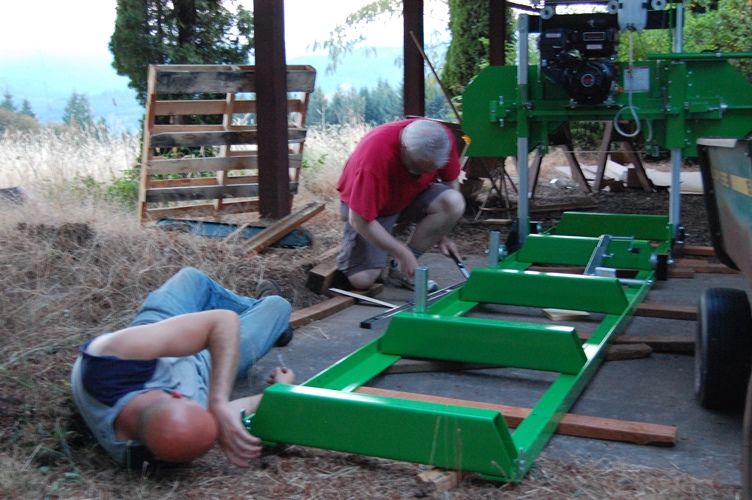
We began assembly, following the manual step-by-step. It was not too difficult to do, even though we had only hand-tools. (Some of the online reviews were done by people using pneumatic wrenches…that does speed things up a bit.)
Assembly in progress.
The track went together pretty smoothly, though we did find that it is a good idea to use a c-clamp to align the track ends, because the finish is so smooth that when we tried to tighten the last bolts, the track would shift slightly, so that the track ends were out of line. The clamp held securely until the bolts were tight, and no further movement was detected.
The nearly completed track: to those sharp-eyed observers among you, yes, I am aware that the log-clamp mechanism is backward– I realized it after the fact, and we had to take it apart and reverse it. (oh, well…)
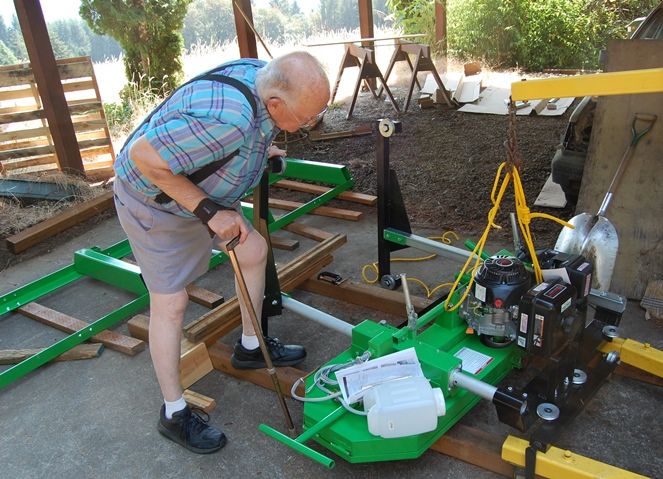
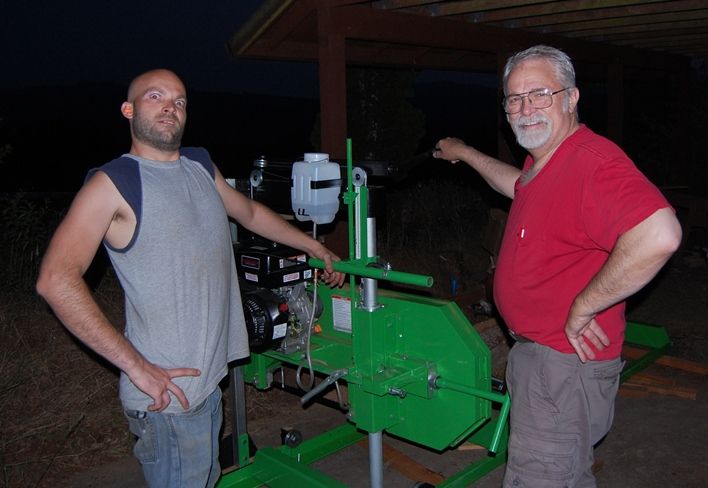
Grandma and Grandpa showed up to enjoy the process…we were all pretty enthusiastic.
Grandpa and the new saw.
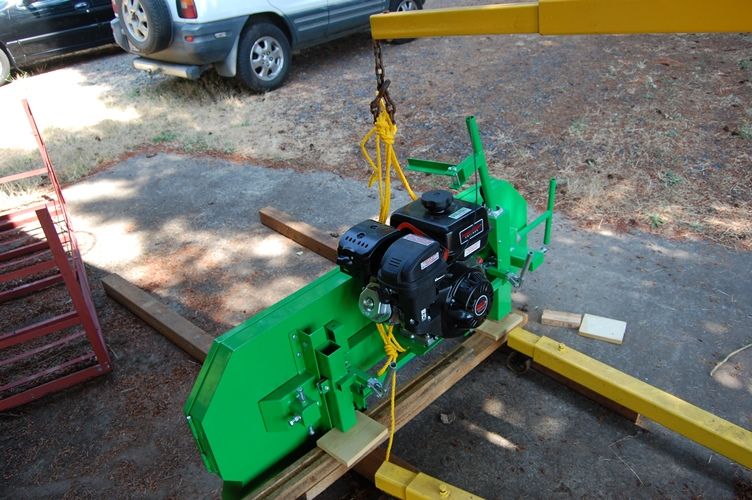
We lifted the saw mechanism onto the tracks, and were nearly ready to go.
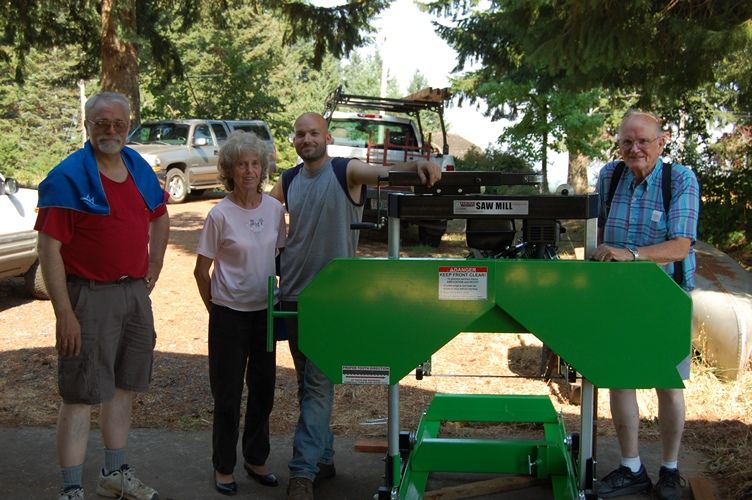
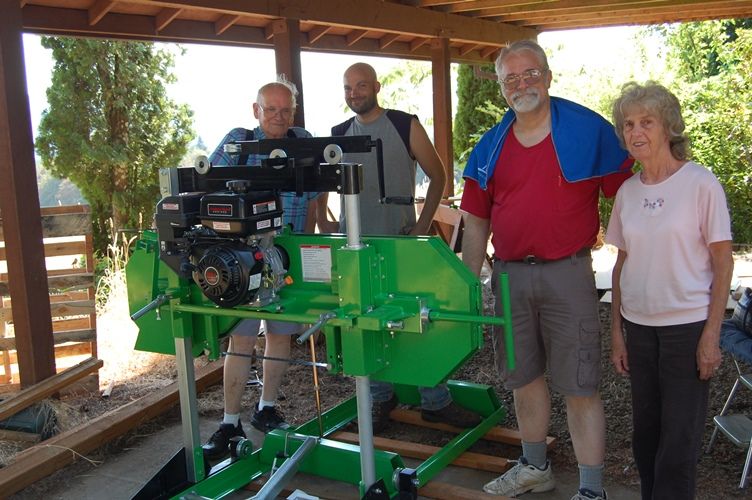
Whole crew (Ann was taking pictures).
Here’s a photo of the other side of the saw:
Other side of the saw.
Finally, we leveled the track, using “line-of-sight” and wooden shims.
Leveling the track: line-of-sight, pry bar, and wooden shims. Dead straight. (Notice the log-clamp thingy is pointing the right way, now…)
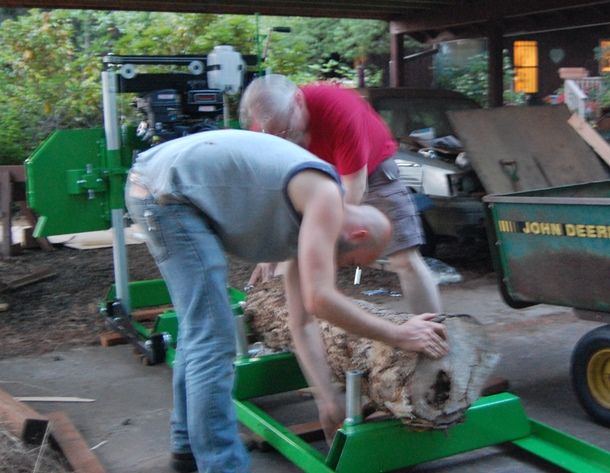
Then we decided to experiment with a very dry, old, willow log.
First log: old willow. This will be used for linings and blocks in my instruments. willow bends easily, cuts like butter, when shaping it, and still is strong and very light.
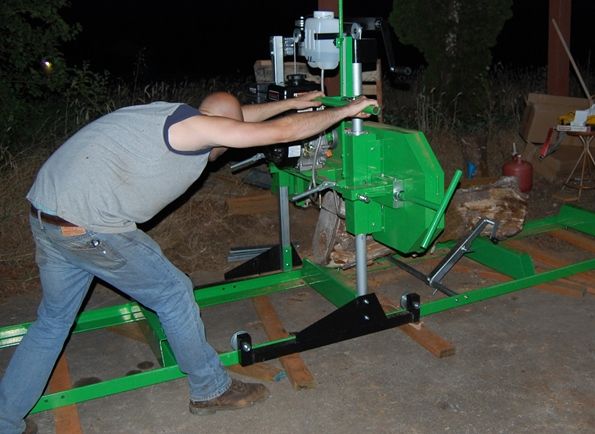
We filled the engine-sump with oil, the tank with fuel, and the blade-coolant jug with water, and started the engine (301 cc Predator–a four-stroke gasoline engine comparable to a 9hp Kohler, I am told). It started on the very first pull, and ran very smoothly… no problems at all. So we made a trim-cut to get the lumps off the log, and a few very thin (7mm) cuts to experiment. The saw cut with virtually no effort. In the photo it looks as though Brian was pushing hard, but in reality, he was bending down to see what was happening…it was getting pretty dark by that time.
Trim cut–getting dark.Several more cuts.
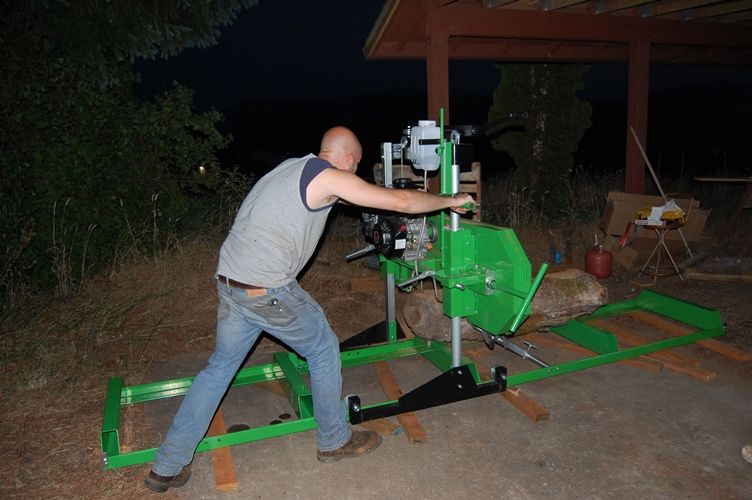
We decided to call it a day. Brian came back the next day and finished cutting the willow up into slabs that I will later shape into blocks and linings for cello, viola and violins. Here is some of the salvaged willow (the old log had a lot of ant-damage):
Salvaged Willow lumber from Ant-damaged Log
It was a good day, all in all. (Obviously Brian was still feeling like clowning. 🙂 I was pretty tired.)
End of the day–everything works fine!
Now we just need to get the maple chunks to the saw, and learn how to handle them safely (they are still quite heavy and unwieldy.) I’ll keep you posted.
Meanwhile, I need to get going on that five-string fiddle. It will take priority for the next month. Brian knows how to run the saw, so I will let him play with it, while I make a fiddle.
If you found this post helpful, please share with your friends!
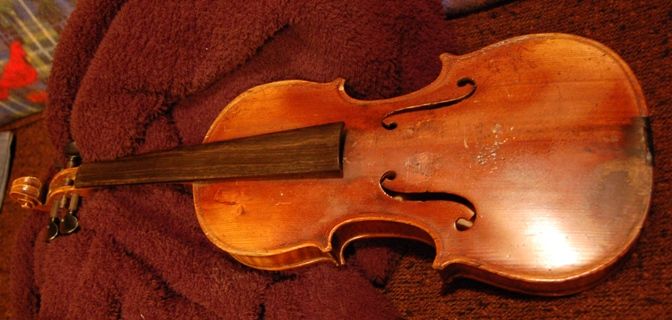
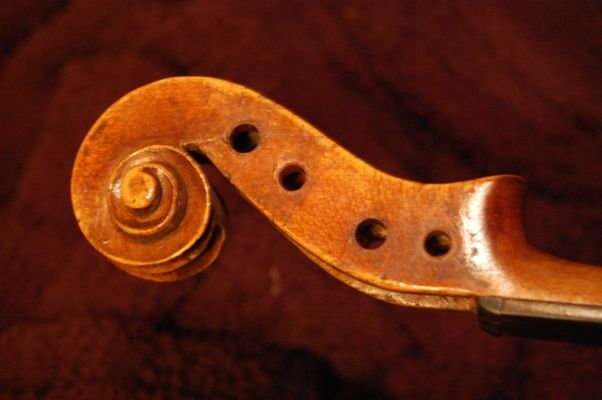
When my maternal Grandfather (Dr. L. E. Green, of Mississippi) was nearing death, he gave me his Grandfather’s (hence, my great-great-grandfather’s) fiddle. It was, coincidentally, the violin on which my mother had also learned to play. She had later been given a much better violin when she graduated from college, but this is the one her great-grandpa Gray played, and the one she learned on. I had been told about it, but had not seen it until it arrived at my house.
I knew nothing about violins, at the time, so I strung it up, and wondered why it sounded bad. I noticed there was a little piece of “dowel” rolling around in the case, and asked around…it turned out, of course, that the soundpost had been removed, and that was it. I took a stiff piece of fencing wire and sharpened it, bent it into an appropriate curve, and taught myself to set a soundpost. It still didn’t sound great, but it was great-great-Grandpa’s fiddle: thus, precious in its own right.
Grandpa Green had sent me the original bow (repaired by some well-meaning amateur– (bullet-casing reinforcement around the shank where the button screws in, because of a crack, etc.), but it had no hair, and was unusable at the moment, so he had bought an (extremely) cheap bow, and sent it along, as well. The case was just a typical, worn-out molded wood and fabric hard-case.
All we knew about the history of the fiddle was that great-great Grandpa Gray had bought it second-hand, in New Orleans, in 1900. I did enough snooping around to figure out that it had probably cost $2-3 or thereabouts, 5-10 years earlier, brand-new, being imported from Germany among hundreds of thousands of others, in the late 1800’s. The only things that made is “special” were the fact that it had been Grandpa Gray’s fiddle, and the fact that the back had an unusual inlay pattern involving a very fine “weave” of purfling with chips of abalone shell adorning the spaces between them. The gaps around the chips of shell were filled with a mastic evidently composed of hide-glue and ebony dust, or the like…possibly just charcoal dust and glue. It was somewhat crudely made, of mediocre to poor wood with a prominent knot in the soundboard (!) and a typical cheap 19th century German trade-fiddle finish. (see Photos)
Fiddle FrontFiddle BackScroll, showing repaired A-peg crack, and spiral-bushed peg-holes.
Waking Up to Sing Again
I played that fiddle off and on (mostly off) for a while, and the sound didn’t improve a lot, but it was acceptable, because…it was Grandpa’s fiddle. During that time, all three of my chidren were learning to play, as well.
About a year and a half later, I heard my daughter playing a tune in the kitchen. The music was the same as she always played on her own violin, but it sounded different–considerably better, actually. So I walked in to see what violin she was using. It was Grandpa’s fiddle!
I couldn’t understand why it suddenly sounded so good, so I took it from her and I tried it myself, thinking that it must simply be that she was a better player than I; but it sounded good for me, too. Evidently, part of the problem had been that the poor thing had sat neglected for 50 years, and had never been played at all during those years, so it took over a year of being under full string pressure, and sporadically played, for it to “wake up” and “remember that it was a violin.” It was quite an eye-opener. I had heard about the need for violins to be “played in”; probably had I played it more aggressively and much more frequently, the change would have come sooner. Good lesson there, somewhere.
A Little More History:
Years later, after I had begun building violins and other instruments, I took Grandpa Gray’s fiddle to Paul Schuback, a local expert (“local”, only in the sense that he lives and works near me– he is internationally reknowned as a violin expert), to see if he had any insight into the background of the instrument.
When I opened the case, Paul’s eyes lit up. He exclaimed, “I know exactly where that came from…I’ve been there, many times.” He went on to explain that the cow-herders near Mittenwald, Germany, had nothing much to do in winter (as the cattle were safe in their lowland pens and barns for the season) so they made violins as a “cottage industry”. He had been there, personally, in the 1960’s or 70s, when the modern heirs of the practice brought in a gunny-sack (literally) full of unvarnished violins they had built during the winter months and sold them to the lutherie school at Mittenwald. The students there would complete the instruments, varnish them, set them up, and ship them to the USA for sale. The cow-herd made a little money, the school made a little money, the importers and dealers in the US made a little money, and the buyer got a cheap fiddle. Everyone benefited.
I have seen many of these instruments, as they seem to be about as common as houseflies, but this is the only one I have personally seen that had this specific inlay pattern on the back. (I’ve seen similar ones on the internet.)
I have no doubt that, if I opened the corpus, I would find that the front plate was extremely rough on the inside (“rough”, as in, “looks like chainsaw sculpture”) and that the bass bar is carved as part of the plate, rather than glued in separately. (As I say, I have met with this sort many times, over the last decade.) But I have no call to remove the top plate; only to repair the cracked pegbox…which I did do, eventually, and spiral bushed the peg-holes, so that I could intall new, better-quality tuning pegs. Other than that, I intend no changes. It is what it is… Great-great Grandpa’s Fiddle…and I’m the “Keeper of the Fiddle” for this generation.
In Imitation of the Original
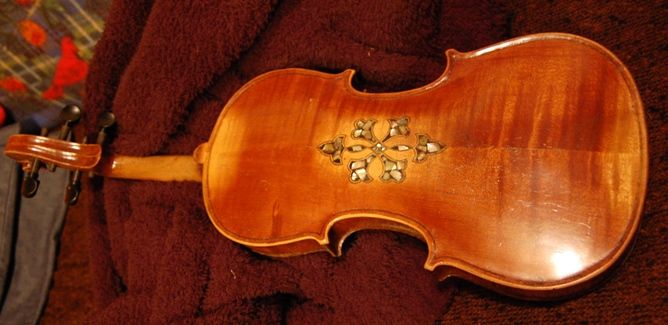
When I began building instruments, my first was a small viola, for my son, Brian. I knew that he especially liked Grandpa Gray’s fiddle, and I thought that the inlay was what he particularly liked. So I carefully copied the inlay pattern, and even took it a step further, cutting the abalone shell to fit the spaces, and filing them flush, rather than just jamming chips into glue, and filling the gaps with mastic. Added an abalone cap to the button, too. Lot’s of peculiarities, due to ignorance and inexperience. But it played well, and sounded pretty good…and it is a pretty thing, even with all the amateurish “oddness-es”.
First instrument, a small viola, with abalone inlay and purfling weave.Brian’s Viola Back Detail
After I was nearly done, Brian was lovingly handling Grandpa Gray’s old fiddle, turning it in his hands and admiring its simple, rustic beauty. He said, “You know what I really like about this violin?” I said, “What?” and confidently waited to hear that it was the inlay….
He turned the violin face up, and tapped with his finger: “This knot, in the front…”
Knot in the front of Grandpa’s Fiddle
(Sigh…) 🙂
If you found this post helpful, please share with your friends!
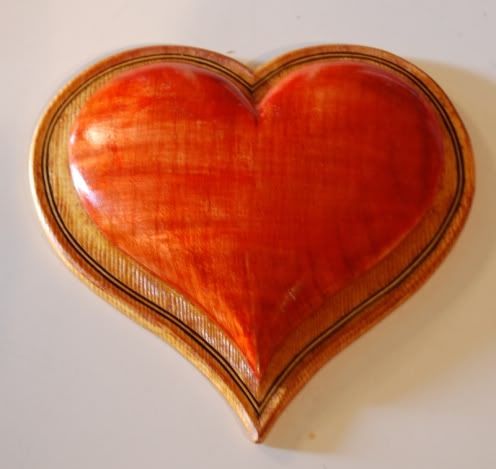
It has been way too many years since I gave my wife a Valentine’s Day gift, or even a card. (She always told me not to…should I have believed her, or was that some sort of “feminine wiles” at work?)
Emergency!
This year, at breakfast, she showed up with a lovely card she had bought for me. Made me choke up. So when she left for work (I had the day off) I went right out to the shed and rummaged around for materials to make a valentine for her.
The red heart is made from a scrap of curly bigleaf maple left over from the cello I made last summer. The backing is Englemann spruce I had sitting on a shelf. Didn’t get much else done that day…but when she got home, it was done. I hope it makes up for some of the wasted Valentine’s Days of years gone by. 🙂
Luthier’s Valentine, made for my wife, Ann, February 2012
I couldn’t ask for a finer wife. We’ve had over thirty-one years together. I’m sorry it took me so long to think of a proper Valentine’s Day gift.
For those interested, the entire finish is shellac, dyed different colors, except for a single coat of propolis on the spruce, after the first coat of shellac, to accentuate the grain. The purfling is cello purfling.
If you found this post helpful, please share with your friends!

 Follow