I decided that I would prefer to purfle first, then graduate, on this plate. Maple is much tougher than spruce, and I wanted maximum mobility as I cut the purfling slot, as well as avoiding any danger to the rest of the indtrument when forcing the purfling into the glue-filled slot. It can require a great deal of pressure.
I used the purfling marker to trace out the location of the purfling slot.
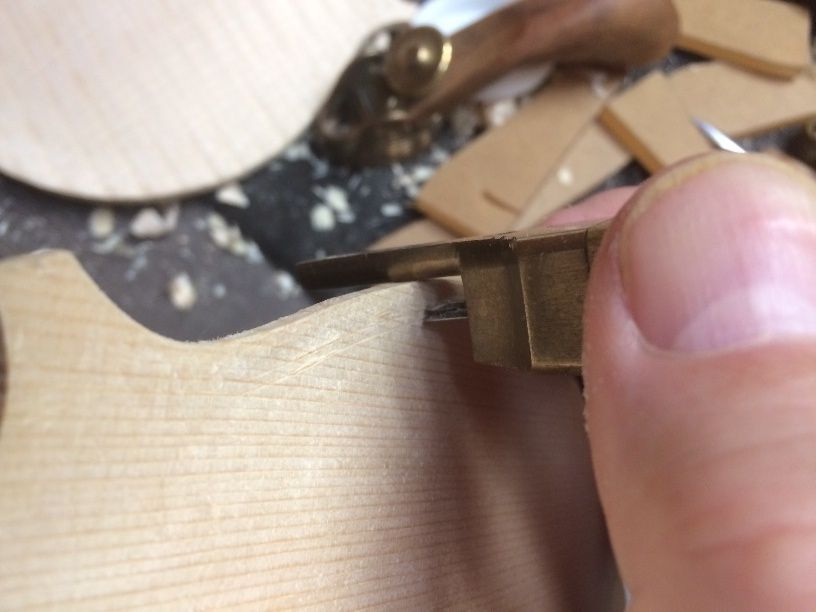
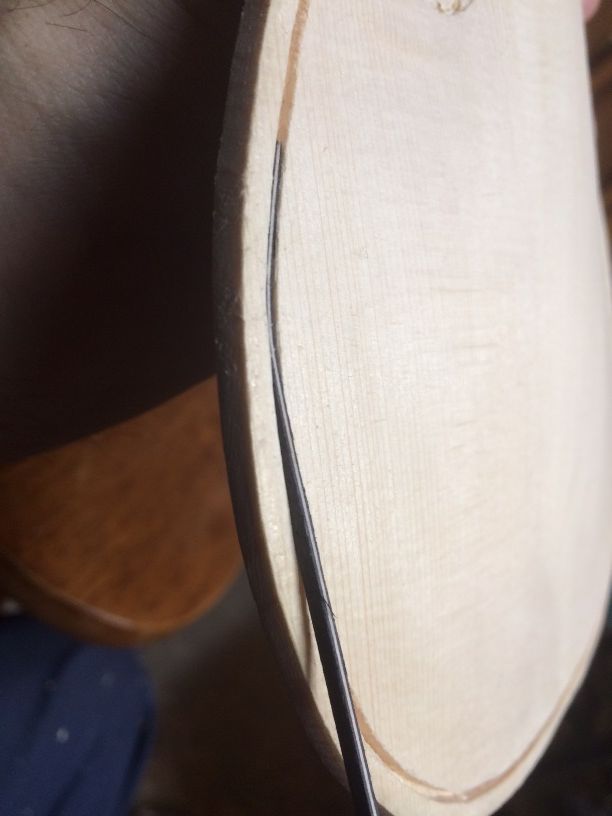
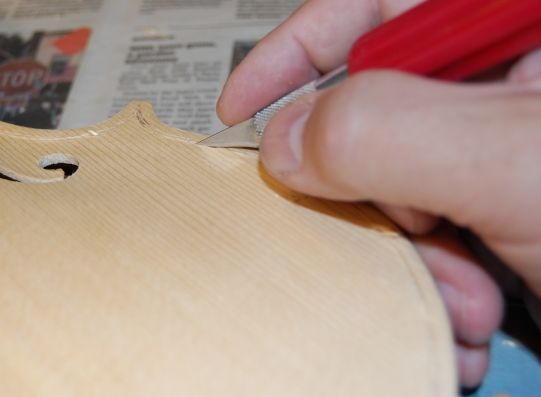
Then I began incising the sides of the slot, and removing the waste wood, with a purfling pick.
I always forget, between instruments, just how tough the European maple is. I always find that I have to take breaks once in a while, and allow my hands to rest.
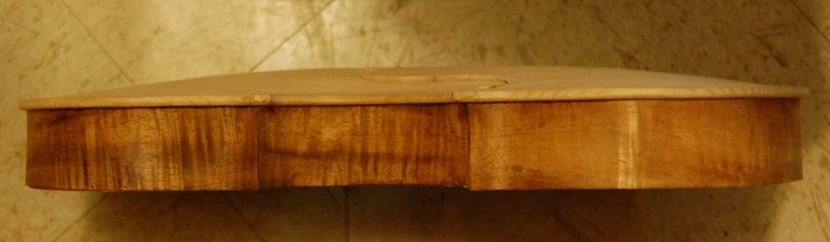
I always find the back purfling to be physically difficult, but it is easier to do clean work.
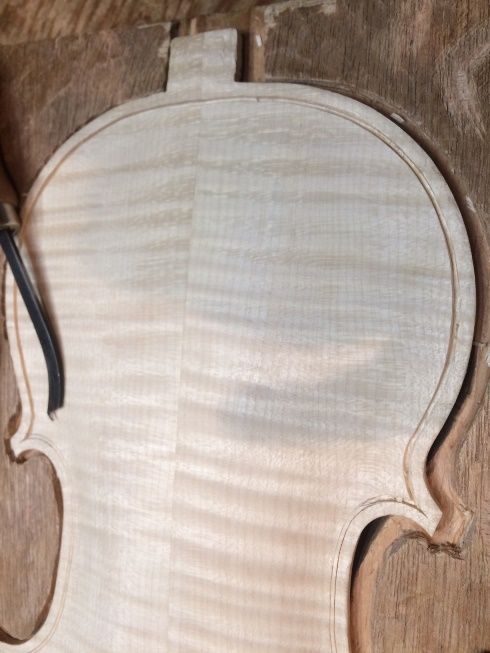
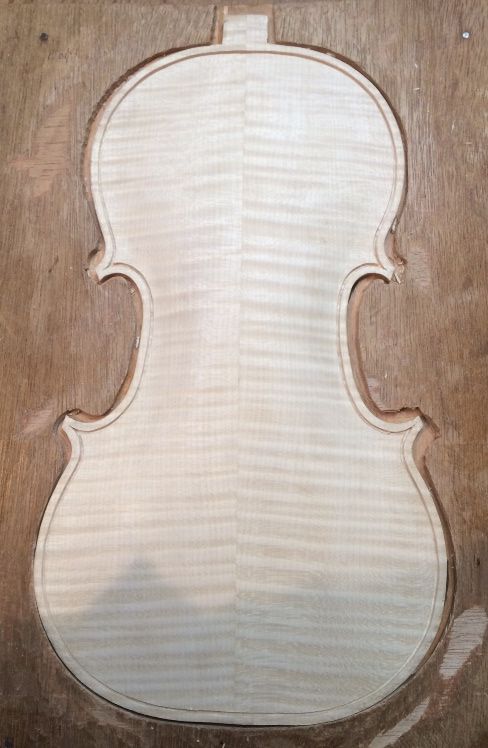
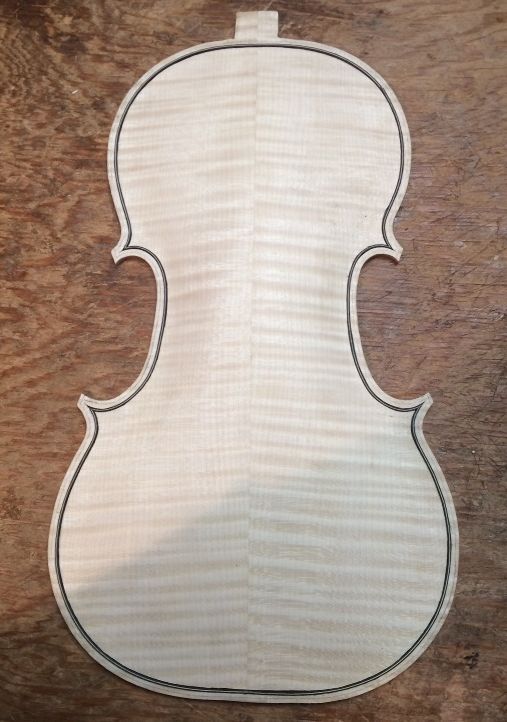
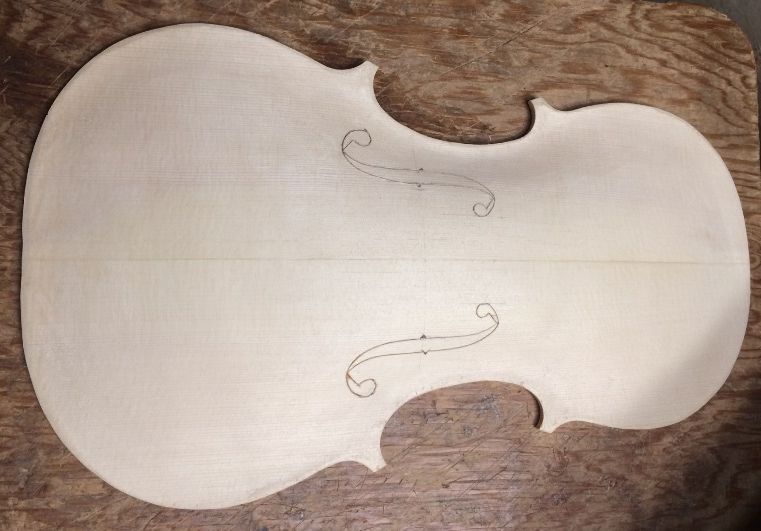
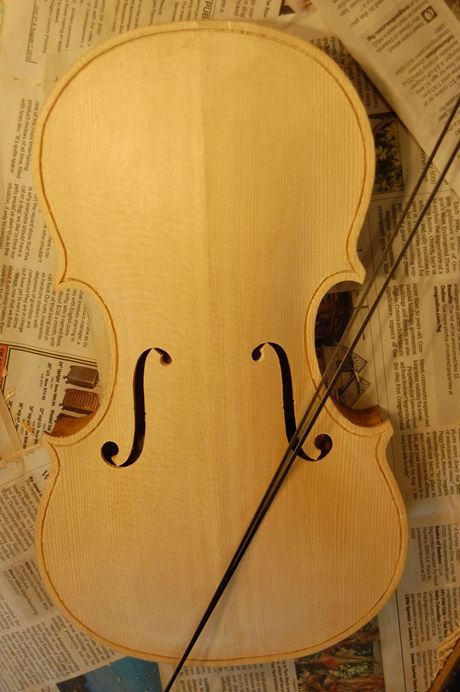
Back purfling slot complete.
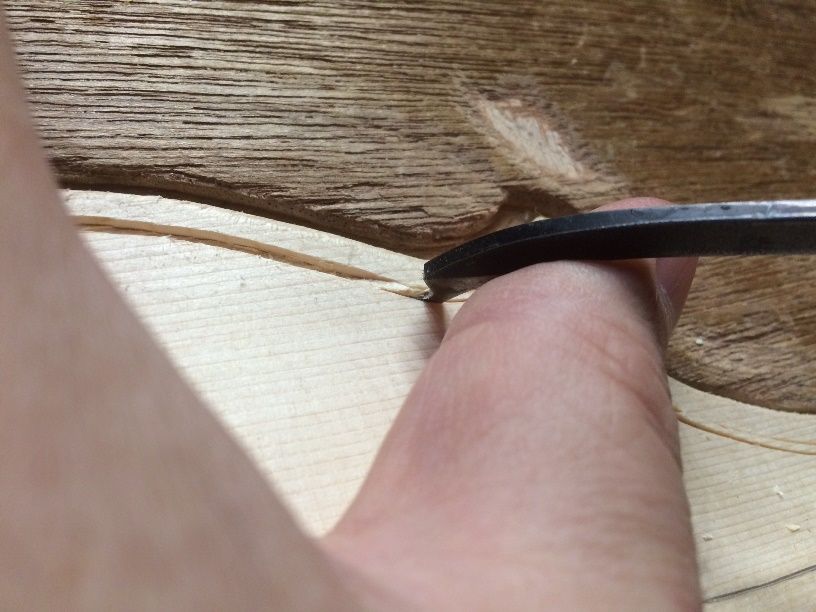
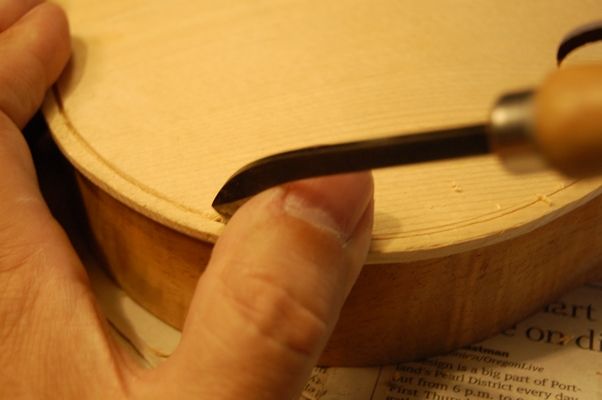
After cutting the slot and removing the waste wood, I double-check the width ans depth of the slot by inserting a scrap of purfling into the slot, and dragging it around the entire slot, so that I know the purfling will fit cleanly.
Then I use a bending iron to bend the purfling, I cut the miters for the “Bee-stings”, and I insert the purfling, dry, to get a perfect fit.
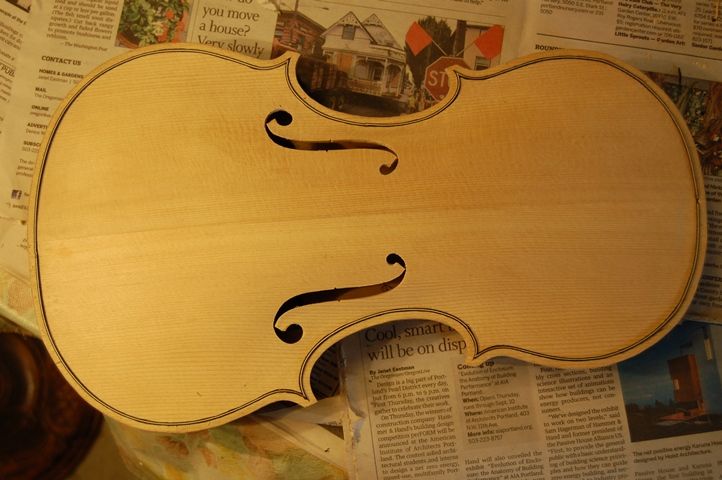
Purfling installed dry.
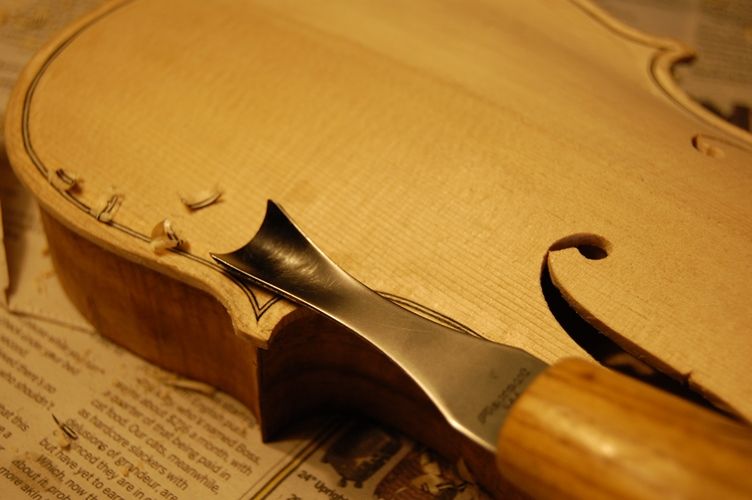
Before I start gluing, I also take time to mark the edge of what will be the “crest” of the edgework, so that I don’t gouge too deeply or too wide, when cutting the channel. After gluing, it is difficult to get the pencil to mark on the wood, if it is either damp or glue-coated.
If you look closely, you can see the pencilled-in crest marks.
Finally, I lift out each purfling segment, one at a time, and slip hot hide glue under the purfling, then quickly press the purfling back down into the slot. I use a hard plastic roller to help force the purfling deeply into the slot.
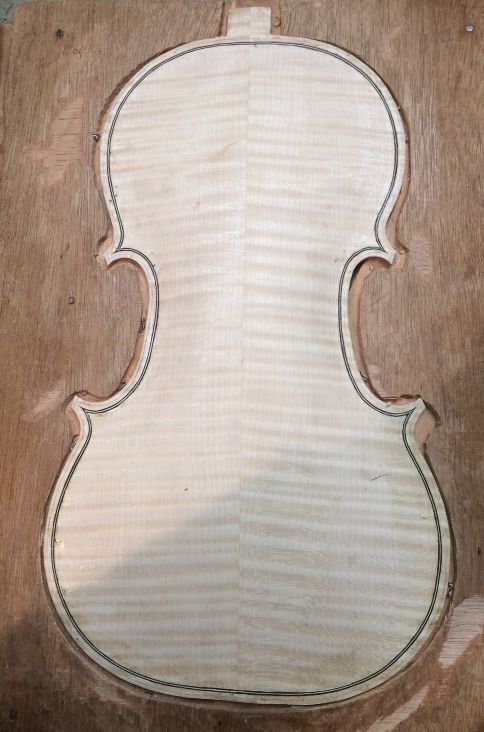
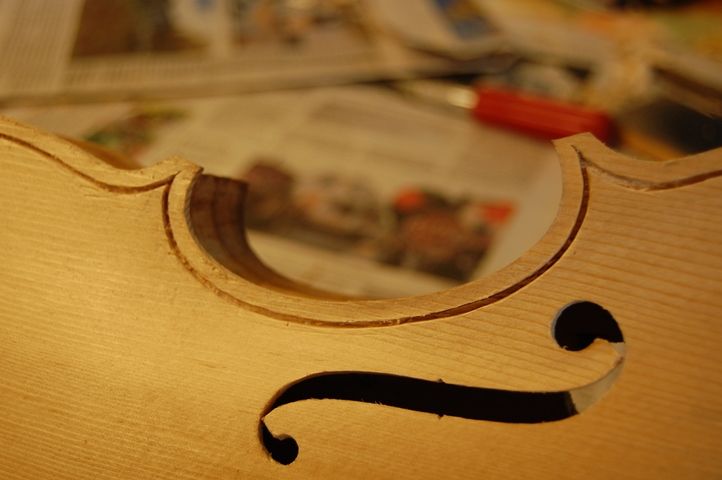
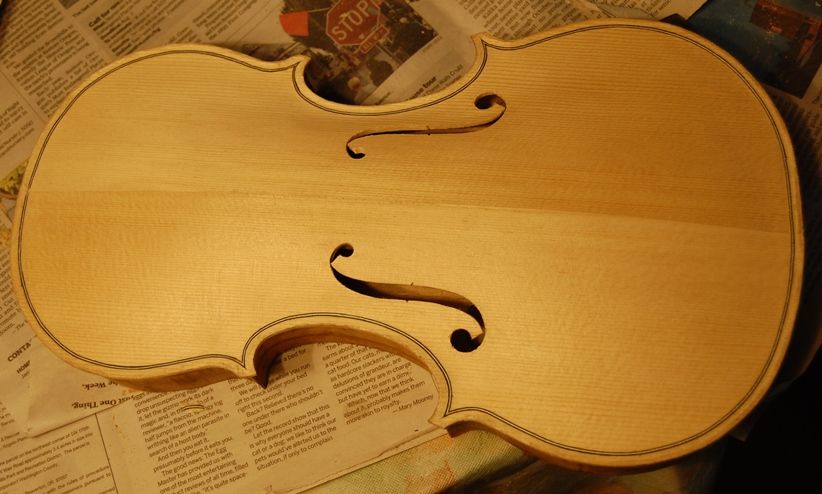
The purfling is glued in place, and I can cut the channel now.
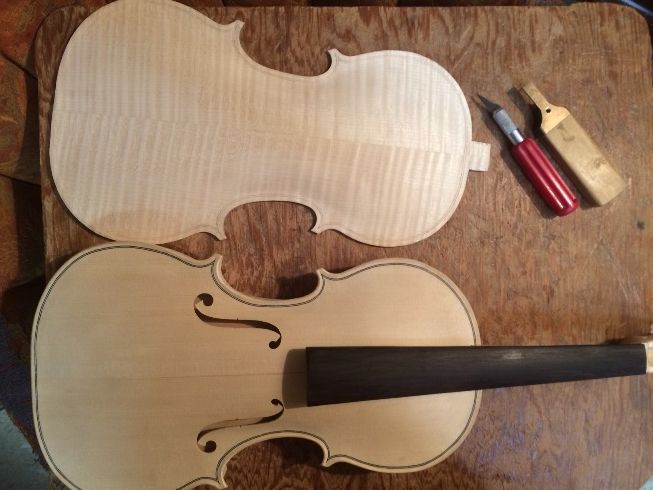
In this case, I chose to work on the graduation, next. I did not get it done, but I am within an hour of completion. Then I can conplete the plate, add the label, remove the mold, and close the corpus.
Graduation in progress.
I will also complete the channel and the inner edgework, before removing the mold and installing the plate. But it is getting there…
Vacation is a hard time to get things done, because the people take higher priority, and everything eats up the time. (Ah, well…always good to spend time with family.)
Thanks for looking.
If you found this post helpful, please share with your friends!
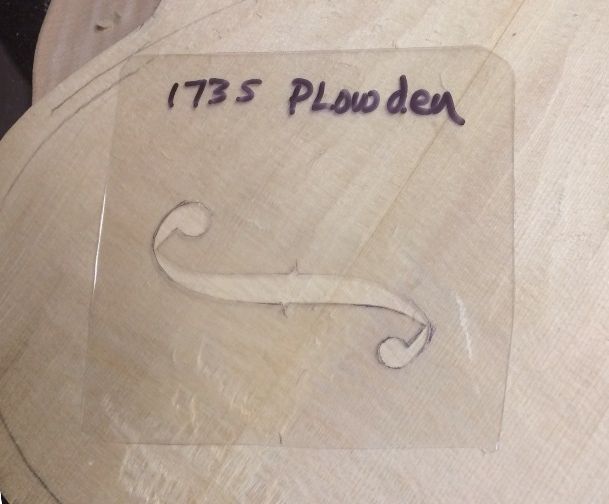
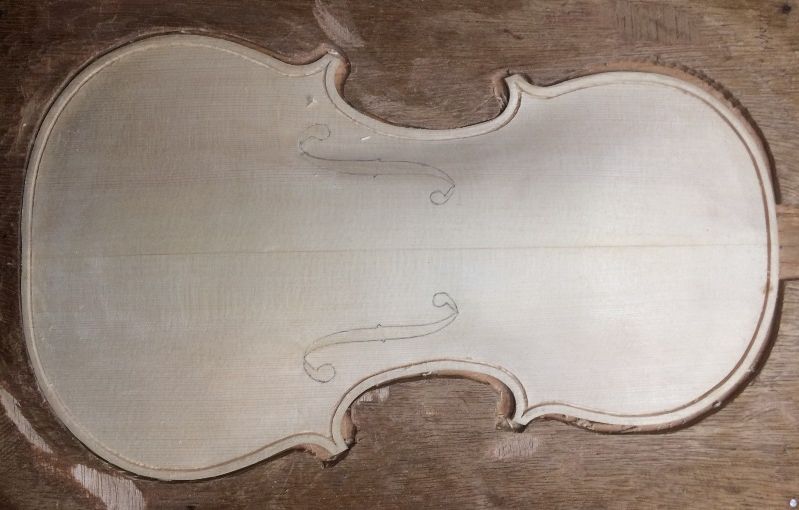
I had to make a new template for the f-holes of the Guarneri model. I thought that I had made one some time ago, but if I did, I guess I must have misplaced it. I measured the image on the poster, to make certain that it matched the dimensions of the technical data on the back, and it turned out to be quite accurate, so I procured a piece of thin, fairly stiff, clear plastic (also called “re-cycled blister pack” from some sort of hardware I had bought), and laid it flat on the poster, and traced the outline of the hole with a ball-point pen. Then I traced the lines with a small sharp knife, until I was able to pop the waste plastic out, leaving a very nice template.
New f-hole template.
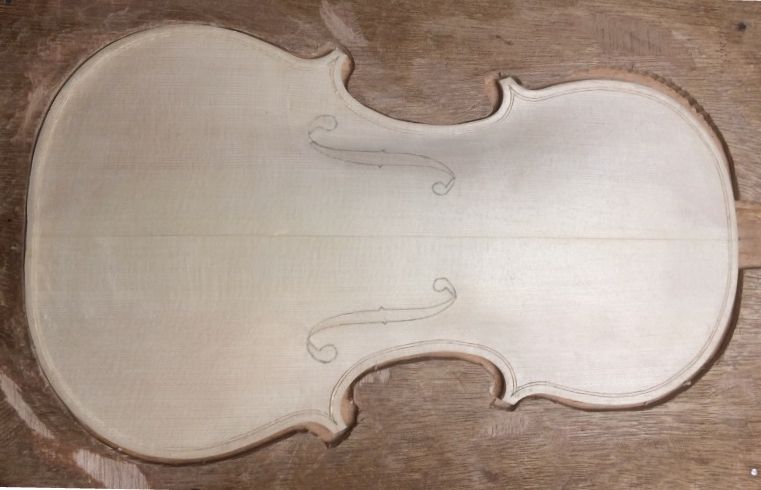
I laid out the “mensur” (sometimes called “stop-length”) on the front plate, for the bridge location, then began to lay out the relative positions of the upper and lower eyes. I had the data sheet to tell me how far apart they were to be, how far off center, and how far from the outer edges of the plate. I simply pushed it this way and that, until everything was according to the data sheet, and then traced the f-hole onto the plate, using a very sharp pencil. Then I flipped the template over and repeated the process on the other side. I double-checked everything, to make sure the layout was correct, cleaned up a few details, and was ready to incise the outlines of the f-holes.
F-hole layout complete. Ready to incise the outlines.
Incising the F-hole Outlines
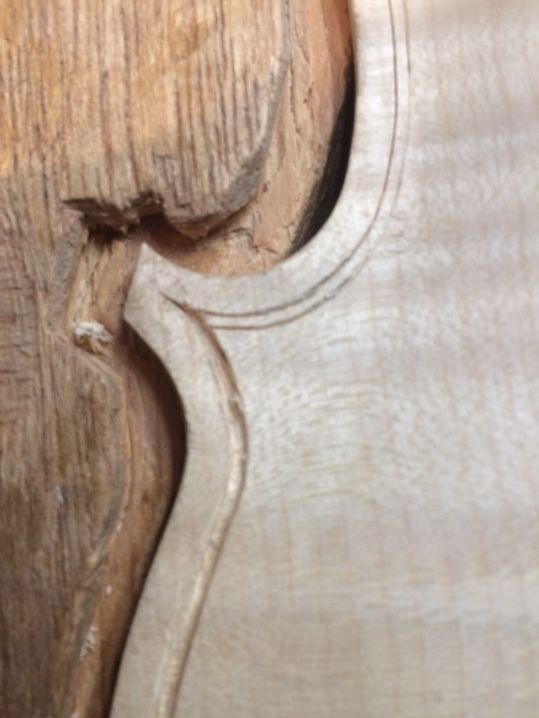
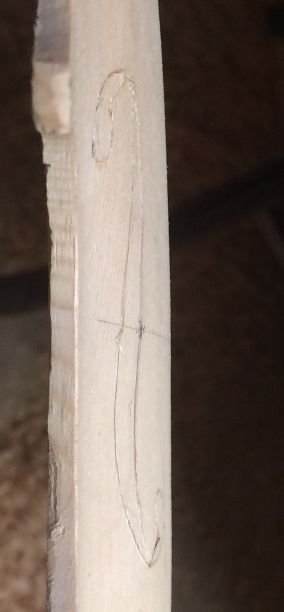
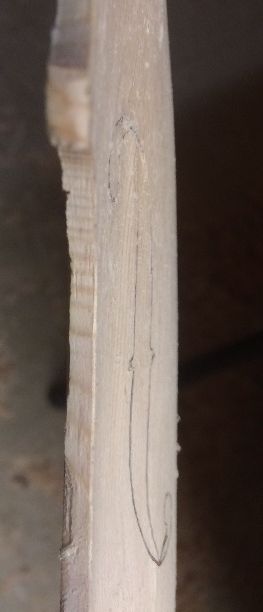
I am only incising the hole outlines at this point, not making any attempt to cut them out: I have found that there is always a small flaw in my archings, in that they are always a little too high at the lower end of the f-holes. The result is that, if I look at them from the edge of the plate, my f-hole outlines look like a letter “S”, laid on its side, whereas when I look at the side view of any of Stradivari’s or Guarneri’s instruments, the stem of the f-holes seem to be nearly parallel to the plane of the ribs. So, to correct this anomaly, I lay the holes out so that they are correct, looking from the front; then I incise my outlines deeply, and finally plane and scrape the “south” end of the holes until the stems look correct from the side. The front view remains unchanged, and now it looks good from the side as well. Here is a “before and after” comparison:
Side view of an F-hole before correction.
Side view of the same F-hole after correction.
Beginning the Purfling Slot
The tool used to mark the location and dimensions of the purfling slot is called a “purfling marker,” or, fairly commonly, a “purfling cutter.” I suppose that, because there are two sharp blades on the tool, which are carefully set to the correct distance apart for the width of the purfling slot, and the correct distance in from the edge of the plate, it probably seems logical to call it a “cutter.” But the fact is, the tool does not work well for that purpose, and it works very well for just creasing the surface of the plate, thus scribing a double line virtually all the way around the plate. Usually the corners themselves must be laid out separately, either by hand and eye, or, by using a special template. (I have done both.)
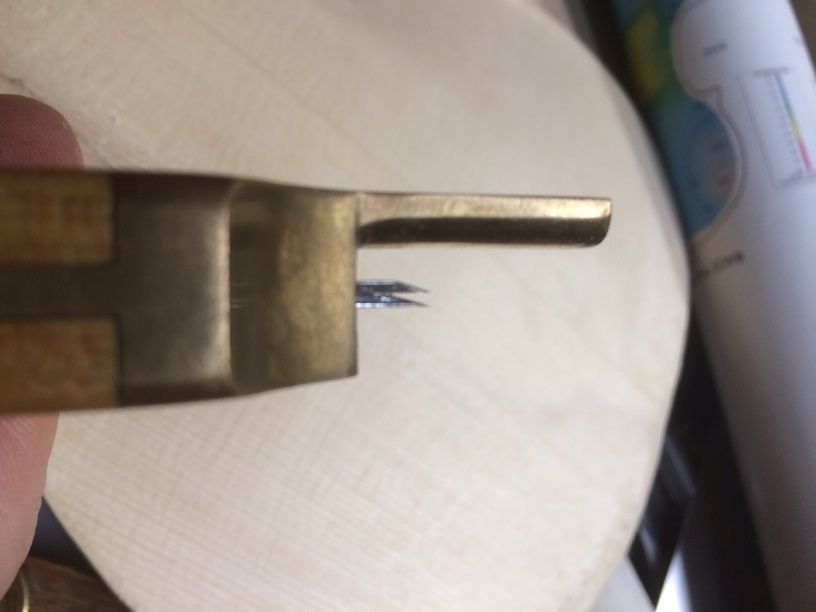
Here is the tool, viewed from the edge, so you can see the two blades. There is a pair of small set-screws that hold the position of the twin blades.
Purfling marker blades. The blades are set for the width of the actual purfling, and the desired distance (4 mm, in this case) from the edge of the plate.
Purfling marker in use. The rounded brass shaft is pressed tightly against the edge of the plate.
Once the slot is marked all the way around, and I am satisfied with the look of the corners, I begin incising the purfling slot. The first time around, I am barely deepening the lines left by the marker; essentially just “darkening” those lines. The second time around, I press a little harder, cutting a deeper path through the wood. After that, I can cut as aggressively as I need to, and not have to worry about the blade being “turned” by a hard winter-reed, and marring the plate. This practice is especially important on the front plate, which invariably of spruce: The summer grains in spruce are very soft and easy to slice. But the winter grains (or “reeds”, as they are called) are much harder, and it is very easy for a harder, winter reed to turn a blade that is trying to cut too deeply from the start. (Hard experience speaking, here.)
Lightly tracing the outlines of the purfling slot with a thin, sharp blade.
Initial outline lightly incised. Ready for final cuts, and removal of waste wood.
Picking out Waste Wood from the Purfling Slot
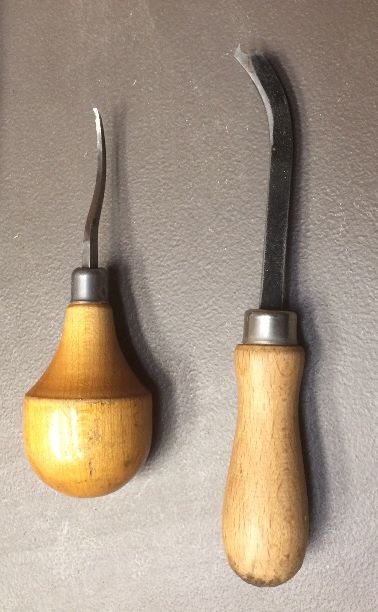
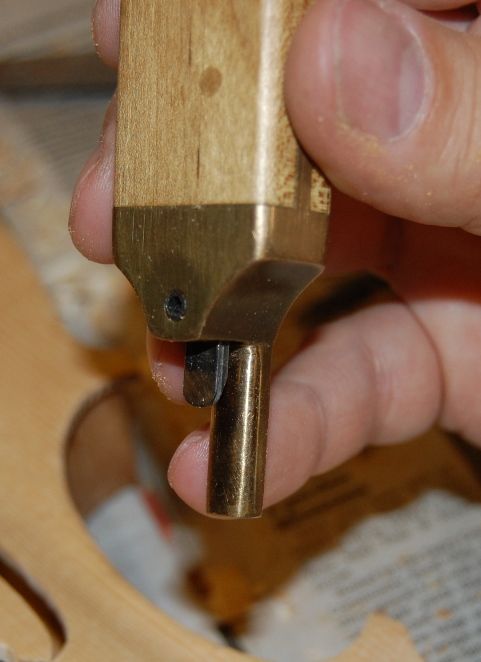
After cutting to the approximate depth I want the purfling slot, I use one of several tools to pick the waste wood out of the slot between the incisions: any of them could be called a purfling pick. One of them is actually a 1/16″ gouge, made by the now-defunct Millers Falls tool people (at least, if they are still in business, I have lost track of them.) One is a tool I made for myself, attempting to achieve an easier, higher-quality cut. (It’s not that great, but it works…I can’t find it, now anyway….) The third is an actual “purfling pick” made by a commercial tool-maker. (I have had other such tools, which were functional to varying degrees. Some I eventually set aside because of poor-quality steel. They wouldn’t hold an edge.) So here are photos of the two I regularly use:
Top tool is a purfling pick from Howard Core Co., and the bottom one is a 1/16″ gouge made by Millers Falls Co.
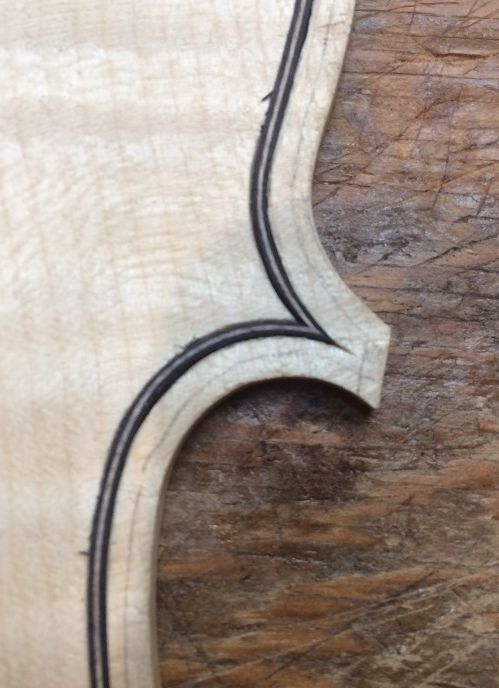
The idea, ultimately, is to end up with a slot into which my purfling will easily fit, but with very little extra room. I want the glue to swell the wood a tiny bit, and make it fit tightly, when I glue it in place. I also want my corners to look good. There is a reason they are frequently called “bee-stings.” I want them to be sharp and clear, and pointed in the right direction.
Using the purfling groove cleaner, (AKA “purfling pick.”)
Purfling slot completed. The dark dot at the top is hide glue, where I repaired a “slip.”
Installing Purfling
I make certain the slot is the right width and depth, checking it with a piece of scrap purfling, then I cut and bend the purfling to fit, giving special attention to the mitered corners. Finally, I remove one section at a time, slip hot hide-glue into the slot, using a thin palette-knife, and quickly re-insert the section of purfling, using a special roller to press it to the bottom of the slot. Once I have all six (four on the back plate) sections installed, I clean up any excess glue, and set the plate aside to dry.
Checking the depth and width of the purfling slot. I want the purfling to end up just below the surface of the plate.
Purfling cut, mitered, bent and inserted into the dry slot. the top center will be removed when the neck mortise is cut.
Purfling glued in place, pressed to the bottom of the slot, using the rollers in the picture.
The back plate is prepared in exactly the same way, except that I like to make the upper and lower purfling sections in one piece on the back. On the front, the top and bottom will eventually be removed when I cut the neck and saddle mortices, so I stop the purfling near the center at the top and bottom of the front plate. In some ways, the back is easier, in that the blade does not tend to wander as easily; but the maple is just a great deal tougher, too, so it is more physically demanding.
Next time, we will (maybe) talk about the final edgework, marking the crest of the edges, and fairing the curve from the bottom of the purfling channel up onto the curvature of the arching. But perhaps carving out the interior would be more appropriate. 🙂
Thanks for looking.
If you found this post helpful, please share with your friends!
It was fun working on the Sawmill, and just as we got that done our daughter came home (from Switzerland) for a visit, so, between that and all the overtime at work (teaching print-reading classes), it has been hard to get going again, but the fiddle has been patiently waiting on the dinig room table for me to get back to work.
Installing the Front Plate
I levelled the garland by scrubbing it back and forth on a sanding board, then aligned the plate on the garland and clamped it with spool clamps. After heating up the glue, I removed a few clamps at a time and inserted the glue with a thin pallete-knife, and re-applied the clamps. In this way, I can work my way around the perimeter, accurately and easily gluing the plate in place without fear that the glue will gel before I can get the plate clamped in place.
Front plate glued in place
Ready to begin Purfling
The purfling is an inlay that is partially decorative, and to some degree a protection against cracks and splits– an edge reinforcement. There are some (usually very cheap) instruments that have the purfling simply painted on, so that it only looks good, but has no other function. They are usually seen as sub-standard, though, and I will not consider making an instrument that way…so, here is the beginning point: the purfling marker. Two blades set apart by the exact thickness of the purfling to be inlaid, and the distance from the edge set, as well.
Purfling marker
Some people call this a purfling cutter, but it really does not workwell if you try to use it to cut the slot. I mark the slot with this tool and then cut the slot with a sharp, thin knife. In use, the purfling marker should be held exactly perpendicular to the plate, and tightly against the plate edge.
Purfling marker in use: see the double lines.
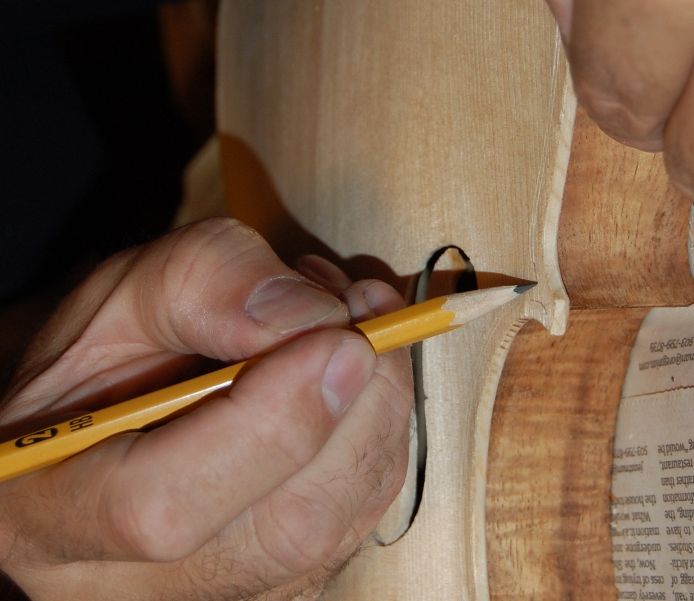
The purfling marker will not complete the corners, and they are fairly critical to the overall look, so I carefully sketch them in with a very sharp pencil.
Sketching the corners
Cutting the Purfling Slot
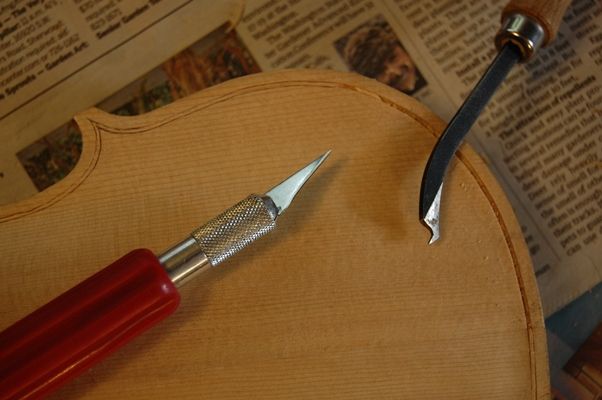
I usually use an X-acto knife to cut the slot, and pick the center out with one of several tools made for that purpose.
Purfling tools.
The first trip around the plate it is important to go lightly but very accurately, so that I am barely deepening the marks left by the purfling marker: after that I can cut more deeply.
Incising the Purfling Slot
Cleaning the Purfling Slot
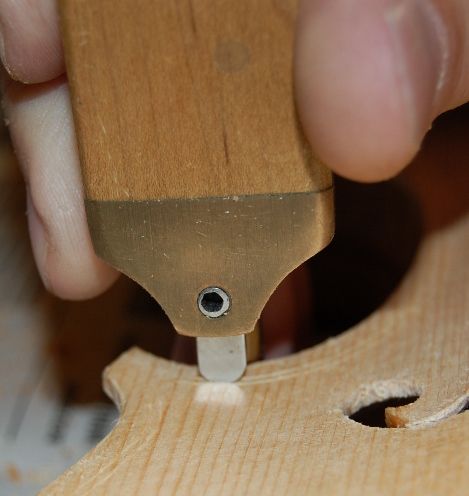
After I am satisfied that the cuts are the correct depth all the way around, I carefully pick out the center of the slot and clean the slot, using a purfling pick. I have some that I made myself, but this one was given to me by Jake Jelley, and it works very well.
Purfling Pick in UseReady to Install Purfling
Installing the Purfling
Some people make their own purfling…maybe I will try it someday, but for now, I buy mine in three-ply strips. The strips are too brittle to bend, so I use a bending iron to make them flexible and to bend them to the correct curvature for the tight corners.
Purfling strips with prepared front plate
I try to install the C-bout purfling first, then force the mitered ends of the upper and lower bout purfling against the mitered ends of the c-bout purfling. It takes practice to get good at this: I do not claim to have “arrived”. But it does seem to be getting easier. (I read the other day that someone asked Pablo Casals why, at 93 years of age, he was still practicing the cello for three hours a day. He said, “I think I am seeing some improvement!”) (Good one, Maestro!)
C-bout Purfling installed dry
Then I install the rest of the purfling strips: I want the slots to fit snugly, but not so tight that I will struggle to install them once I apply the hide glue.
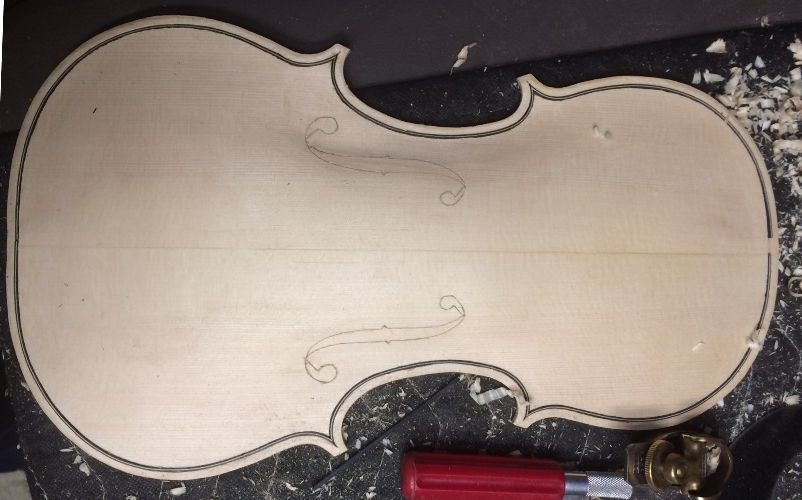
All Purfling installed dry. Spliced in some places, but after gluing the splices will be invisible.
Gluing and Trimming the Purfling
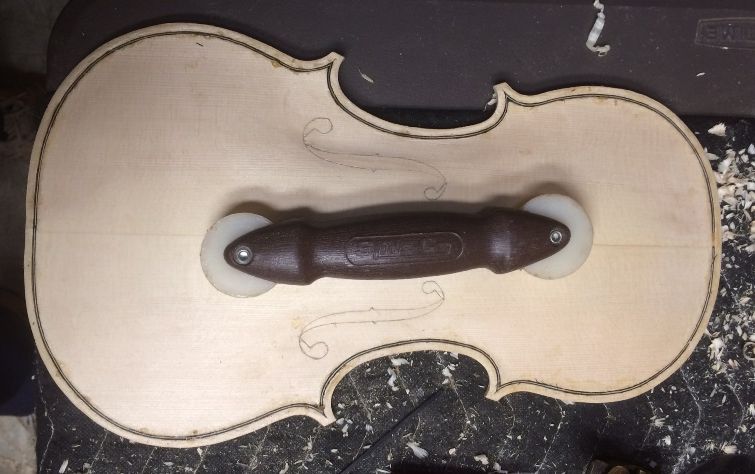
I lift each section up out of the slot, one at a time (tilting them, so as to try to leave the mitered ends in their places), and use the palette knife to slip thin hide glue into the slot, then press the purfling back into the slot, all the way down. I use a roller made for installing the rubber trim around window screens to force the purfling all the way home. The glue squeezes its way into the mitered corners, and secured them. The plastic roller is easy to clean afterward with hot water.
Once the purfling is glued in place, I mark a line around the margin of the plate, using a compass, with the pencil set to about 1.6mm (1/16″ or so), so that I have a guide to follow as I cut the “channel” (trimming the purfling below the surface into which it has been glued.) I want the wood surface and the purfling to make a smooth curve that begins near the edge of the plate, cycles down through the purfling, and sweeps back up to join the curve of the violin plate. I carve the channel with a gouge, then scrape to complete the curves. The faint pencil guide line can be barely seen in this photo.
Trimming the purfling and cutting the channel.
And there is the finished work, ready for the next step.
All the purfling is trimmed, the channel is cut, and the scraping is complete.
The outer edgework will be completed after I install the neck. I used to wait and install the neck last, but I eventually decided that I prefer to install the neck and fingerboard while the front plate and rib garland are still on the mold, then trim the heel of the neck to be in plane with the back of the rib garland so that the back plate can be installed last. But that is a subject for another post….
If you found this post helpful, please share with your friends!

 Follow