Cello linings installed (front)

Please share with your friends!

Willow cello linings installed, glued and clamped.

Purpose of the collapsible cello mold:

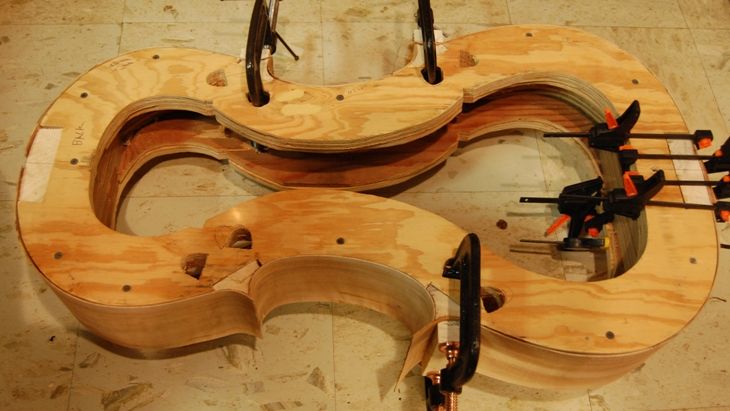
My cello mold is built with a front and back “spacer”, each of which is removable to allow installation of linings. Each is held in place by a few drywall screws. I got tired of the repetitive motion of turning the screws by hand, and bought a very cheap  electric screwdriver, barely sufficient for the task. I will later make a special attachment for it so that it can turn the tuning machines on double basses…that’s another task that wears out my wrists. Anyway– in less than two minutes I removed the front spacer, and the cello looked like this:

Cello mold with ribs installed, linings ready to install--front spacer removed.
Cello mold with front spacer removed and linings ready to install.

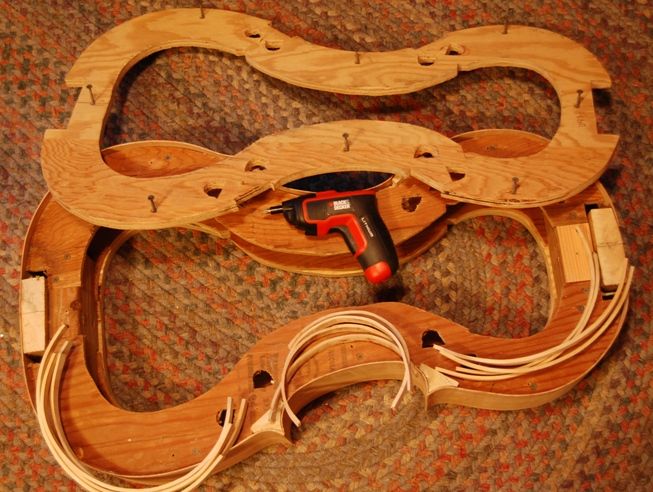
Dry-fitting the linings:

Then I cut the mortises into the blocks, fitted the linings (that I had bent earlier) into their respective places, and prepared for gluing. So, with the linings dry-fitted and ready for gluing, it looked like this (notice that only the center linings have clamps at this point; that is because they want to relax away from the rib, while the upper and lower linings straighten and tighten against the rib):

Willow cello linings dry-fitted, ready for gluing.
Cello linings (willow) installed dry, ready for gluing.

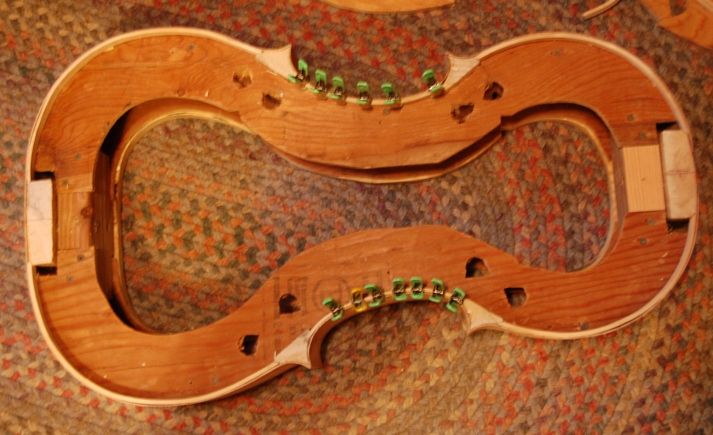
You can see the importance of the linings, by comparing the two photos above: without the linings, the ribs are only about 1.5mm thick…not very strong, nor is there sufficient gluing surface on that thin edge. So, with the linings in place the edge is about 5.5mm thick, which significantly strengthens the edge, and more than triples the gluing surface.

Hot Hide Glue and lots of clamps!

Once all the linings fit correctly, I heated up my glue, prepared a container of hot water, and my various brushes and palette knife, and, one by one, I brushed on the hot hide glue and clamped each lining in place. Those little spring clamps work pretty well. I got them from Home Depot, and they have served this purpose to my satisfaction. Occasionally there is a reluctant joint that needs more pressure, in which case I use a larger clamp, or one of those little f-clamps. (You can never have too many clamps!) After gluing and clamping, the cello looks like this:

Cello linings glued and clamped in place.
Cello linings glued and clamped.

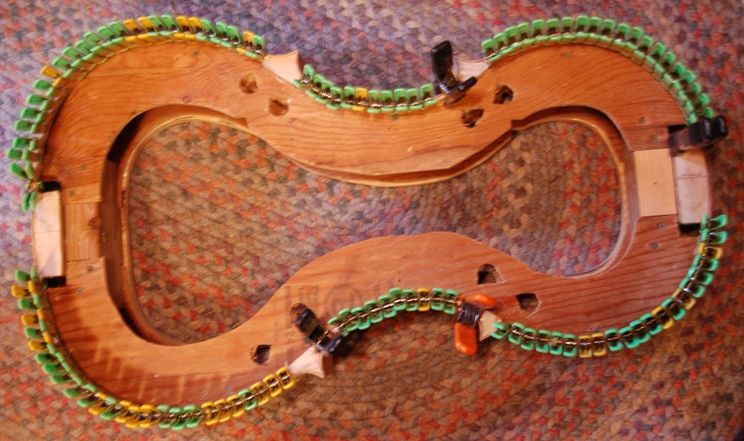
Once these linings dry, I will remove the clamps and repeat the process on the back side. the back has a slight taper, from tail to neck. At the bottom block, the ribs are about 113mm tall. At the neck they are about 108mm tall. So I will want to plane the ribs to those approximate dimensions before I install the linings. One thing you can’t see in the photos is the fact that I fit the linings just a little high…slightly “proud” above the rib edge. I want to make sure that whatever planing needs to be done is primarily removing willow, not curly maple. I will accomplish final leveling with a sanding board, however, just before tracing the shape of the plates, from the shape of the completed rib garland.

If you found this post helpful, please share with your friends!

Cello progress

Please share with your friends!

Cello ribs installed in the mold, glued and clamped to the blocks.

Yes, you have to keep the wood warm!

The weather outside persisted in temperatures hovering just above freezing, so I brought the project indoors, heated the joints with a heat-gun, brushed hot water, slathered hot glue and clamped ’em home. Good glue squeeze-out all around; should be very good joints.

All ribs installed–glued to the blocks in the mold. Next step is linings.

Next Step: Linings

Actually, the very next step is to trim the excess rib length off the corners, and smooth them so that they are square-ended and straight along the edges…and parallel to one another. But that is a small enough task that I will combine it with installing the linings. The linings are a pretty easy, pleasant step in cello building…they are easy to make, easy to install, and the work goes quickly. That is what is next, and I should have it done pretty soon. Nice weather or no. 🙂

Thanks for looking.

If you found this post helpful, please share with your friends!

Small progress report on the cello–upper ribs installed

Please share with your friends!

Upper Ribs installed–Pegbox carved deeper

Tonight I shaped the upper sides of the upper corner blocks and the lower sides of the lower corner blocks to receive the upper and lower ribs.

Shaping the Blocks

I did some of the shaping on my oscillating spindle-sander–a very handy tool which has paid for itself many times over–and some with an incannel gouge (Curved, but beveled on the inside face, rather than the outer face), finally smoothing with a half-round rasp.

More work for the Bending Iron

I noticed that during the time the bent ribs have been languishing in the unheated shop, they had straightened a little, so I turned on both the bending iron and the glue-pot, and while I waited for them to get hot, I carved some more on the pegbox of the scroll. It is nearing completion, in terms of depth and inside dimensions, but there is a whole lot left to go before it is anywhere near final completion. It takes about 20-30 minutes for the bending iron to get really hot, and that is about right for the gluepot as well.

Installation procedure

I dry-fitted the ribs first, to make sure that once they were glued in place, both ends would fit correctly and the length of the ribs would lie flat along the curve of the mold. Then I loosened the lower end and slathered the hot hide glue on, and clamped the rib into the curve with a clamping caul (a elongated wooden block shaped to force the rib tightly into the curve of the corner block.) Once the corner block end was in place, I glued the upper end to the neck block.

Note to self: warm the wood before gluing!

The shop was awfully cold, and the glue was gelling very rapidly. I hope I achieved a good joint– if not I can correct it tomorrow. I should have heated the joints with my heat gun, before applying the glue, but I wasn’t sure where it was, and didn’t feel like stopping everything to go look for it…so I just worked very quickly. 🙂 We’ll see how it turns out.

My other work: barge-building

Tomorrow, Ann and I will attend a barge launch at Gunderson, LLC, in Portland, where I work. We build large ocean-going barges, and rail freight-cars, there. Here’s a video of an earlier launch, if you have never seen one: http://www.gbrx.com/Videos.php?expandable=2

(I would rather build cellos…) 🙂 When I get home I will try to get the lower ribs installed, and the pegbox completed.

If you found this post helpful, please share with your friends!