I have been in a mad rush to complete this violin before the upcoming show (“Violin-Tasting Event”) this coming Sunday, at the Hilton hotel, in Corvallis, so I took very few photographs, but here are a few:
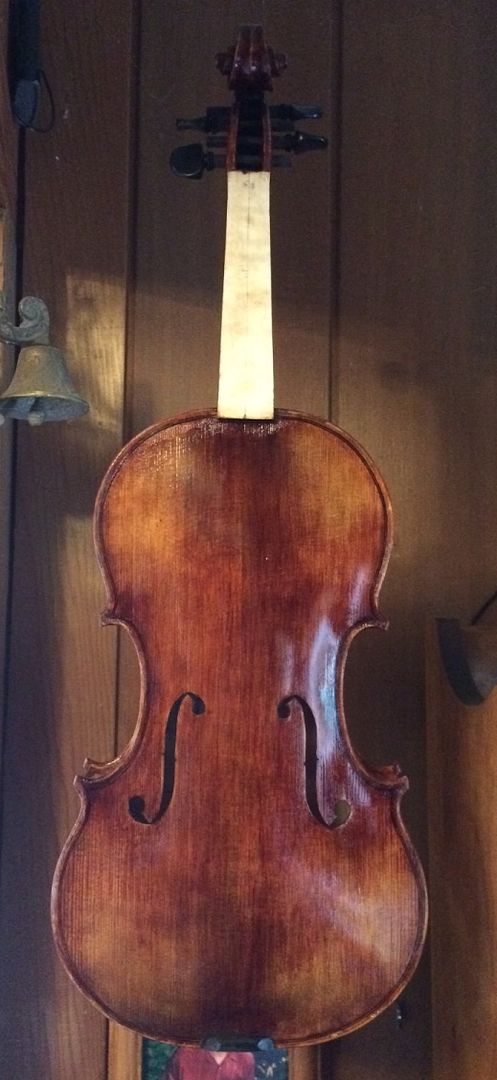
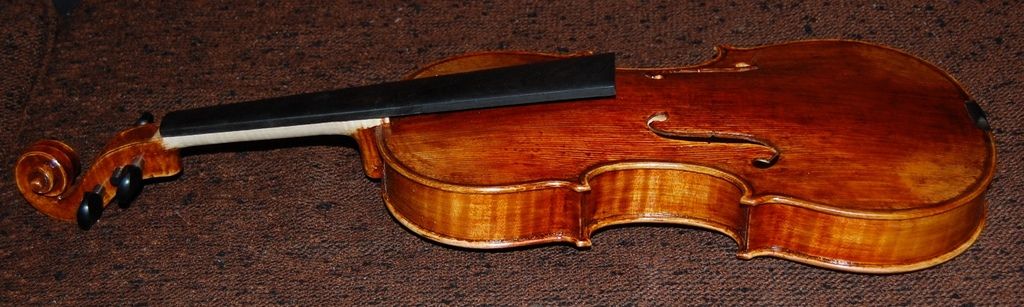
Varnished front, before pegs, saddle, or endpin.
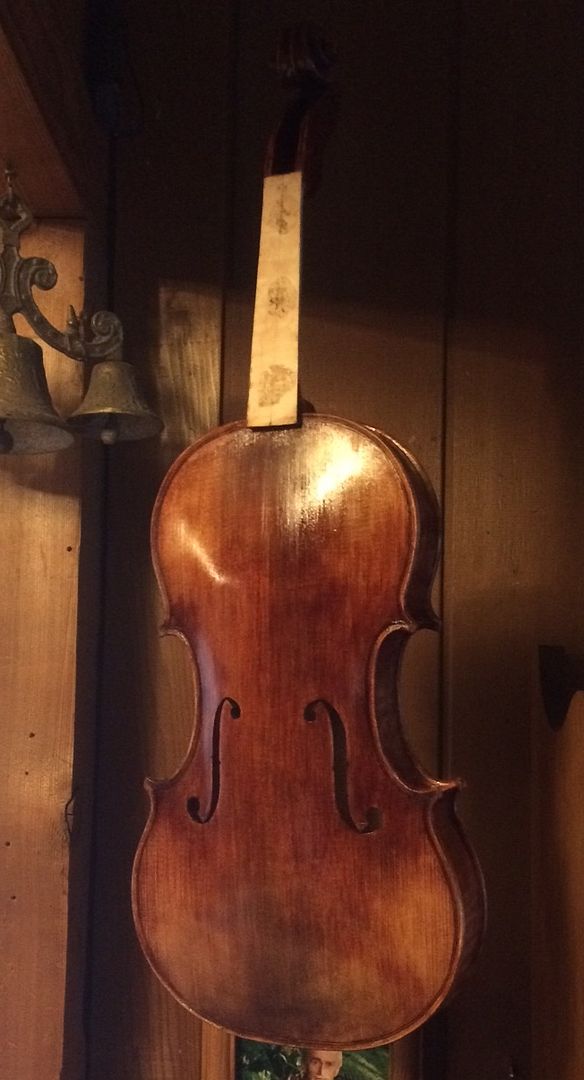
Varnished back, before pegs, saddle or endpin.
Once the varnish had hardened, I sanded it back very gently, installed the endpin, pegs and saddle, and then applied one more coat of varnish. It is very soft, now, so I scarcely dare touch it, to re-install the fingerboard, let alone set a bridge and add strings. I have it hanging up in our dining-room, where the woodstove is keeping things warm, in spite of the snowy weather we’ve been having. Hopefully it will be dry enough, by this evening, so that I can add the fingerboard and then complete the set-up tomorrow. I don’t want to rush things, but I am running out of time.
Anyway, here is how it looks right now:
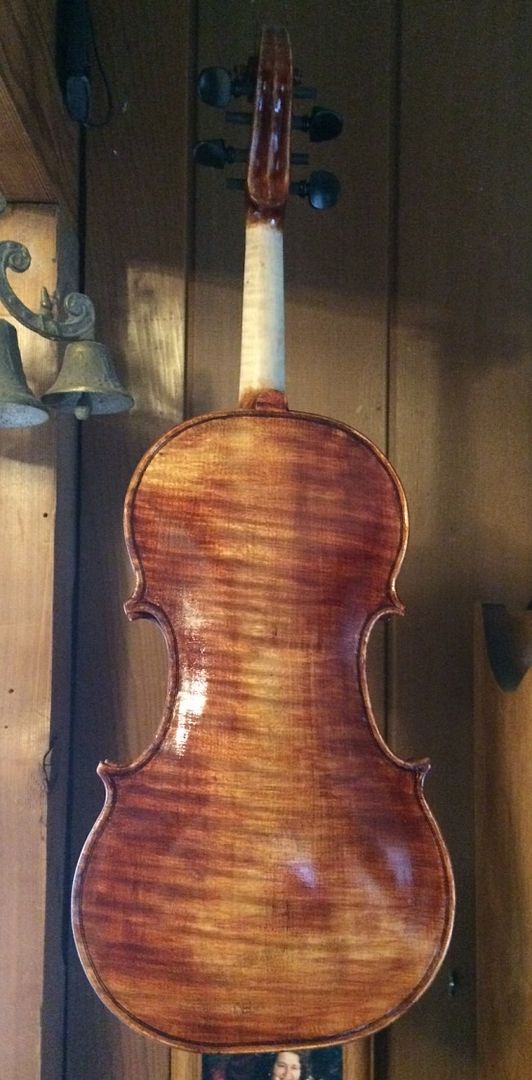
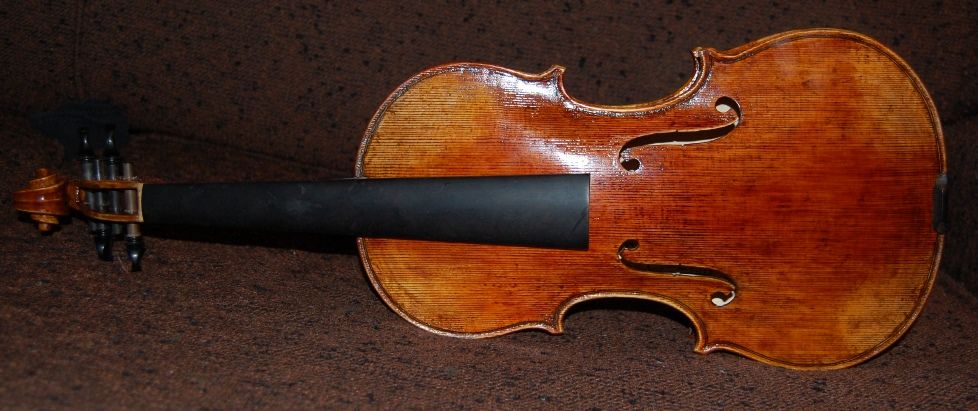
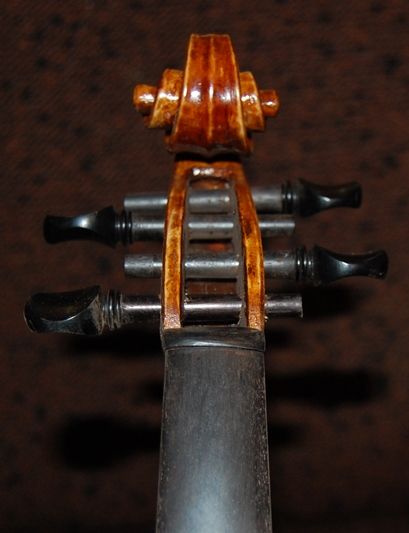
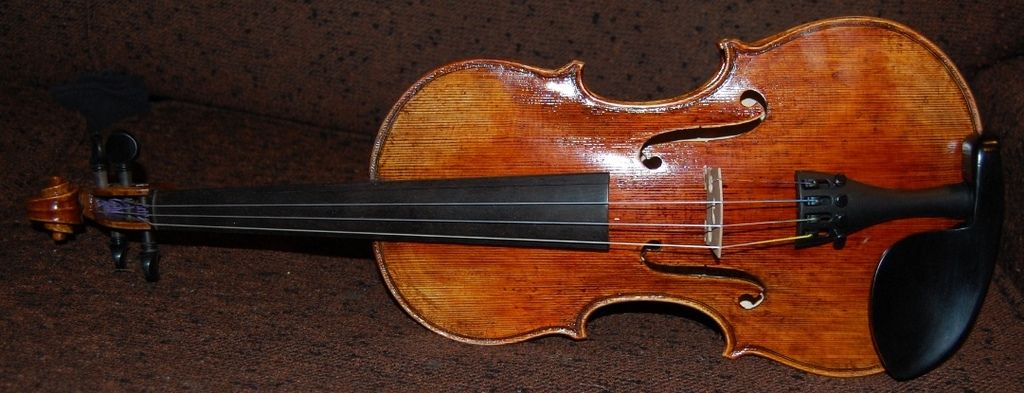
Varnished front with pegs, endpin and saddle.
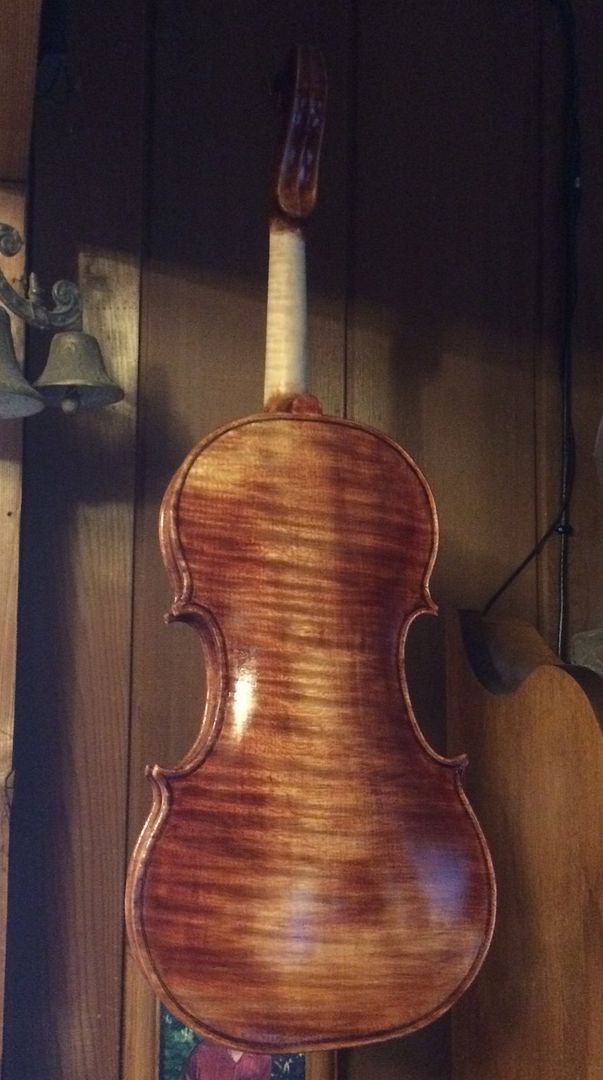
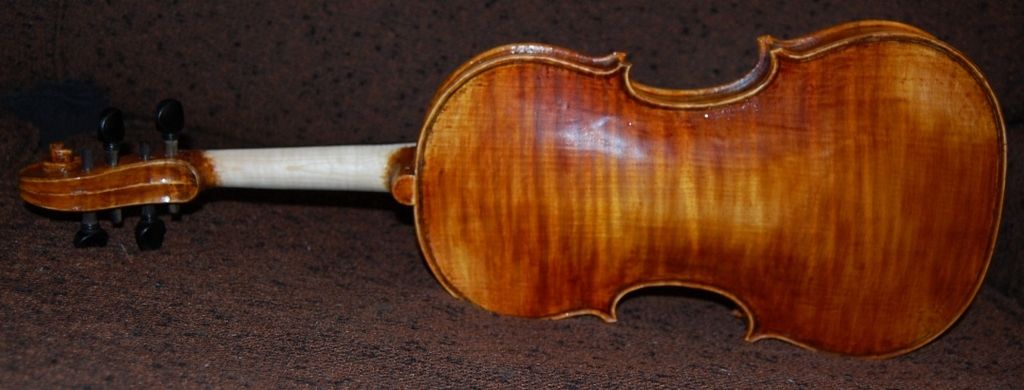
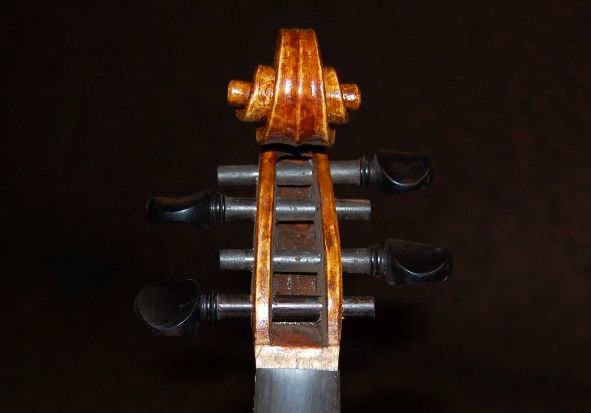
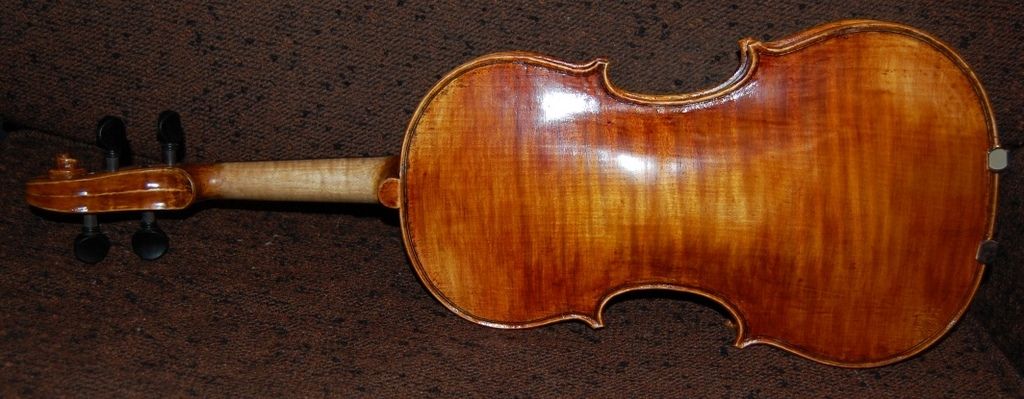
Varnished back with endpin, saddle and pegs.
The instrument definitely still needs a rub-down, and I hope I will get to do all that before Sunday.
It looks and feels as though it will be a very good violin. Time will tell, of course.
Thanks for looking.
If you found this post helpful, please share with your friends!
Probably some people don’t consider all of this to be “set-up”, though I usually think of it that way. “Set-up” usually means taking a fully completed violin, made by someone else, and:
dressing the fingerboard if needed
adjusting the string height at the nut
Fitting the bridge to the corpus, and cutting the height to set the string height over the fingerboard
Treating the pegs, if needed (Some are very dry and need “peg dope” as a stiff lubricant)
fitting the soundpost, or adjusting it, if it is already there
adjusting the tailgut, to achieve the correct afterlength between bridge and tailpiece
installing strings
checking the string height over the end of the fingerboard, and adjusting as needed (by adjusting the bridge height)
balancing the tone by adjusting the soundpost position
(sometimes) installing a chin-rest (if it wasn’t in place already)
final check by playing
But, as a builder, once the varnishing is done, all the rest of it feels like “set-up” to me. So, I am usually thinking of:
fitting and installing the endpin
installing and trimming and polishing the saddle
installing and trimming and drilling the pegs
dressing the fingerboard to achieve the correct camber and contour
fitting, installing and dressing the nut, including string grooves
and then all the things listed above, for final set-up. So, to prevent confusion, I am going to call it “final assembly and set-up.”
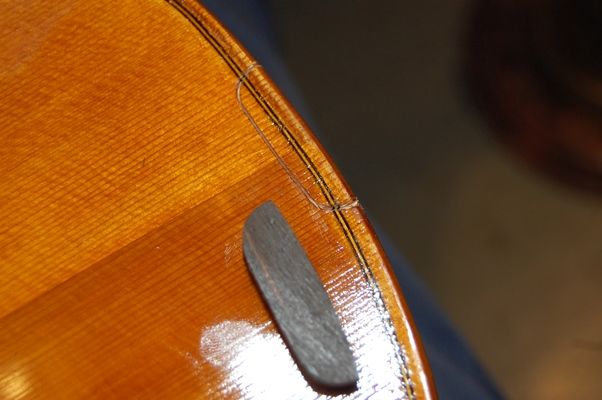
Saddle and Endpin
I began by installing the saddle and endpin:
Saddle with endpin (sometimes called end button.)
Tuning Pegs
Then I drilled the peg holes, and reamed them to the correct (1:30) taper, and shaped the pegs to fit the holes at the correct depth. I lubricated the pegs with “peg dope” and worked them into their respective holes, pushing and turning vigorously, to make them seat well. I don’t want them to do a lot of “self-adjusting” later on, so that they drift dramatically deeper in the first few months after assembly. I want it to happen now, before I trim the pegs to length, and (especially) before I drill the string-holes. Otherwise I can end up with the string-holes up against the far wall of teh pegbox, instead of roughly centered. I do drill the holes (shown later) slightly closer to the gripped-end of the pegs, knowing that there will be some drift, but the idea is to avoid the drift as much as possible.
Pegs before trimming the length or drilling the string-holes. Notice that the one peg is a different color (sigh…).
Endangered Species of Hardwoods, and Alternative Wood Choices
It is sometimes frustrating to find that the ebony for the pegs is not always consistent in color: as Ebony becomes more scarce, the people making the fittings are less picky about the wood, and the sapwood for ebony is a tan-color. You can see a little stripe of it on the end of the “D” peg, where it will be cut off, but the whole “G” peg is the lighter wood. If it bothers me enough, I may either dye it or simply cut a new peg. Haven’t decided, yet. I will probably try dyeing it, first, to see how it looks, at least.
However, this raises another point: there are other woods that function well for fittings, so–why do we not use them? The main reason is customer demand. Everyone wants ebony, so, to satisfy the customers, we all buy ebony blanks from which to make the pegs. BUT! Some makers are branching out into other, more plentiful woods, such as Ipé. I have used Ipé a few times for fittings, but not for pegs. Though I do have a lathe, I have never tried making pegs myself: I always buy the blanks and turn then to the correct taper and diameter by hand, using a peg-shaver. Ipé blanks are not yet available. So…perhaps I need to try making some alternative-wood peg blanks myself. If some poor, underpaid child in Sri-lanka can do it, why not I? 🙂
The obvious alternative wood, for me, though, living here in Oregon, would be Oregon Mountain Mahogany. It is not terribly common, but is certainly not endangered, though it is usually not a very big tree. A friend gave me several small logs, cleared from some remote mountain property. I am drying it, gradually, and will attempt to use it sometime in the near future. It is a light-tan to medium brown color and is quite hard. I would certainly not be the first to try it, but the commercial pegmakers who turn them out on a lathe, one-by-one, want (rightly) a very high price for their work, so I have never bought any.
Meanwhile, as I mentioned earlier, Ipé is a readily available hardwood coming from Latin America, but so plentiful that they are selling it as decking material…to walk on! It is a pleasant, medium-dark brown, and quite hard. Oddly, though, the dust from sawing or sanding it is bright yellow.
Other options include Osage Orange (sometimes called hedge-apple, or Bois D’arc). It can be very hard, but it is a bright yellow-orange when freshly shaped, and, though it fades to a nice brown over a long time, I think I would have to accelerate that change in some way…I’m not impressed with the look, right now.
Another is Persimmon, which, ironically, though it is native to the United States, is in the same family as ebony. I have never used it for anything, nor have I even seen it, but I am told it can work well, and that it looks good too. I simply haven’t seen it.
So–I try to be responsible in my wood-choices, but the bottom line continues to be the bottom line. Eventually, the customers have to also agree, or I can’t sell my work. One time (once only) I made a fingerboard out of purple-heart: the prospective customer was not only not impressed, they were angry, as if I had tried to pull some sort of trick on them. Purple-heart is really bright purple when freshly shaped, but fades to a nice dark, red-brown with time and exposure to the air. But the couple who had been interested in a student instrument for their child were angry that I had made the fingerboard out of purple-heart, and I never saw them again. (Sigh…) My thought had been that a small child might really like that, but I certainly won’t try that again.
Re-installing the Fingerboard
I usually remove the fingerboard to make varnishing easier, as it gives me easy access to the front of the instrument. But that means I have to re-install it perfectly, and that is not as easy as one might expect. Remember, the board is rounded on top; the neck is rounded on the back, and both taper from one end to the other. The only flat surfaces are the surfaces between the two. So, with the slippery, hot, hide glue between them, there is a strong tendency for things to shift under pressure, and result in a bad fit.
What I now do (after years of struggling with the above scenario) is:
Position the board on the neck, exactly the way I want it, dry, then
Clamp it in place, using several clamps on the handle portion, and one larger one at the heel.
Check angles and heights, etc. to be sure everything is really correct.
Loosen and remove the large clamp at the heel, and
Insert hot hide glue, using a thin palette-knife, spreading the glue carefully, to avoid any dry spots, then, immediately replace the clamp.
Wipe off excess glue that squeezed out under clamping pressure, then,
Remove the small clamps, check to be sure nothing moved, and, using the same palette-knife,
Repeat the gluing process on the upper end.
Replace the clamps, checking to be sure nothing has moved.
Wipe off the squeezed-out excess glue, and allow it to dry, and finally, remove all the clamps.
Here is how it looks at this point, after scraping the sides of the fingerboard and neck:
Side view with fingerboard and tuning pegs. The nut is not there yet, nor has the fingerboard been dressed. The neck wood is completely devoid of added color.
Front view with fingerboard and tuning pegs. The pegs have not been cut to length, nor have the string-holes been drilled.
Back view– same status. You can see the transverse flame in the neck, in this picture, but it is quite faint. It will show up better after I seal the neck.
Dressing the Fingerboard and Smoothing the Neck
I buy my fingerboards as blanks. Every surface is oversize and must be cut to correct dimensions, curves, etc. So, though the fingerboard looks OK at this point, it will still have to be “dressed”. Dressing the fingerboard means planing, filing and scraping it to produce exactly the shape needed so that, when being played, there will be proper clearance for the vibrating strings and no buzzes anywhere on the board: no humps or hollows, and just the right curves. A slight camber (scoop) is desireable, so that a straight-edge laid longitudinally on the fingerboard will reveal about one string-diameter gap between the middle of the board and the straightedge. That gives the needed string-clearance for the vibrating strings when playing. The transverse profile I shoot for is a radius of 42mm at the “big end” and transitioning to a flatter curve at the nut. Finally, I polish the fingerboard surface, using progressively finer grits, finishing at 1500 grit. At that point it is mirror-shiny, and quite beautiful to look at. I realize it will not stay that way, as wear from the strings, grime from players hands and rosin accumulate, but it is nice to see it that way when it is new.
The sides of the fingerboard have to smoothly fair into the neck, so that one cannot feel the seam at all. This is accomplished by scraping, then filing and sanding with progressively finer grits. I wet down the handle portion of the neck with coffee, to raise the grain, and let it dry. Then I sand off all the raised grain so that it is silky smooth again. I repeat the wetting, drying, and sanding procedure until the grain will no longer raise and it stays smooth after wetting and drying.
On my first few instruments, I did not know this little “secret”, so my beautiful, silky-smooth necks ended up very rough, after just a few days of being played by a sweaty-handed player. They would bring them back, unhappy with the feel of the neck, and I was confused, because I was quite sure I had left them perfectly smooth. I eventually realized what was happening, and began making the “preemptive” move of raising the grain ahead of time, and smoothing it, over and over, until it becomes completely stable. Then I will seal the neck with a tiny amount of spirit varnish (a dime-sized spot on the end of my finger, with a rag), rubbed in hard, until it is dry and shiny. I used to use linseed oil, but it collected dirt, over time, and eventually looked dark and grimy. Using my current method, they stay beautiful and stay smooth. (Everyone else probably already knew that; I guess I am a little slow at learning some things. 🙂 Here are the results of the above paragraphs:
The camera’s depth-of-field limitations at close range made it difficult to get a very clear shot of this, but you can see how smooth it is. The sides still will receive some more work, to remove the “ripple” you can see, there.
Here is a clearer picture, but it doesn’t have the same perspective that sighting down a freshly-dressed fingerboard provides:
Dressed fingerboard, straight-on view.
By the way, I went back and dyed that one light-colored peg:
The “G” peg, here, has been dyed, to get closer to the color of the other pegs. When I am done, they will all look the same. This was definitely an improvement, though. 🙂
This one was taken after everything else was complete (out of sequence.) But that is what the finished violin neck looks like.
Fitting the Nut
The nut is a tiny piece of Ebony, with the grain transverse to the fingerboard, over which the strings all bend, and on which they converge, as they approach their respective tuning pegs. The shape of the nut is fairly critical to playability, sound and string-life. The feel of the instrument is either good or bad, depending on the shape of the neck, fingerboard and nut, the nut being under the thumb and forefinger of the player more frequently than any other part except the handle portion. So, all of them have to be flawless. That small white rectangle (or trapezoid) in the photograph above, is the footprint of where the nut will be attached.
Here (below) is the nut, freshly glued in place– there will be a little more scraping and filing to do, to bring it to a perfect fit all around, but if you look closely, you can see that the portion standing proud above the surface of the fingerboard is less than a millimeter in height, so the string grooves will be very shallow. I do not want the strings “buried” in the nut, as I feel that it diminishes the tone, as well as having a negative effect on string life.
Here is the fitted nut, freshly glued in place. There’s a little more shaping, before it is really done, escecially including the string grooves.
Here is a side view of the nut, with the scroll and fingerboard. You can see the very slight lip of the nut, standing above the fingerboard.
In the photo immediately above, you can see that the handle portion of the neck is not longer a clean white: that is the third grain-raising with coffee, and it is staying pretty smooth this time. If it does not feel rough, after it dries, I will sand it one last time, and seal the neck after touching up the places where I had to scrape to level the fingerboard seam. Meanwhile, as it is drying, I will fit and set the soundpost.
Soundpost Setting
In several languages of which I am aware (French, Italian, Spanish and Romanian, I think, to begin with), this little thing that looks like a dowel-rod, is called the “soul” of the instrument. That is appropriate, because it has final control over the sound of the violin. If it is set incorrectly, or too tight, too loose, wrong position, wrong angle– whatever–the result will always be negative. That is not to deny that there are a few instruments with odd requirements, so that the soundpost “looks wrong”, but sounds great– and if you try to set it “right”, the sound will suffer. However, as a general rule, there are some standards regarding the placement of the soundpost. Most luthiers start with those values, then make tiny adjustments to coax the best sound from the instrument. Sometimes a difference of 0.2 mm can make a huge difference. Sometimes it seems to make no difference at all. Some instruments are simply more forgiving than others.
In general, the starting position of the soundpost is:
Centered, laterally, under the treble bridge foot, but
Located one post diameter (more or less) “south” of the back edge of the treble bridge foot. (I frequently end up placing it closer than that.)
Vertically adjusted between the back and front plates so that the top and bottom ends fit “airtight”, and under
Pressure just a little more than the amount it takes so that if you loosen the strings, the soundpost doesn’t fall over.
I frequently make my posts tighter than this, as I know that in the first six to twelve weeks, the shape of the top will change somewhat, rendering the post much looser than at the beginning. Many makers simply ask the customer to bring the instrument back in six months, for a “post adjustment”. I just start off a little tight, and still stand ready to re-adjust or replace it if it ever needs it.
I insert the post through the treble f-hole, using a special (traditional) tool called a soundpost setter. I insert the soundpost setter into the post, and then slide the post, tool and all, into the corpus and locate the post as described above. (Sorry; no photos, here– it takes two hands to do the work, and I had no one to take pictures. Maybe some other time.)
Final Set-up
Final set-up included fitting a bridge, adjusting the tail-gut, installing strings and adding a chin-rest. I’ll spare you the details, as, again, it all took two hands, and I was working alone.
The violin is finished. The strings are an old, used set of Dominants I had in a drawer, specifically saved for initial set-up work, as it usually requires many iterations of tensioning and de-tensioning the strings, and that takes the “new” out of new strings very quickly. But this time I hit the target right on the first try. The strings came out at exactly the right height, which doesn’t happen for me very often.
Anyway, here is the finished instrument:
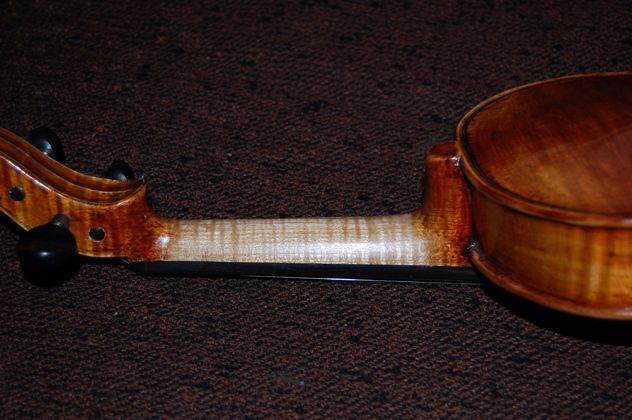
Finished violin , side view. These colors are actually pretty close. Not sure why it works sometimes and not others. I will color the bridge a bit when I change the strings.
Front view. I changed my mind about the tailpiece. That is a Wittner tailpiece with four built-in fine tuners. Not ebony, but man-made material, and very light.
Back view. Notice the neck color– the flames show better, now, after sealing and polishing the handle portion.
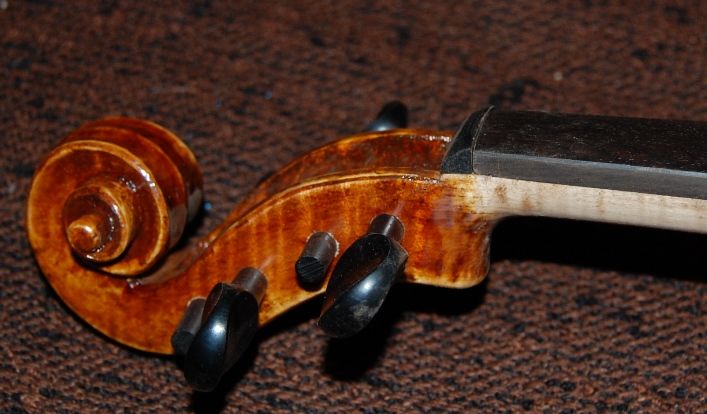
Scroll, showing the trimmed and domed peg-ends, and the finished and polished nut.
You can see that the varnish has been restored in the places where I had scraped it off during final neck-shaping. The handle has been stained with coffee, sanded and polished to 600-grit, sealed and polished with spirit varnish, and will stay smooth indefinitely. Looks nice, too. 🙂 Those pegs will continue to work in deeper, and will hopefully end up aproximately flush on the terminal side.
Playability and Tone
I try to make sure that the neck is the right shape and size and that all the dimensions are correct, to begin with, but then I bring the string height at the nut as low as I can, to make it an easy touch at the nut. I also adjust the string height at the end of the fingerboard, to an optimum height, for the same reason. Beyond that, the response and volume and ease of speaking are all largely a matter of arching and graduation, I think. Probably wood choice matters, too, but I consider that to be a given.
I do balance the tone of adjacent pairs of strings; that is, I play the “D” on the G-string, and match it to the open string “D” next to it. I adjust the soundpost until the timbre of the two are close enough that it is difficult to hear a crossover. I do the same between the “D” and “A”, and then between the “A” and “E”. On this one, I was fortunate, in that it was right on the first try. I did not have to move the soundpost from my original setting. (Nice! That doesn’t always happen, either!)
This violin sounds very good, in spite of the old strings. It has lots of volume, and good projection. I will play it for a week or so, then change the strings for a set of Evah Pirazzi strings I bought for that purpose. I think this will be a very powerful instrument, but I need to find a local professional player to run it through its paces. I am really not qualified to put it to the test. 🙂 I play by ear, and not very well, at that. Maybe one of the many teachers in my area will do the honors.
So! There it is! I hope to find a player soon, and then I will give feedback here on the website, with their comments.
Thanks for looking.
If you found this post helpful, please share with your friends!
I failed to take any photos of this, but– it is pretty simple: I centered a hole on the center joint between the lower ribs, and centered between the plates. I drilled it first to 1/8″, then to 7/32″, and finally reamed it with a 1:30 tapered reamer… the same one I use for tuning pegs. I shaved the endpin blank to the correct size and taper using my peg-shaper, while gripping the endpin with a special homemade gripper. I shaved the endpin until it would just barely fit into the hole, leaving a little clearance between the collar and the rib surface. (There is a photo of it later on…)
Fingerboard:
In the photo below you can see some of the tools I used to fit the ebony fittings to the violin. Looking at the fingerboard, you can see the three “dots” of glue that secured it to the neck while I was shaping both the neck and the fingerboard. When I re-install the fingerboard, there will be glue on the whole faying surface. The carved out portion will help to lighten the fingerboard, and apparently helps tone.
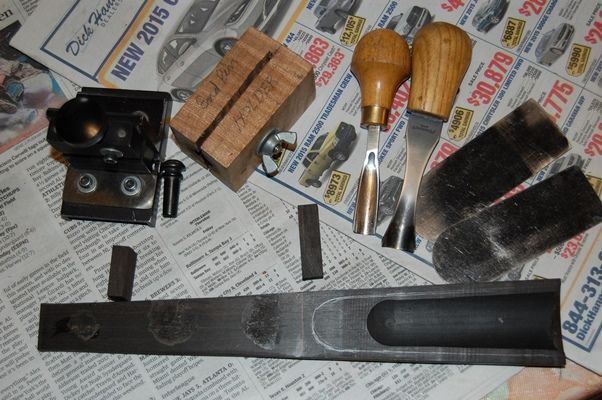
Fittings waiting to be shaped and installed.
The black mechanism is the peg shaver I use. The block next to it is the gripper I use for end-pins. The endpin blank is right next to the shaper. The small ebony block between the shaper and fingerboard is the nut blank. The larger ebony block midway along the fingerboard is the saddle blank. The fingerboard has the shape laid out that I intend to carve away, and the gouges and scrapers on the right are the tools with which I did it.
So, one of the first things I did was to make sure my tools were sharp, then I went all around the edges of that trough shape, carving away small chips of ebony to produce a shallow trench all around the edge. Then I carved as best I could with the gouges, until I decided it was time to get the planes into the fight. The little Ibex plane worked well, but the little wooden homemade plane actually worked better, because it has a deeper curve in the sole. It was made of a small section of a broken hammer handle, a piece of scraper blade, and a threaded steel plate to adjust tension and hold the blade in place.
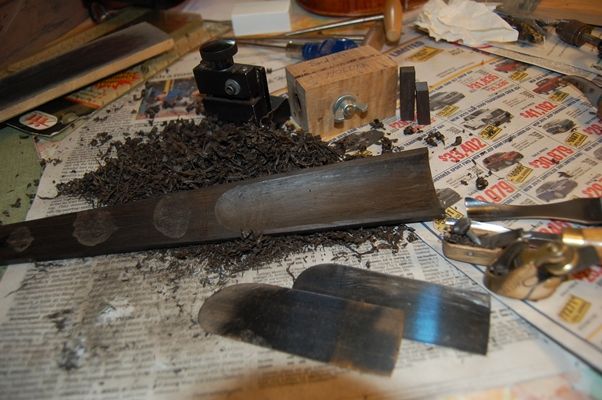
Fingerboard ready for installation. This part took me about an hour. Ebony is hard stuff.
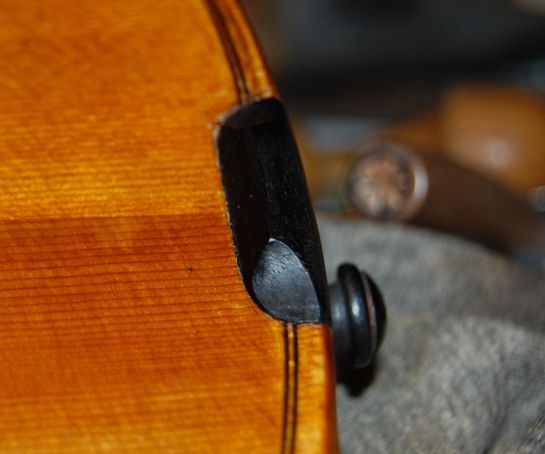
Saddle
Next I worked on the saddle: I cut my saddles with radiused front edges, so as to avoid saddle cracks, which are extrmely common in violin-family instruments…partly, I am convinced, because virtually everyone makes them with square corners, which adds a huge stress-riser to that location in the spruce. To me, that is asking for a crack. I try to avoid suich things.
Saddle footprint with curved front corners.
Some luthiers try to avoid cracks by leaving a small gap on the ends…that makes good sense, too, but why not eliminate the “notch” altogether? Just my opinion…. Either way, you have to remove the wood of the violin front plate to receive the ebony saddle. I use a thin knife to slice through the spruce, and then a flat chisel to loosen the piece being removed. I set aside the piece in case it turns out I made an error of some kind, and need to put some back. It is a whole lot easier to match grain from the piece you just removed, rather than from some random piece of spruce.
Once the saddle fits the mortise perfectly, leaving a small gap on each end (about the thickness of a business card), I glue the saddle in place, and forget about it. Here is a photo of the finished saddle. I didn’t take photos while I was carving. I get pretty wrapped up in what I am doing and forget to take pictures.
Saddle and endpin
Another view of the saddle and endpin. (Pretty ribs, huh?) Varnish touch-up still has to happen.
Pegs
The next issue was the pegs. I wanted them done before I installed the fingerboard, simply because I wanted to be able to set the instrument aside so that the glue under the fingerboard could dry, and not feel that I was being prevented from working.
I had earlier drilled pilot holes in the pegbox, so that I would have guides to help keep the holes perpendicular to the centerline. So I reamed out those holes, all to approximately the same size, using the same reamer (1:30 taper) as I used for the endpin.
Then I sliced a shallow groove next to the collar, on each peg, all the way around, using a very fine razor-saw, to avoid breaking off the collar. (Doesn’t always work, but it seems to help.) I shaved the pegs until they fit the holes, at nearly the right depth, then “greased ’em up” with peg dope, and worked them in, so that the holes and pegs fit perfectly. Later I trimmed off the excess length of each peg on the far side of the pegbox, domed and polished the cut ends, so they would look nice, and put the pegs back in place.
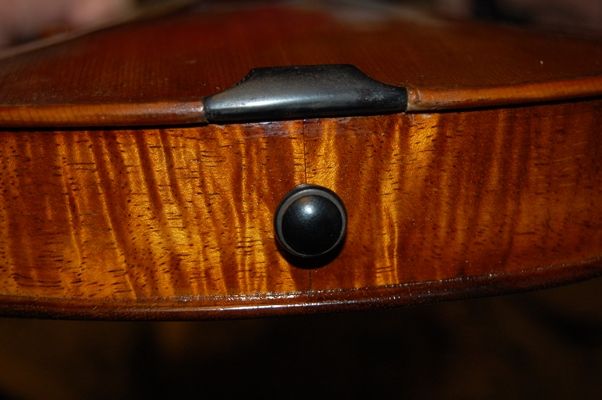
Saddle and pegs installed.
Fingerboard Installation
Last, I installed the fingerboard…I had marked ahead of time the exact location where the nut and fingerboard were to meet; so now, all I have to do is put the fingerboard exactly where it was before (against that line) and glue it in place. I positioned it using a single spring clamp and aligned the upper end as closely as I could, then aligned the lower end as well, and added a large spring clamp in that location. Finally, I re-adjusted the upper and lower clamps until both ends were perfect.
Then I removed the lower clamp, and, using a thin palette knife, I ladled hot hide glue into the space between the neck and fingerboard, sliding the blade up the neck as far as it would comfortably go, and replaced that clamp so that it squeezed out hot hide glue all around. I cleaned up the excess quickly, and double checked to make sure that the position was again perfect.
Then I removed the upper clamp, and repeated the gluing routine, but this time, as I cleaned up, I kept adding more clamps, removing a previous one, and wiping carefully, until I had four clamps in place and no glue drops where they did not belong.
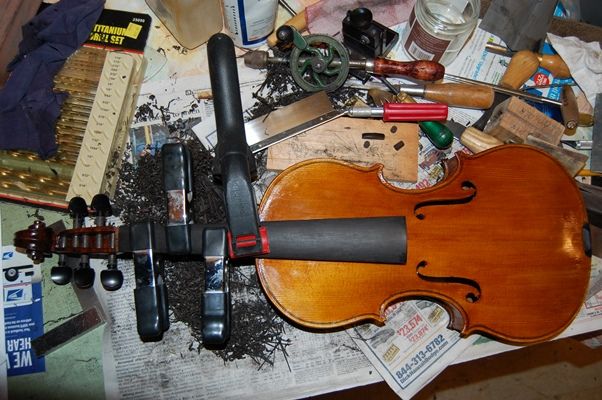
Fingerboard installed with hot hide glue and spring clamps.
That was pretty much the end of the day. My hands were tired and hurting, and I had other things that needed to be done. Much later, I got back and removed the clamps:
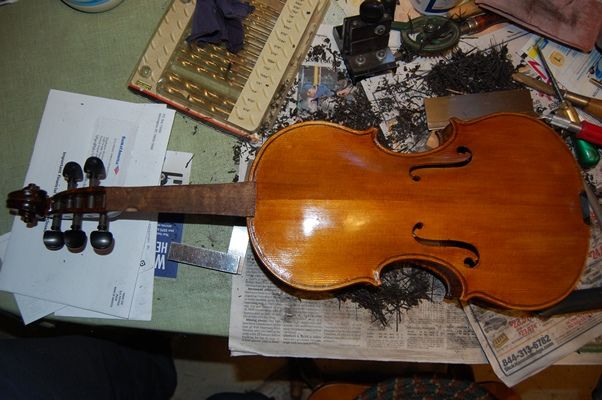
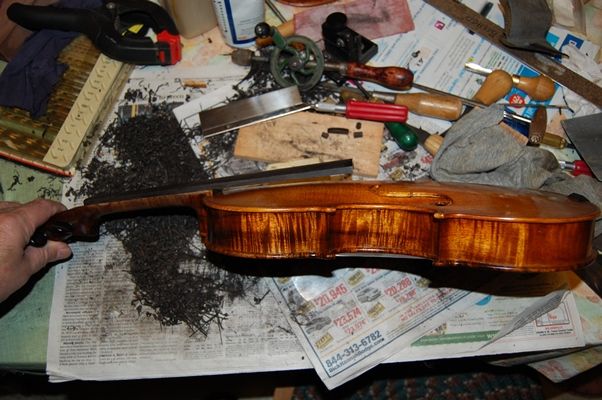
Side view with fittings.
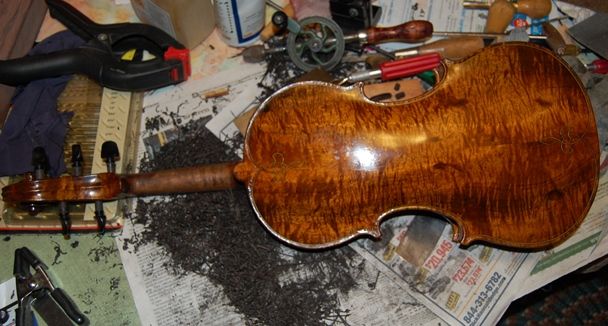
Back view with fittings.
The nut will have to wait until the fingerboard has been planed and scraped to exactly the right curvature, and polished smooth. We call that “dressing” the fingerboard.
After that it will be “set-up” time.
My next post will show the finished fiddle, strings and all.
Thanks for looking.
If you found this post helpful, please share with your friends!

 Follow