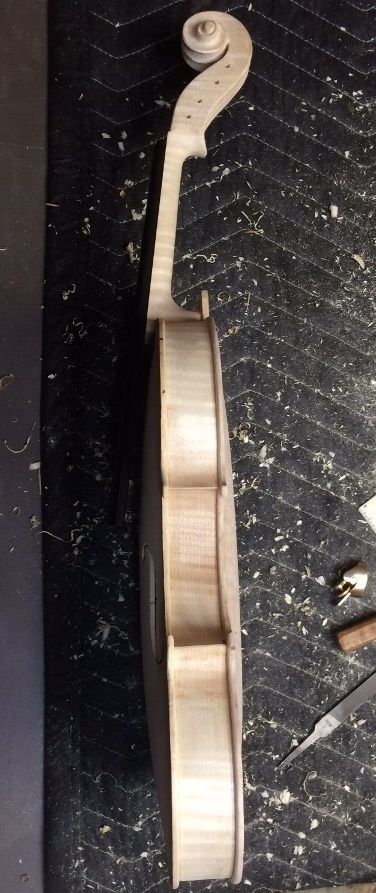
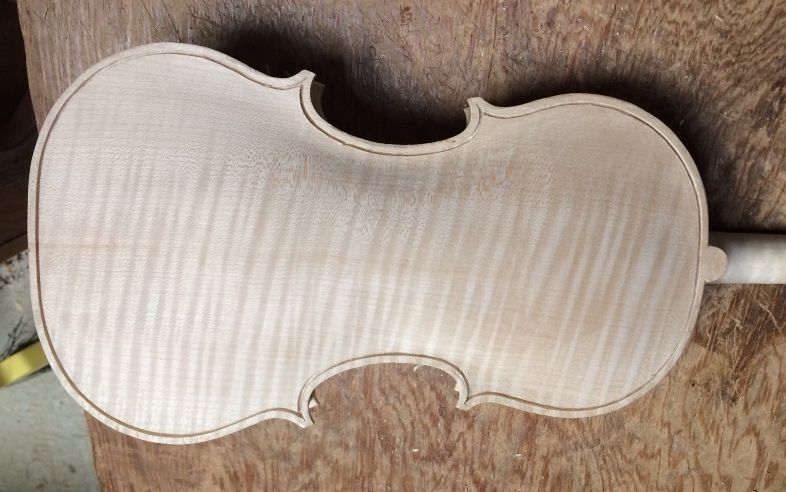
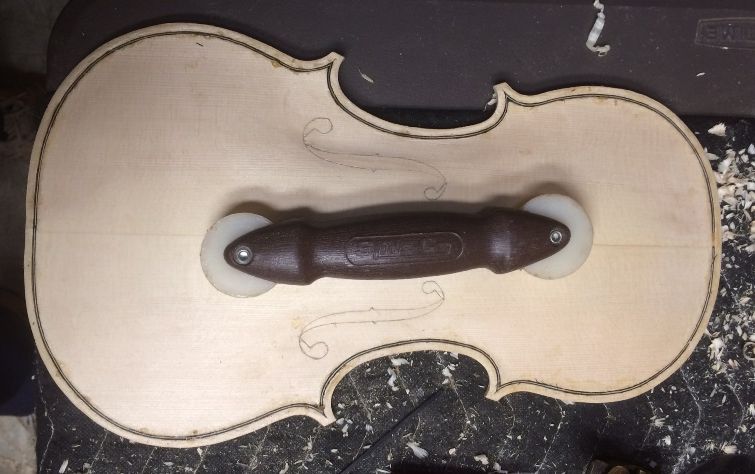
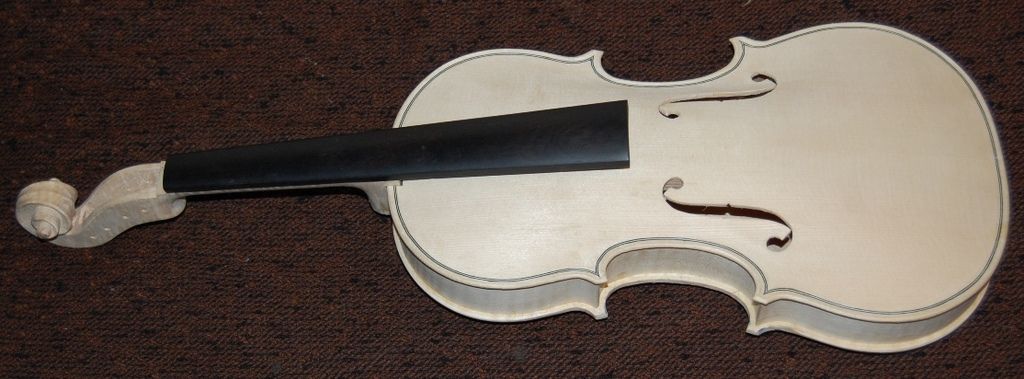
When I installed the back plate, the heel had been trimmed flush with the back of the garland, but the upper surface of the heel was still quite irregular, and the upper end of the button was ridiculously oversized. The excess wood made it easy for me to install a clamp, and get the back plate glued on securely. So…when I removed all the clamps, this is what it looked like:
Back plate installed; button and heel not yet trimmed.
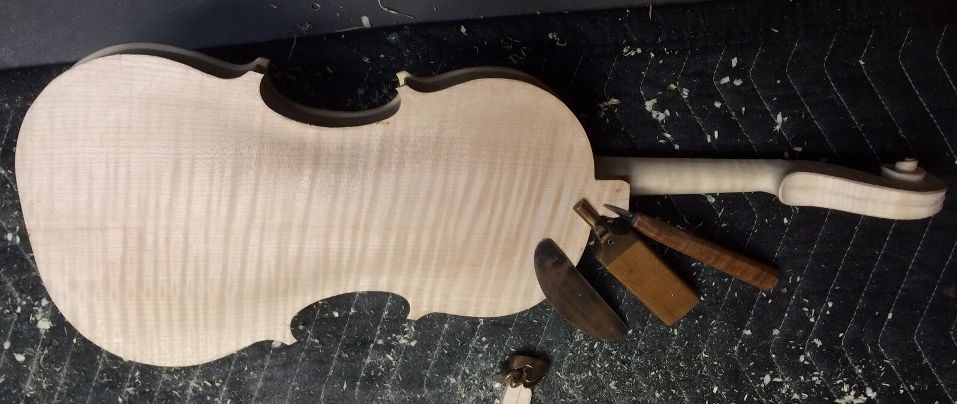
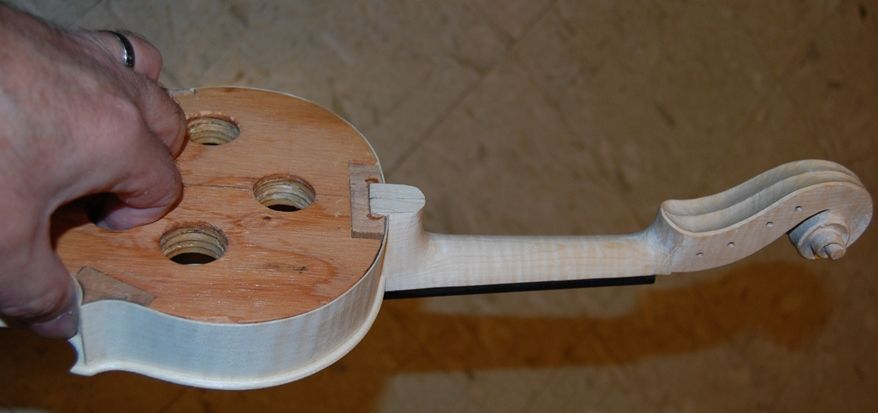
Next, I will trim the button and heel, then add purfling, then scrape. These are the tools I will use.
This is roughly the shape the button will be, but a little more refined, I hope.
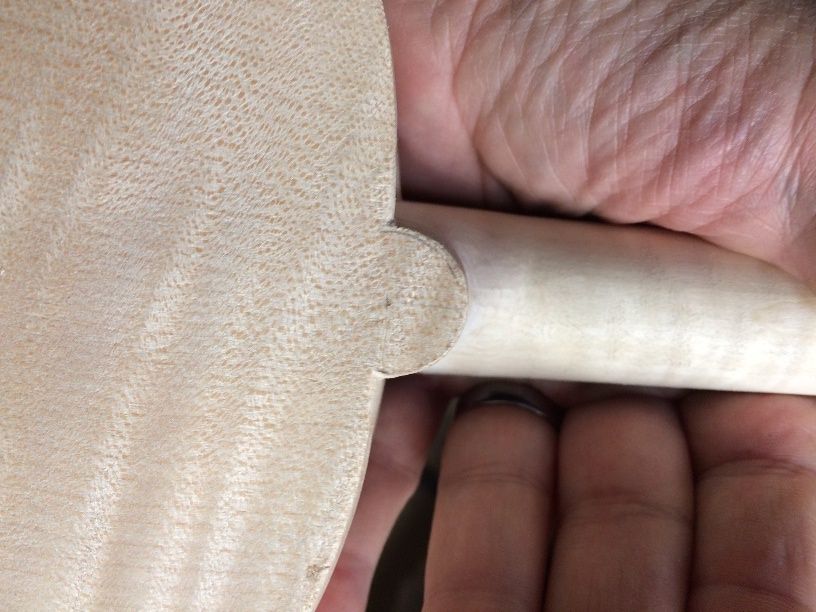
Side view of the heel and the button. The closeness of the camera warps the picture a little.
Installing the Purfling
The next thing was to scribe in the purfling slot. I used the purfling marker to scribe the double line exactly 4mm from the outer perimeter of the plate, except the corners, where I used a sharp pencil to sketch the “bee-stings” in by hand. Then I incised the lines all the way around, just barely deepening the lines, so that they are more visible, and a little easier to follow with the blade of my small knife.
Purfling slot lines lightly incised.
Then I slice in pass after pass, trying to get the lines deep enough for the purfling I will install. I usually find that, especially on the hard maple, I have to cut the slot in two layers: the first gets about half the depth I want, and the second finishes the slot. Here is the slot at half-depth:
It looks good, but it is not deep enough.
Purfling slot ready for purfling.
Back purfling installed…glue still wet. 🙂
And the Front!
Back to Work!
As most of you know, I had undergone hernia surgery, just after Christmas, and had a 6″ x 8″ polypropylene mesh patch installed in my abdomen. I have been convalescing, and just this week, have finally been feeling better. So…I just received word that I will return to my work at Gunderson, Inc., tomorrow at 6AM. I think I had better call it a day, and try to get some sleep. 3:30AM comes at the same time, every morning, whether I am ready or not. I will get home sometime after 4PM, I expect. Maybe I can jump back in where I left off. 🙂
Tomorrow evening, then, I hope to complete the purfling channel and the outer edgework of both the front and back plates, and begin the final scraping in preparation for varnishing. Any little glitch, regardless of how tiny, will be very visible under the varnish. So this part has to be done with great care.
Thanks for looking.
If you found this post helpful, please share with your friends!
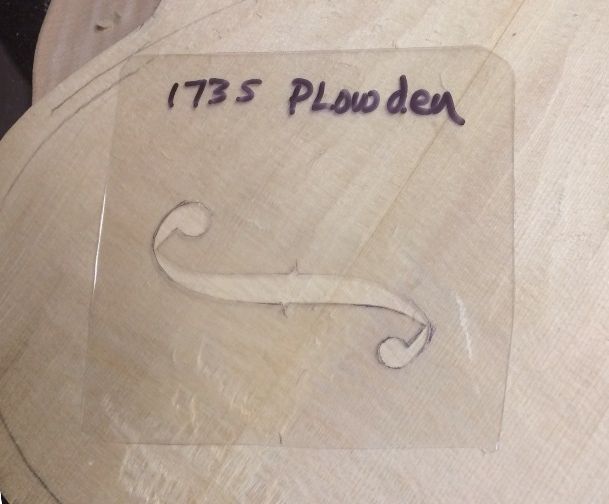
I had to make a new template for the f-holes of the Guarneri model. I thought that I had made one some time ago, but if I did, I guess I must have misplaced it. I measured the image on the poster, to make certain that it matched the dimensions of the technical data on the back, and it turned out to be quite accurate, so I procured a piece of thin, fairly stiff, clear plastic (also called “re-cycled blister pack” from some sort of hardware I had bought), and laid it flat on the poster, and traced the outline of the hole with a ball-point pen. Then I traced the lines with a small sharp knife, until I was able to pop the waste plastic out, leaving a very nice template.
New f-hole template.
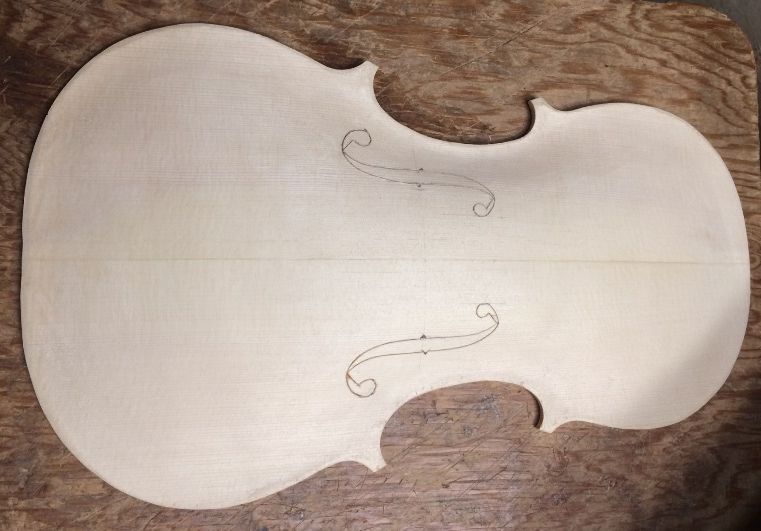
I laid out the “mensur” (sometimes called “stop-length”) on the front plate, for the bridge location, then began to lay out the relative positions of the upper and lower eyes. I had the data sheet to tell me how far apart they were to be, how far off center, and how far from the outer edges of the plate. I simply pushed it this way and that, until everything was according to the data sheet, and then traced the f-hole onto the plate, using a very sharp pencil. Then I flipped the template over and repeated the process on the other side. I double-checked everything, to make sure the layout was correct, cleaned up a few details, and was ready to incise the outlines of the f-holes.
F-hole layout complete. Ready to incise the outlines.
Incising the F-hole Outlines
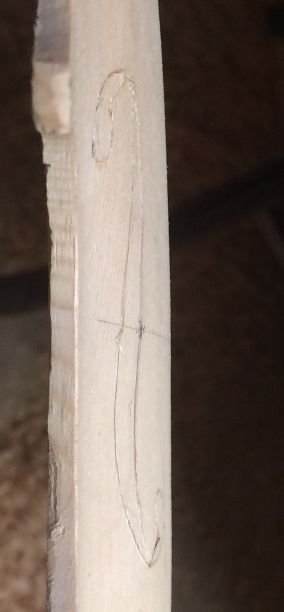
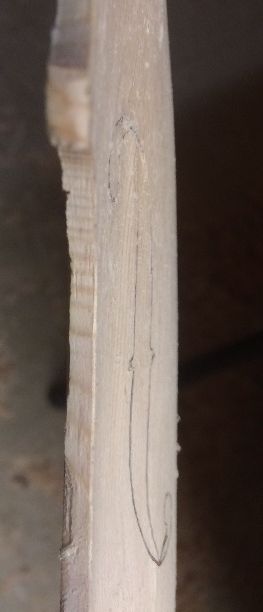
I am only incising the hole outlines at this point, not making any attempt to cut them out: I have found that there is always a small flaw in my archings, in that they are always a little too high at the lower end of the f-holes. The result is that, if I look at them from the edge of the plate, my f-hole outlines look like a letter “S”, laid on its side, whereas when I look at the side view of any of Stradivari’s or Guarneri’s instruments, the stem of the f-holes seem to be nearly parallel to the plane of the ribs. So, to correct this anomaly, I lay the holes out so that they are correct, looking from the front; then I incise my outlines deeply, and finally plane and scrape the “south” end of the holes until the stems look correct from the side. The front view remains unchanged, and now it looks good from the side as well. Here is a “before and after” comparison:
Side view of an F-hole before correction.
Side view of the same F-hole after correction.
Beginning the Purfling Slot
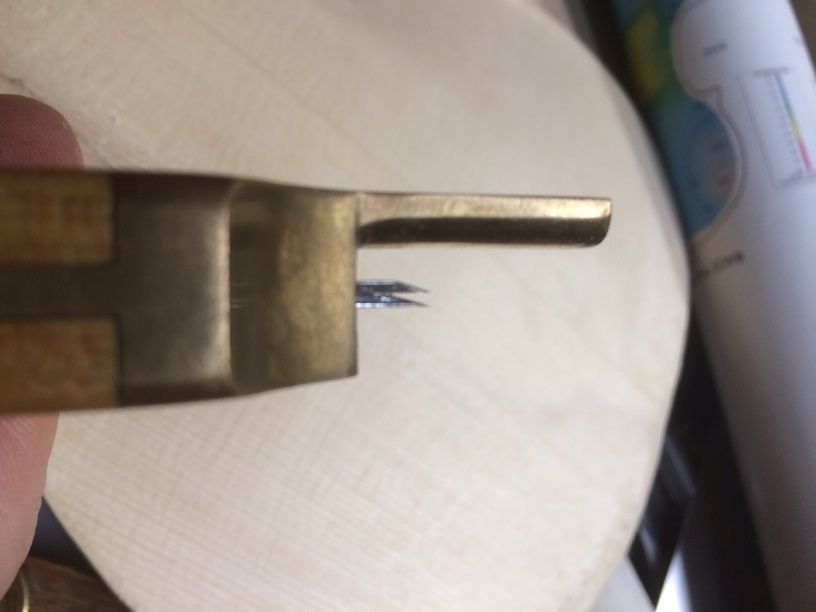
The tool used to mark the location and dimensions of the purfling slot is called a “purfling marker,” or, fairly commonly, a “purfling cutter.” I suppose that, because there are two sharp blades on the tool, which are carefully set to the correct distance apart for the width of the purfling slot, and the correct distance in from the edge of the plate, it probably seems logical to call it a “cutter.” But the fact is, the tool does not work well for that purpose, and it works very well for just creasing the surface of the plate, thus scribing a double line virtually all the way around the plate. Usually the corners themselves must be laid out separately, either by hand and eye, or, by using a special template. (I have done both.)
Here is the tool, viewed from the edge, so you can see the two blades. There is a pair of small set-screws that hold the position of the twin blades.
Purfling marker blades. The blades are set for the width of the actual purfling, and the desired distance (4 mm, in this case) from the edge of the plate.
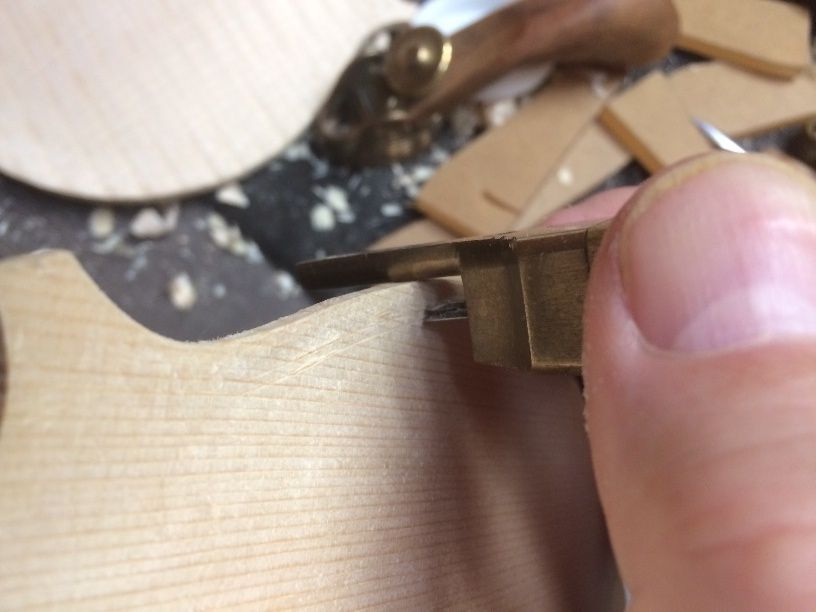
Purfling marker in use. The rounded brass shaft is pressed tightly against the edge of the plate.
Once the slot is marked all the way around, and I am satisfied with the look of the corners, I begin incising the purfling slot. The first time around, I am barely deepening the lines left by the marker; essentially just “darkening” those lines. The second time around, I press a little harder, cutting a deeper path through the wood. After that, I can cut as aggressively as I need to, and not have to worry about the blade being “turned” by a hard winter-reed, and marring the plate. This practice is especially important on the front plate, which invariably of spruce: The summer grains in spruce are very soft and easy to slice. But the winter grains (or “reeds”, as they are called) are much harder, and it is very easy for a harder, winter reed to turn a blade that is trying to cut too deeply from the start. (Hard experience speaking, here.)
Lightly tracing the outlines of the purfling slot with a thin, sharp blade.
Initial outline lightly incised. Ready for final cuts, and removal of waste wood.
Picking out Waste Wood from the Purfling Slot
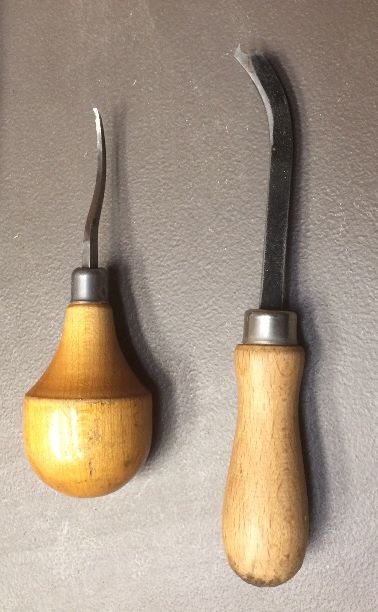
After cutting to the approximate depth I want the purfling slot, I use one of several tools to pick the waste wood out of the slot between the incisions: any of them could be called a purfling pick. One of them is actually a 1/16″ gouge, made by the now-defunct Millers Falls tool people (at least, if they are still in business, I have lost track of them.) One is a tool I made for myself, attempting to achieve an easier, higher-quality cut. (It’s not that great, but it works…I can’t find it, now anyway….) The third is an actual “purfling pick” made by a commercial tool-maker. (I have had other such tools, which were functional to varying degrees. Some I eventually set aside because of poor-quality steel. They wouldn’t hold an edge.) So here are photos of the two I regularly use:
Top tool is a purfling pick from Howard Core Co., and the bottom one is a 1/16″ gouge made by Millers Falls Co.
The idea, ultimately, is to end up with a slot into which my purfling will easily fit, but with very little extra room. I want the glue to swell the wood a tiny bit, and make it fit tightly, when I glue it in place. I also want my corners to look good. There is a reason they are frequently called “bee-stings.” I want them to be sharp and clear, and pointed in the right direction.
Using the purfling groove cleaner, (AKA “purfling pick.”)
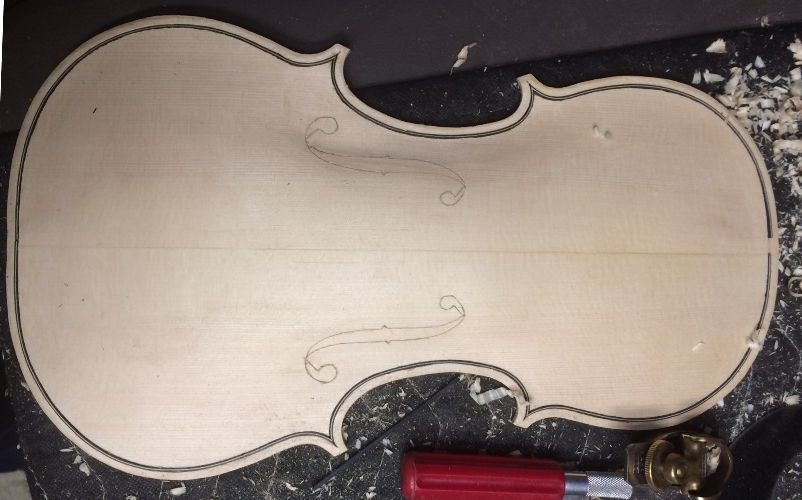
Purfling slot completed. The dark dot at the top is hide glue, where I repaired a “slip.”
Installing Purfling
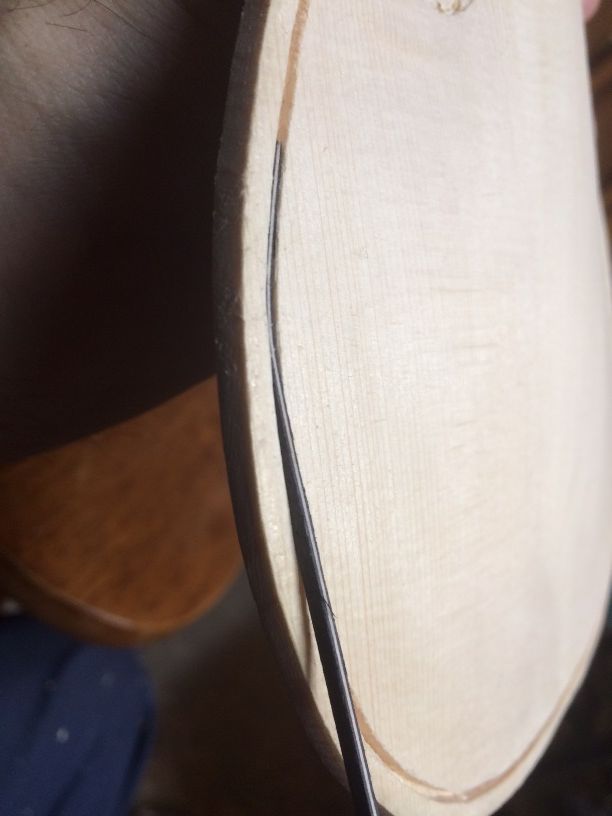
I make certain the slot is the right width and depth, checking it with a piece of scrap purfling, then I cut and bend the purfling to fit, giving special attention to the mitered corners. Finally, I remove one section at a time, slip hot hide-glue into the slot, using a thin palette-knife, and quickly re-insert the section of purfling, using a special roller to press it to the bottom of the slot. Once I have all six (four on the back plate) sections installed, I clean up any excess glue, and set the plate aside to dry.
Checking the depth and width of the purfling slot. I want the purfling to end up just below the surface of the plate.
Purfling cut, mitered, bent and inserted into the dry slot. the top center will be removed when the neck mortise is cut.
Purfling glued in place, pressed to the bottom of the slot, using the rollers in the picture.
The back plate is prepared in exactly the same way, except that I like to make the upper and lower purfling sections in one piece on the back. On the front, the top and bottom will eventually be removed when I cut the neck and saddle mortices, so I stop the purfling near the center at the top and bottom of the front plate. In some ways, the back is easier, in that the blade does not tend to wander as easily; but the maple is just a great deal tougher, too, so it is more physically demanding.
Next time, we will (maybe) talk about the final edgework, marking the crest of the edges, and fairing the curve from the bottom of the purfling channel up onto the curvature of the arching. But perhaps carving out the interior would be more appropriate. 🙂
Thanks for looking.
If you found this post helpful, please share with your friends!
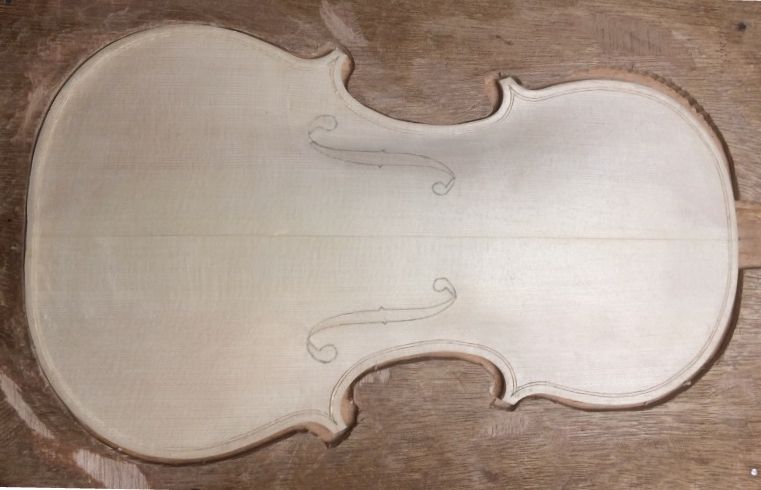
More Progress: The Plowden-model looks like a violin!
Removed the Mold and Installed the Back Linings
One nice thing about this (French-style) mold is that it is easy to remove– it usually takes less than five minutes to get it out, provided I have waxed the non-glued surfaces of the mold, so there is no chance of an accidental adhesion to the ribs. I simply use a flat chisel to crack the glue loose at each block, where it is attached to the mold, and then slip my parting knife (in reality, it is an old potato knife) between the block and the mold, to make sure nothing is still adhering to the mold. After that I can slide the mold out by lifting as shown, while wiggling each individual block to make sure they are all moving evenly. The only drawback is that I have to install the back linings after the mold is removed, and the rib garland is pretty fragile. In the past, I have used a two-part collapsible mold, in the italian style (centered between the front and back edges of the ribs); but it is more difficult to remove. The only real advantage is that I can install all the linings while the corpus is still on the mold, and still get the mold out without too much trouble. I believe it does have a slightly greater tendency to leave the ribs slightly convex in the center, as well, and some people find that attractive. (I do too…. Perhaps I will eventually go back to using the Italian-style molds.)
Back before mold removal. You can see how thin and fragile those ribs are.
This time, the linings went in without a struggle, though, and the whole task took about 30-40 minutes. A few hours later, the glue had dried, and I was able to remove all the tiny spring-clamps, and get going on leveling the back of the garland, and cleaning up the interior.
Back linings installed, ready for shaping and smoothing.
Blocks and linings before shaping and smoothing. I had trimmed the front side of the blocks, and the front linings, before I installed the front plate.
Blocks and linings shaped, ready for scraping and smoothing. The blocks and linings are weeping willow…the bass bar is Sitka spruce.
Cleaning up the Interior
Cleaning the interior primarily means shaping the linings and blocks, after the mold is out of the way, but it also is a final opportunity to scrape any rough spots, and make any minuscule repairs. So, I put on my magnifying visor, and look things over very carefully. I use a knife to trim the linings so that they are triangular in cross-section, thickest at the edge, to suport the edge of the rib, but tapered so as to not restrict the vibrations of the middle of the ribs too much.
One thing I have to remember, at this point, is that it is also my “last shot” at the interior of the back plate, so, before I install it, I carefully check and scrape it, and, as a final “seal of approval”, I install my signed and numbered label, gluing it in place where it will be visible through the bass-side sound-hole. All my instruments are individually hand-crafted, and each ends up a signed and numbered original, not a mass-produced instrument. I’m really not interested in doing things the “factory” way.
Installing the Back Plate
I used to complete all the work on the back plate, including purfling and final edge-work before installing it on the garland. But I have recently altered my order of operations so that I purfle and do edgework after the plate is installed. This allows me to adjust the plate overhang boundaries, and make final decisions as to how I want things to look, before permanently locking the shape in place by installing the purfling.
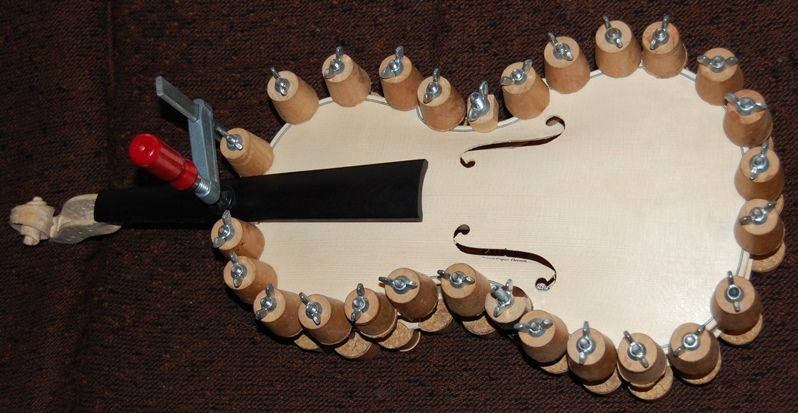
I also used to “self-induce panic,” by spreading hot hide glue around the perimeter of the garland and plate, and then frantically trying to align the edges perfectly and adjust all the (25-30) spool-clamps, etc. before the glue gelled. That was a fool’s-errand, as the glue usually gels far more quickly than I could ever get everything clamped in place. The late Sam Compton shared how he applied the glue and allowed it to gel, then aligned everything at a leisurely pace, gently clamping everything in place. Afterward, he went around the perimeter with a hair-dryer, gradually warming the plates until the glue re-liquefied. Finally, he tightened the clamps just enough to completely close the joints. Pretty clever.
I ended up clamping everything dry, then loosening a few clamps at a time, and slipping the hot hide-glue into the seams, using a very thin palette knife. That seems to work pretty well, and definitely eliminates stress. (His method probably is even better, but this is how I do things, for now.)
Back plate glued in place, using hot hide glue and spool clamps.
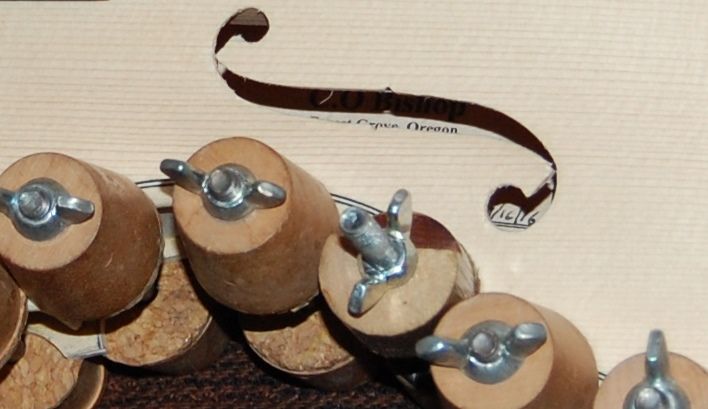
Label visible through f-hole. The f-holes still will require quite a bit of smoothing.
Final Edge Shape and Purfling
Once the back is securely glued in place, I can trim the edges to exactly the shape I want, so that the overhang is matching the front plate, etc., and then begin purfling.
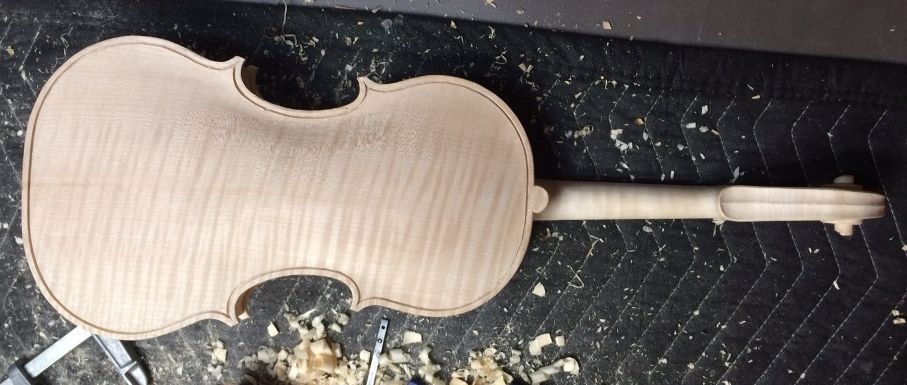
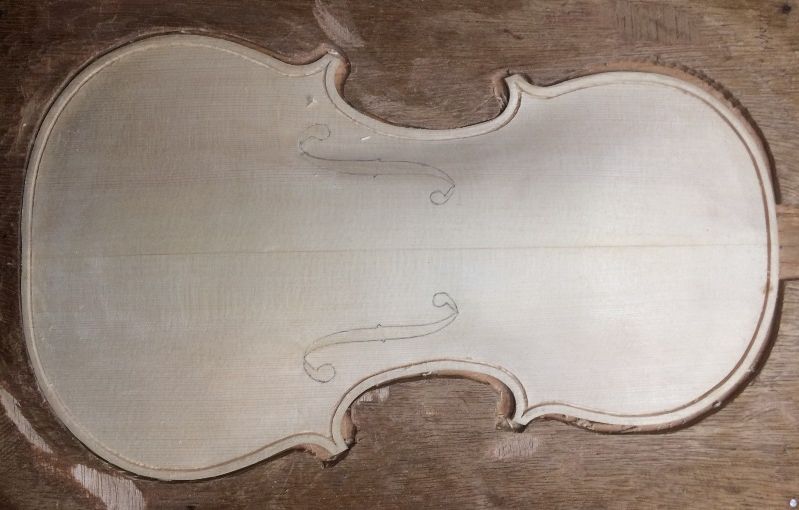
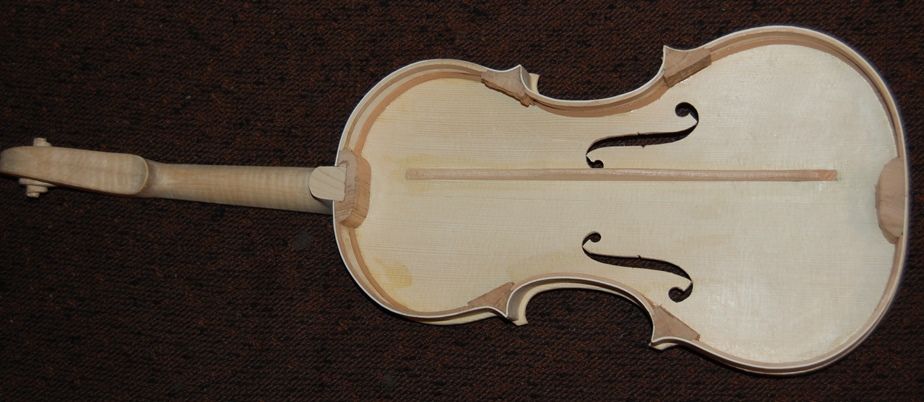
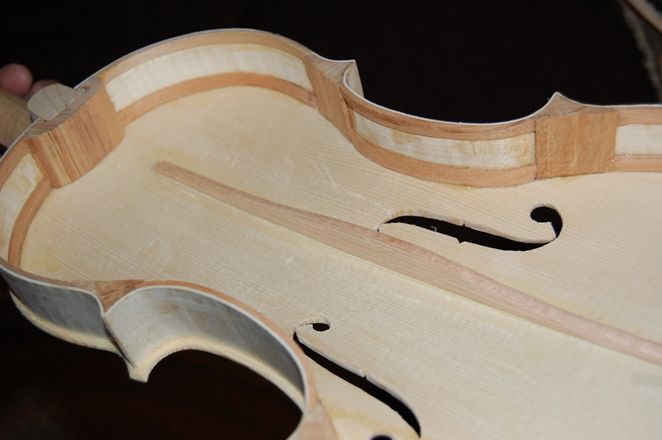
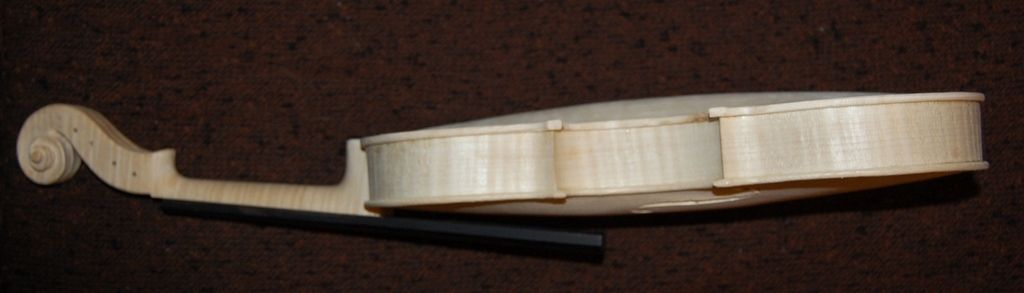
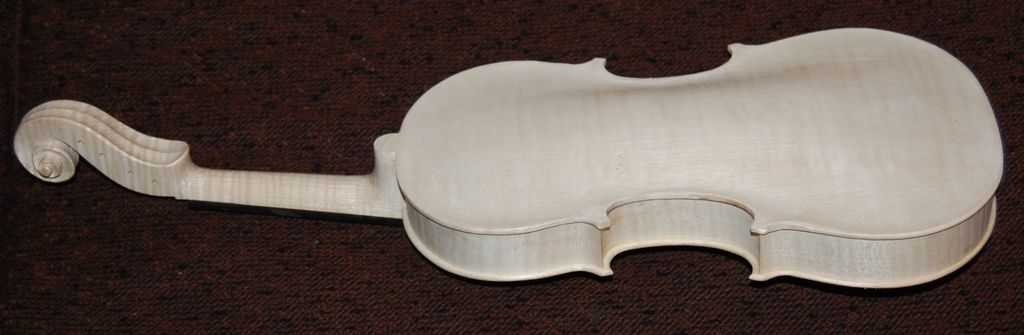
Front view: back plate has been installed and trimmed to size.
Side view, before purfling and edgework.
Back view: before purfling and edgework.
I use the purfling marker to scribe in the double lines (except for the corners) where the purfling will be inlaid. I then draw in the corners very carefully. I have occasionally used a template for the corners, but it seems to not always work, since the corners are not always exactly the same. So I end up just making some layout marks to get the limits delineated, and then I draw the corners in, freehand.
I incise the purfling slot with a small, sharp knife, in three or more steps:
The first pass with the knife is very shallow and light, only serving to deepen all the scribe marks.
The second and third passes bring the purfling slot to the correct depth, and
The last step is to use a purfling pick to remove all the waste wood between the paired cuts.
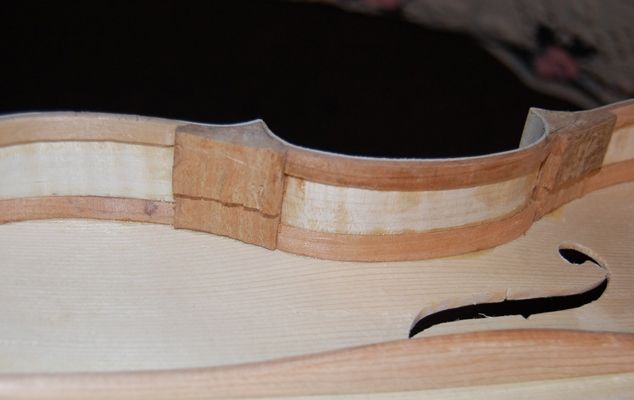
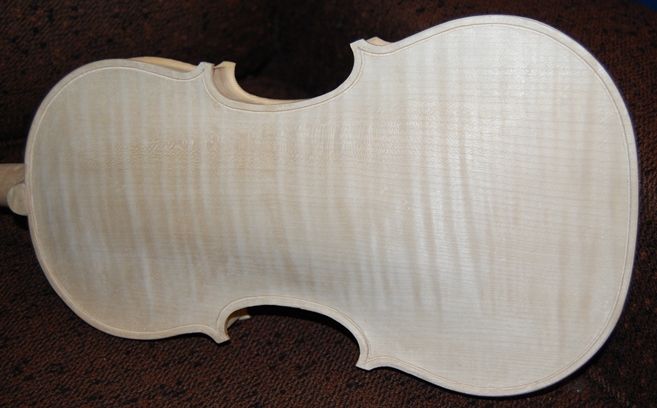
One-piece European maple back: the Purfling slot is partially completed; but still too shallow, and a little too tight.
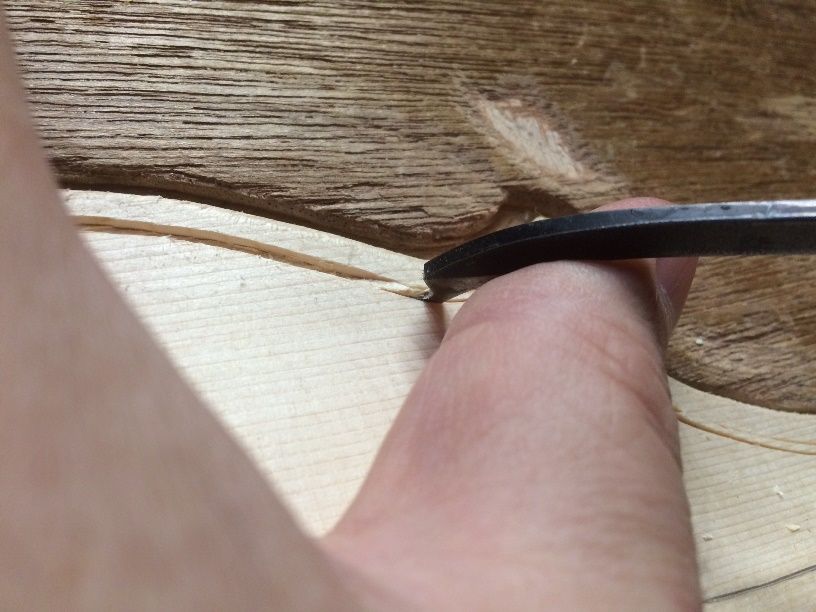
Purfling slot is completed… it turned out to be a little too tight: I used a tiny sharp knife to trim the tight spots, until everything fit.
I check the depth and width of the slot by inserting a small section of purfling into the slot, all the way around, until I am sure that the slot is correct. then I bend and fit the purfling strips, and make sure the fit is as exact as I can make it, terminating in the classic “bee-stings” at the corners, rather than a simple “mitered corner.”
Finally, when all is as close to perfect as I can manage, I lift each section of purfling partially out of the slot, one at a time, and slip hot, thin, hide glue into the slot, using the thin palette knife again. I press the purfling all the way down to the bottom of the slot, and allow the glue to dry before beginning the final edgework.
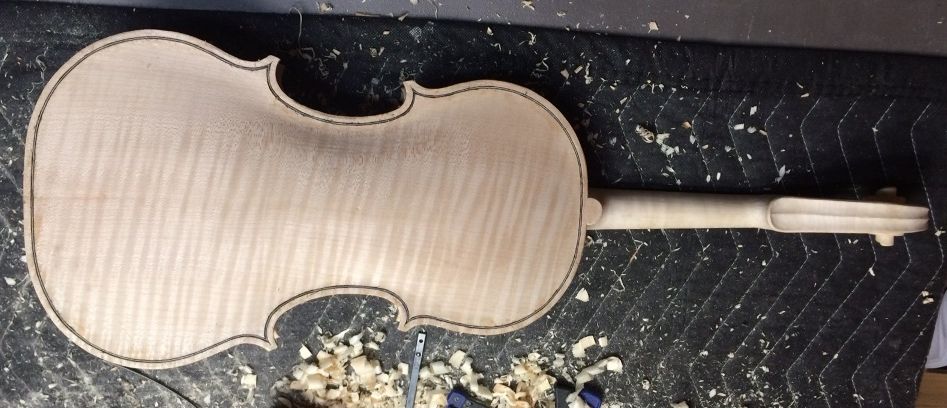
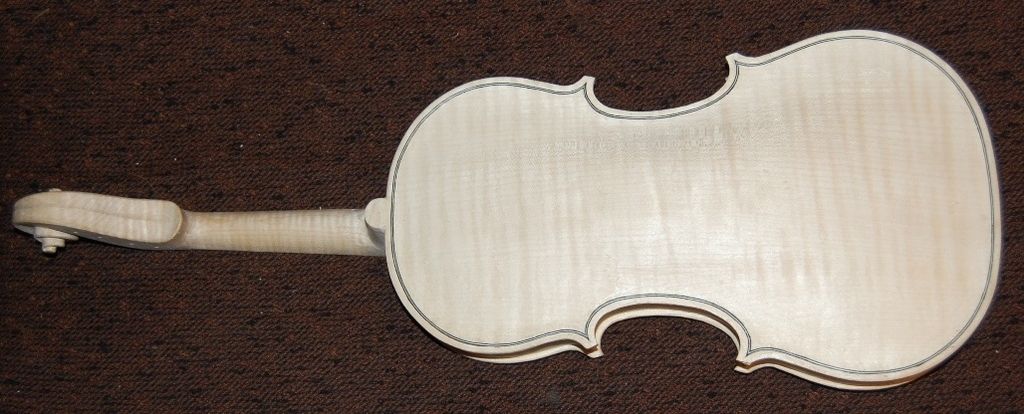
Back purfling completed. Channel still needs to be cut and edgework is still untouched.
The Channel, and Final Edgework:
I scribe a margin around the entire outer edge, usually about 1.6mm in from the outer edge. This will serve as the “limit” for the channel. I cut the channel using gouges first,then scrapers, and bringing the smooth curve up to match the scribed limit. Then I file the outer edge to round in from the center of the edge of the plate up to meet the scribed margin. I true up lines using scrapers, files, and abrasives, and then I am ready for final varnish preparations.
We’ll talk about all that in the next post, and post pictures. I need to get this one wrapped up. I’ll show close-ups of the edges and corners next time. there is still a long way to go, but it is looking more encouraging. 🙂
Thanks for looking.
If you found this post helpful, please share with your friends!

 Follow