Other Student Instruments

Please share with your friends!

Beginner-Level Fiddles

MY Beginning:

When I first began learning lutherie, in 1999, as I noted on the “about me” page, I began by purchasing about 70 instruments and a bunch of bows (60, maybe) on eBay, and practicing repairing them. I mostly sold them for pretty cheap prices.

Some were white violins I bought so that I could practice varvishing and set-up.  Some were old Pfretschners or Ton-Klars, or other student instruments from the mid 1900’s. Others were surviving relics of the hundreds of thousands of cheap violins that came out of Germany and other sources in Europe, and flooded the market around the 1890’s through early 1900’s.

Some were modern cheap student instruments, made in China, poorly set-up, with horrible cheap strings and pegs. And, then, some were simply a mistake to buy, and are what we call a “VSO” (violin-shaped object). Those were not really fixable, and I eventually burned them.

What is a student violin?

Student violins technically could span the realm from VSO to fairly expensive factory-made instruments and still bear that name…obviously on one end we have instruments that are sold to an unsupecting public, and that cannot be made to play in tune, let alone sound decent. Those are a sad part of the trade. They frequently sell for less than $100, and the amount of work it would take to make them a workable musical instrument is far more than the purchase price…and still might not result in a decent instrument.

Unfortunately, right at about that same price-level, I have seen some amazingly good-sounding violins coming out of department stores, etc. where they wouldn’t know a violin from a plastic ukulele. And they sounded pretty good.

How long would they sound good? I have no idea. What percentage of the instruments actually sounded good? Again, I have no idea…the ones I picked up, tuned, and played were discouragingly good: I thought, “If a $100 instrument sounds that good, what chance do I have to compete?” But all is not lost…there are still folks who have a discerning enough ear to hear the difference, and a discerning enough eye to see the difference…so not everyone will run to Wal-Mart (or wherever) and grab their violins.

Still, a student violin does have to be affordable, or parents will sadly tell their kids, “Sorry, we can’t afford a violin. Want to play a trumpet?”  So, in my mind, there is still room for the parent who can only afford a $300-$500 instrument. But how can you get one that sounds decent?

Staying Tuned and Sounding Good

What I have done (beginning with those eBay specials, and moving to other sources later) was to obtain the cheap, approximately $100 violins, and fix their problems (new, properly fitted pegs, new, properly cut bridge, new strings, etc.), and then sell them for my costs plus the labor of upgrading them. Thus, what was a $100+ instrument ends up being a $150-200 instrument, and so forth. And if I happened on an antique that was a gem, I cleaned it, repaired it as needed, set it up with good strings, a case and a bow, and sold it for $350-400.

I have only had two come back, ever– one because the climate it was taken to was far more humid, and the fingerboard warped badly (I replaced the fingerboard at no charge), and the other because the soundpost kept falling over. (??)

I re-set it three times, but finally asked the young player (a strapping tall lad with big hands,) whether he had been holding the instrument (a large viola) by gripping it across the c-bouts with his thumb and fingers. He said, “Uh-huh!” I sighed and said, “Don’t do that! That is why the soundpost keeps falling over– you have enough strength in your big hands that you are flexing the front and back plates, making the soundpost so loose it falls over.”  (It never fell over again.)

All this is to say that ALL of the players (and their parents) were completely satisfied…I did have one orchestra director from an upscale school who flatly told the parents that they were to get their daughter a more expensive violin. The quality and sound was not the issue…the looks were. It did not look expensive.  Sorry…

Beginner-level Student Instruments

Initially I tried to maintain a stock of every size of beginner-level student instrument…but there was never much money in them– it barely paid to handle them…so I eventually decided I only wanted to deal with the better instruments. I began offering advanced student instruments at much higher prices– still less than half what I charge for a hand-made, luthier-made instrument. But it made too big a gap– there were people being left out.

This was brought sharply to my attention recently, when a friend asked whether I could get his sister-in-law a student violin. He said she was going to get a $60 violin from eBay. He had tried to dissuade her, telling her that what she would receive would not sound good, and would not stay in tune; but she was really reluctant to spend any more money, especially because it was a 3/4 size she needed, and she knew her daughter would soon outgrow it, and she would have to spend the money again for a full-size.

So I agreed to send three instruments, at three prices. I sent a cheap “Cremona” brand student violin at $150, with Red Label strings; a somewhat better grade “Cremona” at $250, with Calvert strings, and a 60-year old “Ton-Klar” with a beautiful, one-piece back, and great tone, at $350, with Dominant strings. Each had a new case, bow, and rosin, as well as the inevitable straps to turn the violin into a backpack.

Failing the Test

(Some of you may see right away what I was doing: I put strings on the violins to match the price-point;  strings that would sound better with the higher priced instrument.) I hoped that she would be able to hear the difference, but I felt that if she could not tell the difference, there was no point in arguing. They asked whether it was OK to take it to their teacher and have her play all of them. (Absolutely! I knew the teacher could tell the difference!)

The outcome? The lady still bought the cheapest one, at $150; but the teacher jumped on the $350 Ton-Klar, and bought it immediately, as she definitely saw it as a bargain. A week later, a friend of the first lady asked whether she could get one of the $150 cheapies (sigh…). But that’s OK. They will play dependably, and I back them just like I do the expensive instruments, trade-in and all. I figure maybe someday that child will want a good violin. However, I have stopped dealing in the very cheap imports. 

Intermediate and Advanced Student Instruments

I can supply a decent Intermediate-student instrument for about $2,000. I That should help close the gaps, so that people can afford to play, and trade up to a better instrument later, still without bankrupting themselves.

I can buy an unfinished instrument, in the white, and do every bit of the work to complete the finishing and set-up. Because I don’t build them from scratch, they are not “signed, numbered and dated instruments;” but they are the next best thing, in terms of sound and playability. and I can sell them for about a third of what I charge for my handmade instruments.

If you need something even less costly, I will help you find one with someone else.

Used Instruments will usually fit into the Student Instrument or the Advanced Student instrument category. I do whatever upgrades are needed and sell them at prices I think are fair.

All my instruments carry the same guarantee.

If you found this post helpful, please share with your friends!

Luthier Repairs

Please share with your friends!

(Repairs to the Luthier)

I haven’t felt very good for most of this year, but usually nothing very specific– back-aches, belly-aches, indigestion, etc. Nothing that would send me hurrying to a doctor, for sure.

Then, back in May or June, one evening after I had showered and was getting ready for bed, I noticed a definite, thumb-sized lump in my abdomen. I could easily feel it by running my hand across it, and it was quite firm…and hadn’t been there before.

It did not feel like a hernia, so I figured the only two things it could be were a subcutaneous cyst or a tumor. I called in my wife, Ann, to examine the thing, and she could actually see it, poking up when she pressed down the skin. She concluded, too, that it must be either a cyst or a tumor, and insisted that I see a doctor (I would have anyway– I’m not stupid, I just don’t run to the doctor everytime something happens.) So I went off to sleep, intending to call for an appointment in the morning. The problem was that, in the morning, the thing was gone. I mean completely gone! No trace. We marvelled over the disappearance, and figured that it must have been some sort of cyst, and, with our probing, we must have caused it to drain overnight. We shrugged and went on with life…nothing to show the doctor…no other symptoms; no reason for an appointment.

So, last Thursday, after work, I had a fairly severe bout of belly/back pain. It seemed to begin in the solar plexus area and radiate through to the middle of my back so completely that I was really unsure which was the source of the pain…but the pain was severe enough that if I had possessed some type of narcotic pain reliever, I would have taken it (another thing I don’t often do). So I took maximum doses of Tylenol and Advil, and called in sick on Friday. Saturday morning I seemed to be a little better, but it began to get worse again, and Ann prevailed upon me to call the doctor. So I did, and ended up, an hour later, at the St. Vincent Providence Hospital ER.

By the time I got there, the pain was much more severe, and had moved around to where I had a band of pain all the way around my waist at the level of my solar plexus. They immediately ran test after test, and within an hour had it pegged as the gall bladder. The surgeon came in Saturday night and palpated my abdomen, and she commented on how rare it was to be able to feel the gall bladder through the abdominal wall. (?) I reached down, and, sure enough, there was that “cyst” again!

10:15 Sunday morning, they took the thing out. They were able to do it Laparoscopically, so I have four tiny incisions instead of one large one, and recovery is two weeks, not six. They said they had to partially empty the monster before they could get it out, as it was the size of a small squash. That’s hard to believe…I had no idea they could be that size…but they said it was completely blocked, and filled with “sludge” (their word). They emphasized several times how unusually enlarged it had been.

The hospital stay was extremely positive. Every single member of the medical team, care staff, orderlies, radiologists (or whatever the correct term is) and other technologists…EVERYone was completely kind, compassionate, helpful, professional and supportive. I always felt completely surrounded by care, not criticism, or anything negative.

I was home by Monday evening, and am feeling pretty good, all things considered. There are not even any stitches to remove– the stitches inside are the kind that eventually are absorbed by the body, and the outside incisions were closed with superglue. (I love it!)

I hope that all the general malaise had been caused by the one incipient source, and that I will enjoy good health again. I had gotten pretty discouraged for a while, and was losing interest in lutherie (as well as most other things), so I hope this will improve my outlook a little.

I did sell four (cheaper) student violins this past month, so at least I am getting rid of old stock, if not selling my better instruments. Product flow is product flow. I’m not complaining.

I need to get back into the shop and get building again.

Update, November 10th: I ended up back in the hospital last Thursday. It turned out that there was a small (6mm diameter) stone that had already moved down into the bile duct before they removed the gall bladder, so I was plugged again within about two weeks, and had exactly the same symptoms again. I was pretty despondent about it, as I really did NOT want more surgery, but as it turned out, they were able to remove the stone using a special type of endoscope, without surgery at all.  What a relief! I came home Saturday afternoon, and I really do hope I am finally on the mend now.

My thanks to all who have extended friendly wishes.

If you found this post helpful, please share with your friends!

Bass Bow Progress

Please share with your friends!

Bass Bow Journey Continues

It has been a while since I felt that I could afford the time to work on the bow…I would go by and look at it, sometimes, but I had other things to do– cleaned the chimney, took apart the wood stove and re-cemented gaskets, etc. It’s funny–the commercial chimney sweeps all tell me that my chimney is too dangerous, and they will not touch it– (very steep roof– 12:12 pitch– and quite high).  So I have to do it myself every year. Ah, well…it gives me something to grin about…and leaves me sore for a few days every year. I’ll be 60 this month: the irony that I have to go clean the chimney that men half my age refuse to attempt is not lost on me.

Making a Stainless Steel Bow-tip Plate

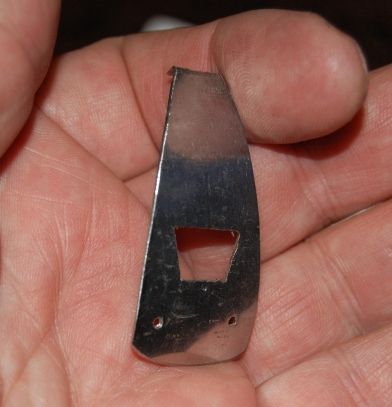
Anyhow, I finally took apart one of the stainless utensils I had bought for a dollar at a resale shop, and hacksawed out the rough shape of the tip plate. Drilled holes for pins, cut out the trapezoidal window for the tip mortise, and bent the little tab on the end of the tip plate. Felt pretty good about it…bent it to fit the curve of the bow tip. Looked pretty nice.

stainless steel tip plate for a bass bow
First try at making a stainless steel tip plate for a bass bow.

Making the Ebony Liner for the Bow Tip

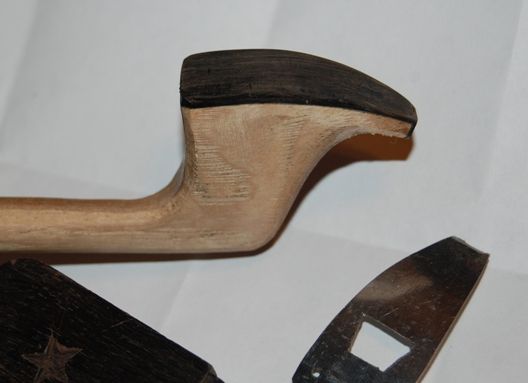
I had a terrible time bending ebony to fit the bow tip (probably a little too thick), but I managed to do it, and even got it fitted, glued, and trimmed to size:

Ebony lining with stainless tip plate, for Bass Bow.

Fitting the Tip Plate

Then, I had hoped to glue the tip plate in place, and even went to the auto-parts store and bought some black epoxy that is supposedly “specially formulated to glue all metals”. But when I got home and looked more carefully, trying to fit the tip plate to the ebony liner, it turns out that I had used up all my tolerances on the stainless and it was just a little too small to fit the bow correctly. (Rats!) That left me two choices:

  1. Modify the bow to fit the stainless tip plate, (which would be dumb) or
  2. Go make another tip plate and be more careful this time. (sigh…)

So I will do that later. (This is not a new thing for me– I have a long history of trying to make something a perfect fit, and finding out that I went just a bit too far…thus proving the wisdom of the adage, “measure twice, cut once.”)

Gold Star Inlays for the African Blackwood Frog

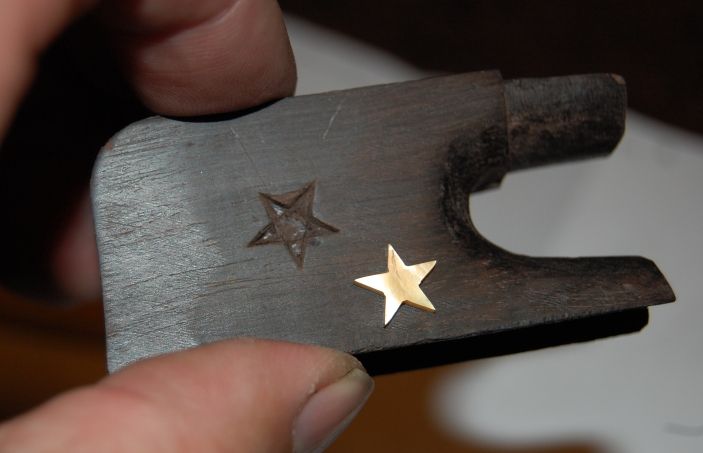
I decided to work on inlaying the little (10 mm) gold stars I had bought from Andy DePaule. I laid out the locations as accurately as I could, then lightly glued the stars in place with a tiny dot of superglue. When the glue was hard, I used an X-acto knife to scribe around the stars, cutting as accurately as I could, into the African Blackwood  of the frog. Then, using a small flat gouge, I popped the mother of pearl stars back off, and began to carve out the cavities for the inlays.

Inlay in progress
Inlay in progress

I cut around the perimeter as deeply as I could with a tiny chisel, then scooped out the excess wood with an even tinier chisel, and finally used the tip of the X-acto blade to clean out the sharp corners. When (many attempts later) the star finally dropped into place , I put gel-style superglue under the shell, and pressed it into place. One has to be gentle with the shell. It will not stand much pushing around before it snaps–it is quite brittle. So one has to simply try and try again until the piece fits as deeply as if needed, with hardly any pressure.

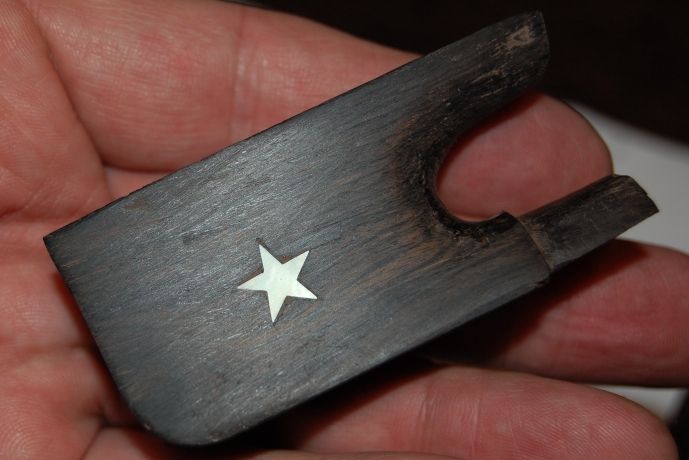
As soon as the superglue gel hardened I added some ebony dust to the very small grooves around the stars where I did not get a perfect fit, then dropped a drip of water-thin superglue into the area, and sanded it flat.

Finished inlay of Gold star on Bass Bow Frog

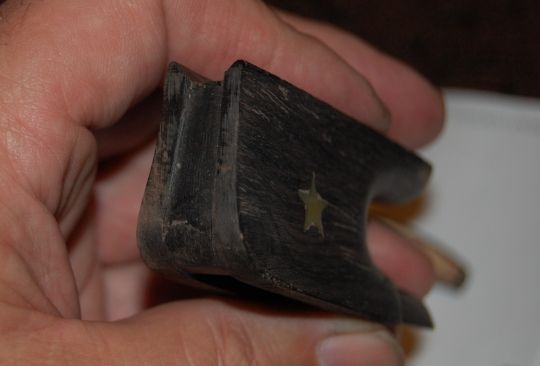
It is interesting to see how the different light reflects differently. Those gold stars can just look pale, or they can shine like real gold, in the right light. Here’s sort of an end-view of the frog:

End view of unfinished Bass Bow Frog.

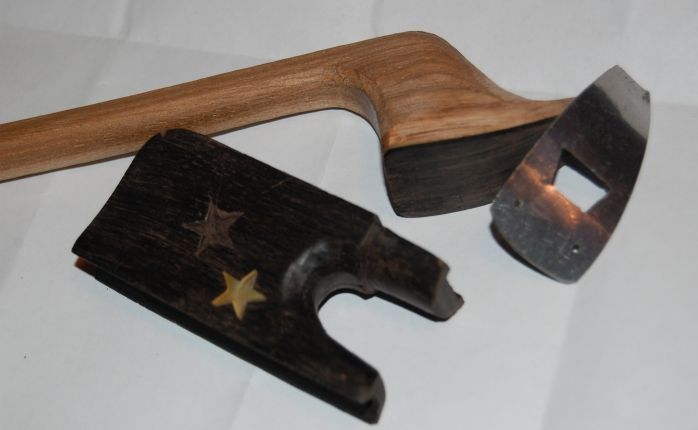
So– that’s the progress report: I will install the second star, make a new tip plate, and complete the frog and button, then I can hair the bow and see what I have got. Here’s the pile as it stands:

A work in Progress.
A work in Progress.

I will post more photos when I get a little further along.

Thanks for looking.

If you found this post helpful, please share with your friends!