Two Violas from Obscurity

Please share with your friends!

Violas in Obscurity

Unsung Heroes

These two violas never had their photos shown, though both have been played by professionals; sometimes in public recitals. I was just starting to put together a website at the time, and had no clue about a weblog, as that was not much of a “thing” back then. When I built this site, I came to realize that it was in fact, a weblog, and that I should be entering posts on a semi-regular basis. So I began to do so.

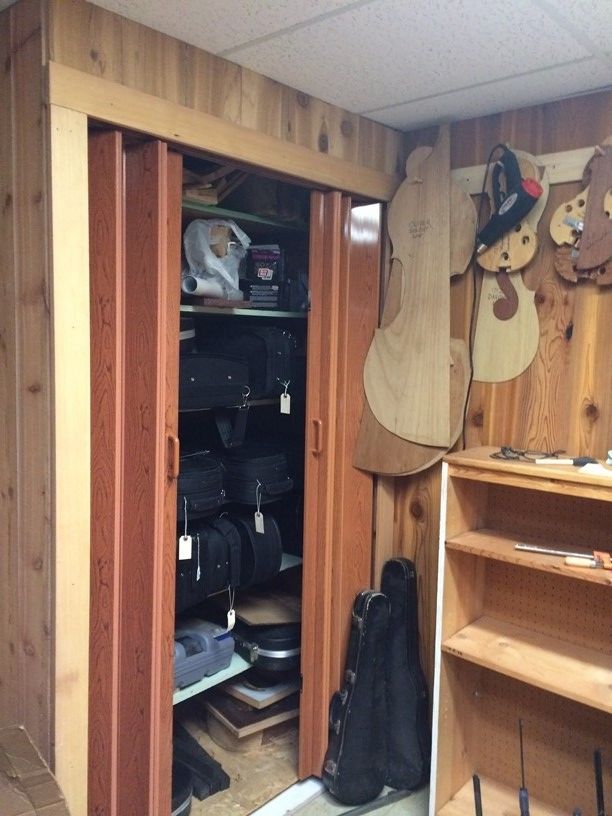
But, the other day, when I was trying to update the “Chronology” page, I realized that one instrument was completely missing (The Forgotten Violin), while a few others had very poor pictures, or none at all.

So: this post will be an effort to remedy that condition.

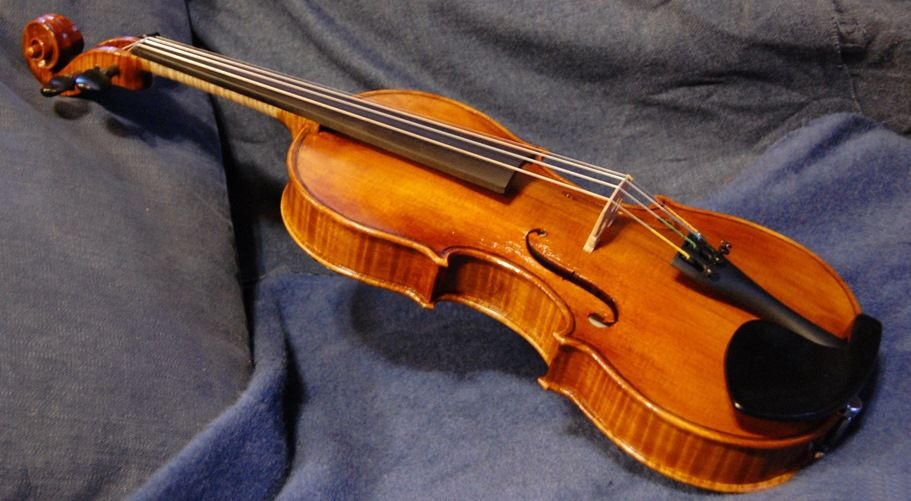
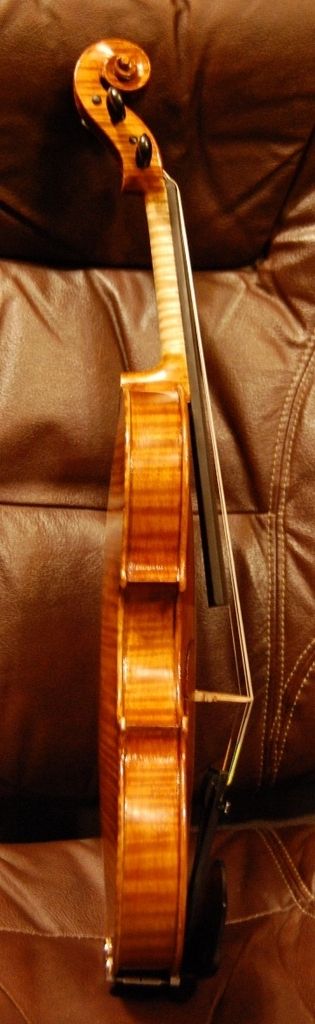
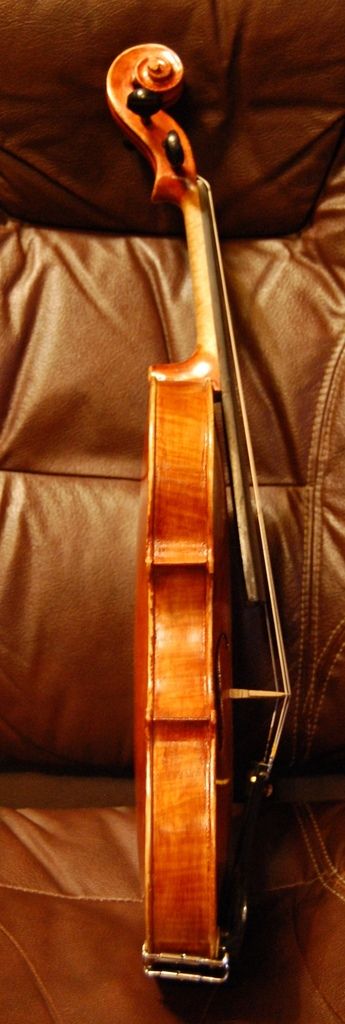
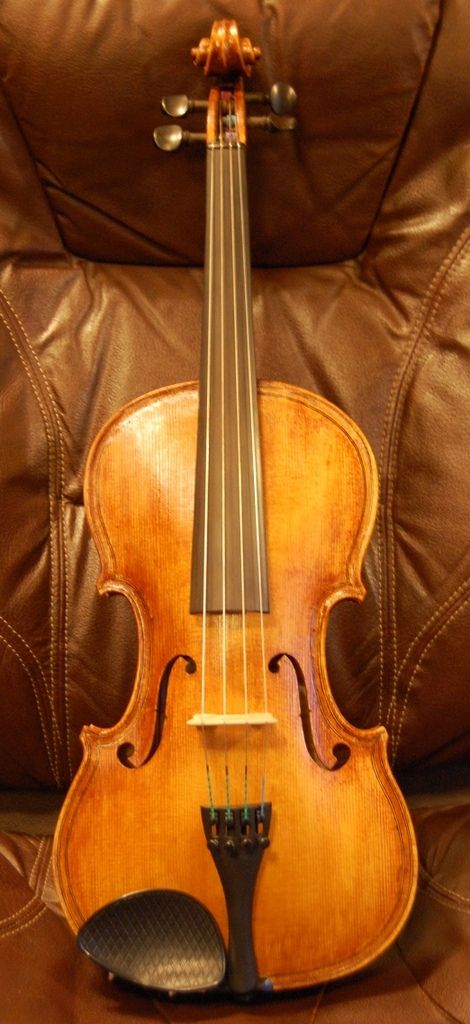
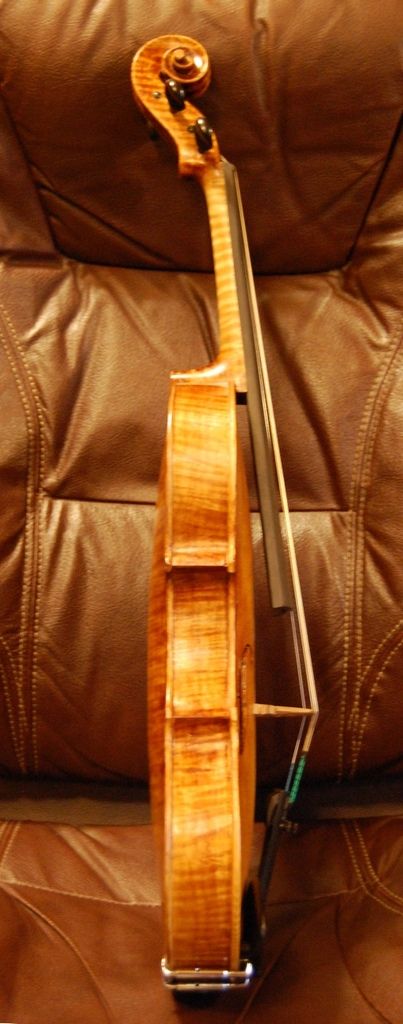
My First Really Small Viola (14″):

My #5 instrument was actually intended to be a violin, modelled after the 1728 “Milanollo” Stradivari violin. But I was pretty ignorant about arching, and did not follow the arching of the original instrument at all, but bulged it outward, allowing the arching to rise almost directly from the purfling, with very limited “recurve.” I thought I was increasing inside air volume and thereby increasing the size of the resonating cavity, and (hopefully) increasing the sound output of the violin. In fact the results were very perplexing: every person who played it, and who knew anything about how violins were supposed to sound, got an odd look on his or her face, and said, “This sounds like a viola!” I was too ignorant to understand what they meant, so I was puzzled and frustrated, thinking, “It is the size of a violin, the shape of a violin, and it is strung with violin strings…and tuned to violin frequencies! How can it sound like a viola??” But they were right: there is a difference in the sound, just as there is a difference between most men’s voices, and most women’s voices. Much later, I learned more about the physical differences between violins and violas, and even learned to hear some of the difference in timbre. I realized that I had simply, inadvertently built a 14″ viola. So, despite the label inside that proudly says it is a violin, it really is a viola…and sounds like one. So I re-strung it with viola strings, and it turned out to be an astonishingly good viola for its size.

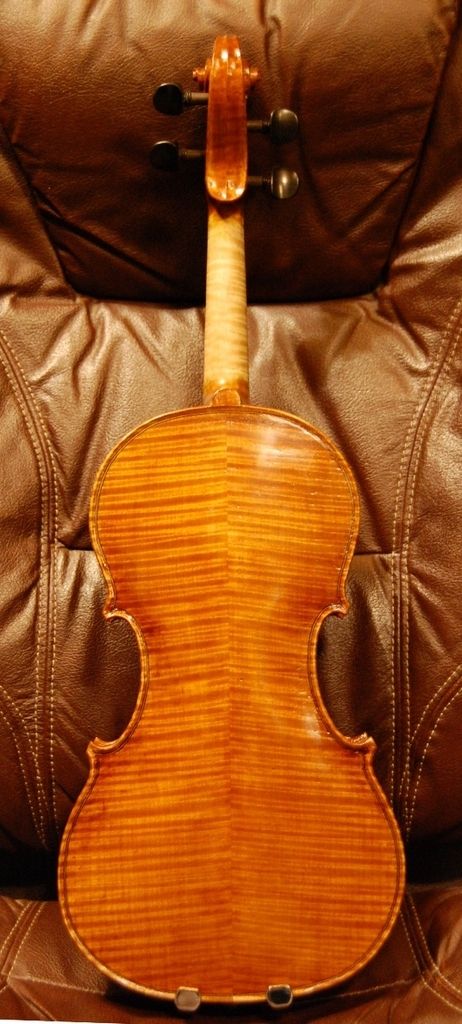
It still has a lot of “marks of the beginner”, in terms of workmanship, but it plays quite well, and, the reason it looks like the work of a beginner is simply… that it is.


My first very small viola (14
My first very small viola (14″)


14
14″ Viola side view


14
14″ Viola Back

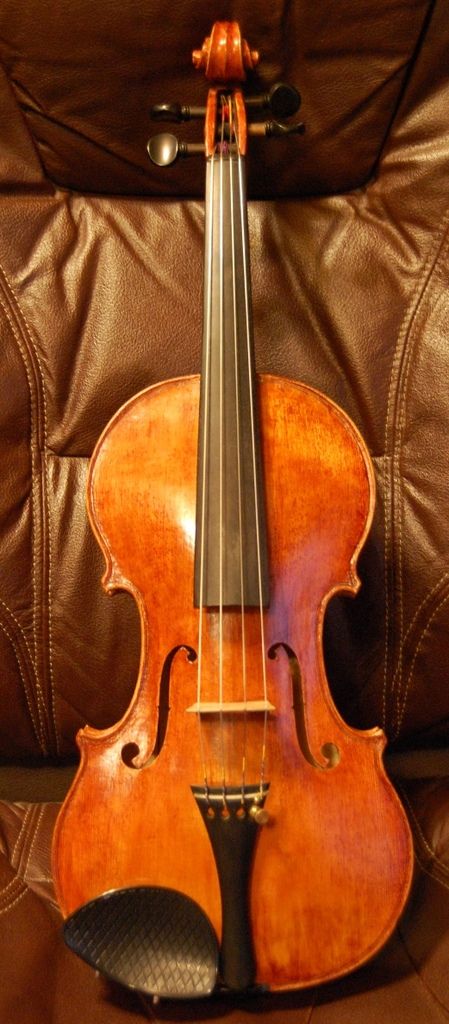
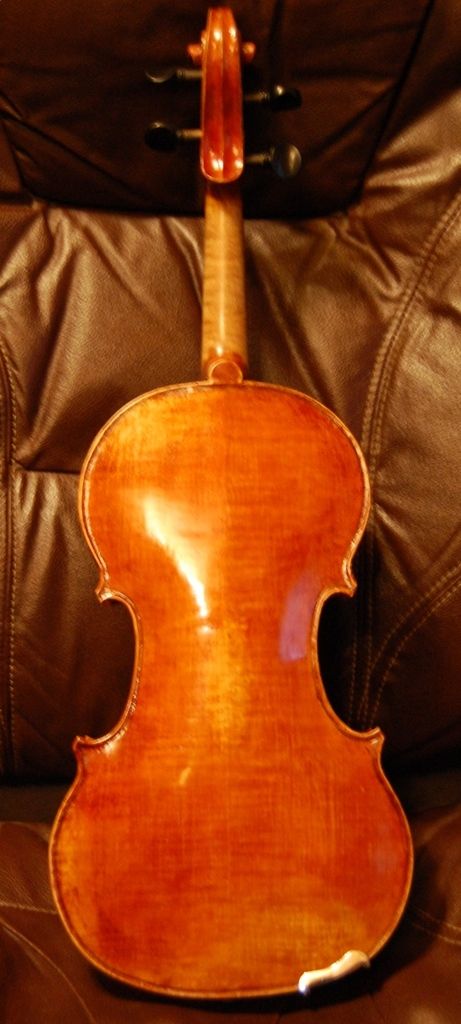
I made the little Viola from “European Maple and Spruce” that I bought on the internet, so I have no idea of the Country of Origin, nor even a way to find out, since back then I was buying on eBay, not from a reputable source (ignorance again…). The few professionals who have played this instruments were really surprised at its open, easy responsiveness and power.


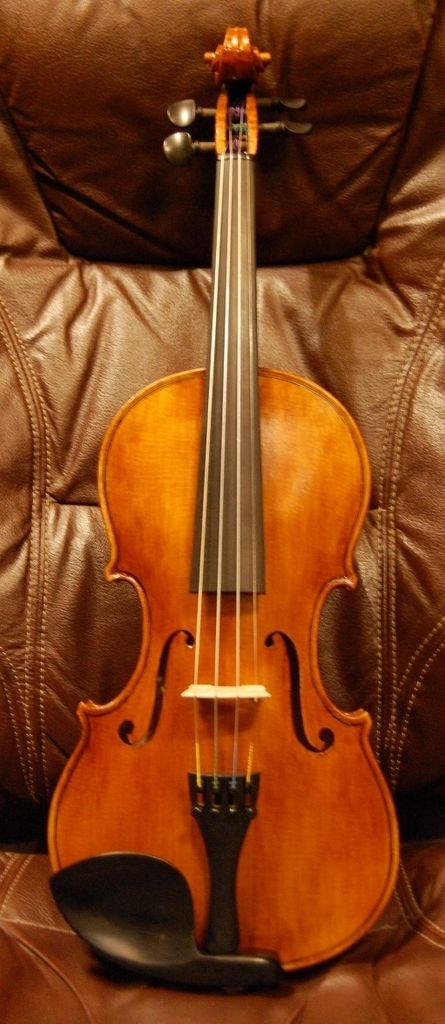
A 14-7/8″ Viola–The “Brian”

This is my third small Viola, and the second from this mold. It is the same mold as the first instrument I ever made, a viola for my son, Brian, hence the name of the mold. All the violins off this mold bear the label of “Brian”. When I began this viola, I was helping a young man by coaching him through his first instrument, a 15-1/2″ viola modelled after the 1580 Gasparo da Salo  “Kievman” viola. It had a charming purfling weave on the back plate, and double purfling, which I liked, so I decided to incorporate those two features into my viola that I was building while he worked on his own. (As it turned out, he took an exceedingly long time to complete his instrument, while I pressed on and completed mine the next summer. His turned out very nicely, by the way.)

The viola took a little while to “wake up”, so to speak: The lower frequency notes were a little flabby, at first, but with continued playing, and soundpost adjustments, it opened up very well, and is a easy-to-play, good-sounding viola today.

So, here is the Brian viola:

14-7/8
14-7/8″ Brian Viola


14-7/8
14-7/8″ Brian Viola Side


14-7/8
14-7/8″ Brian Viola Back


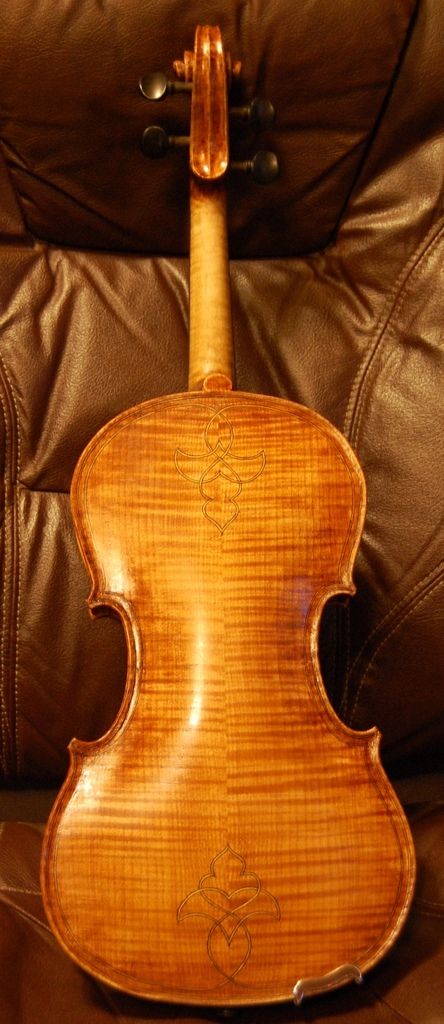
The wood for this instrument is Big Leaf Maple and Englemann Spruce, both from John Tepper, at Tepper Tonewoods.

I updated the “Chronology” page, and added the photos that were missing, there, as well as here.

Thanks for looking.

If you found this post helpful, please share with your friends!

Lutherie and Gift-making

Please share with your friends!

Viola Box

Gift for my Grown Daughter

With Christmas around the corner, it suddenly occurred to me that, as the children were growing up, though I had frequently made things for each of them, I had made some fairly nice handmade gifts for my two sons (handmade hunting knives with hand-tooled scabbards for each, and a viola for one), but I had never made anything comparable for my daughter.

Time was running out, so, while she and my wife were out shopping, I hit it hard in my workspace, and made a bentwood box with a viola theme:

Viola Box Open
Viola-box, open, showing the bent, figured maple sides, and the violin purfling.


The scroll is one I had begun for a large viola, but it wasn’t working out right. The top and bottom are CVG Douglas Fir, left over from my closet-making project. Inner blocks are Englemann Spruce, left over from some instrument. Bent portion is probably Big Leaf maple, unused, and sitting in my shop waiting for a project. So is the scroll, for that matter.


Viola Box, closed
Viola Box, closed.


The stub of a scroll is inletted into the Doug Fir top, and secured with Titebond glue.  No fasteners are used. The workmanship isn’t great, but I got it done in one long day…applied the last coat of varnish early the next morning, and it was dry and ready to wrap for Christmas.

Everyone was happy with it, including me.

I had a nice photo of her with the box, but she forbade me to post it. 🙁

Thanks for looking

If you found this post helpful, please share with your friends!

The Forgotten Violin

Please share with your friends!

I Forgot a Violin! (Oops!)

Pressed for Time: didn’t take pictures.

I don’t know how I managed to do it, as I always take photos of my work, but I somehow skipped one.

In March of 2015 I completed a very good quality violin, just before the 2015 Northwest Musical Instrument Makers Show, at Marylhurst University. I vaguely recall that I was pressed for time, and got it playable literally the day before the show, or thereabouts. But, for whatever cause, I neglected to take photos of the build-process, and even of the completed violin. It wasn’t until I was trying to update my “Chronology” page that I realized something was missing

Then I had to go back and look at the dates inside instruments (as well as my archived weblog posts) in order to figure out what had happened. This was the Forgotten Violin:

Oliver Long Form
Oliver Long Model

A Different Mold:

This is only the second violin I have produced from this particular mold: The other was actually the first violin I ever made, so the two can’t really be compared. I changed some things since then anyway, so I have dubbed this mold, as it now stands, the Oliver “Long Model”, since it is a little narrower in the upper and lower bouts, giving it a “long” look, though it is really about the same length as the others.

European Wood–(mostly)

I am pretty certain that the front and back plates are European Spruce and Maple, respectively, but the ribs and neck are not European. I believe the neck is Red Maple that I bought from Elon Howe, in Michigan, and the ribs may be, as well. I wish I had written down all this information when I made the instrument, but I didn’t, and my memory is not coming up with any certainties. Sorry.

Cycloid arching

The one thing that made this violin special in my mind, is that it is the first one on which I attempted to use the “Hypocycloid” or “Curtate Cycloid” curves to establish the arching. In the past, I either slavishly copied the arching of the old master instrument I was trying to emulate (which can work very well, provided the instrument you are copying worked very well), or I just winged it, and established the archings the way I thought they ought to be. This time I actually established my curves differently, using math, a compass and straightedge, and actual little wheels of thin plywood I made. (Sounds strange, I know…but it was math that was definitely available to the old master makers, and technology that was available to them, as well, so I wanted to try it.)

And it worked out very well. I had very positive reviews from professional players from this instrument as well as those whose arching reflected the Cremonese master (Guarneri del Gesu) I had attempted to copy on those instruments. (Why?) Evidently that is how they originally perfected their arching, as the templates I made from scratch closely matched the templates I lifted from their work. It was an interesting experiment at any rate, and I still have the templates, if I want to use them, and I know how to establish all the curves again, if I need to do so. In the meantime, this is a very good violin.

A Violin for smaller hands

I deliberately made this instrument on the “delicate” side: just a little narrower at the neck than usual, and a daintier scroll than I usually make, because there was a small-stature player I was hoping to interest in the violin…but (naturally)… it turned out they were not in the market at the time. (Sigh…) This is an exceptionally easy instrument to play, though, and has very good projection and tone. So…I guess I will simply hope to find another player with small hands. 🙂

At any rate, here is the violin:

Oliver Long Form Front
Oliver Long Model Front


Oliver Long Form Side
Oliver Long Model Side


Oliver Long Form Side
Oliver Long Model Side


Spirit varnish, and… Not Antiqued

This is one of the few instruments on which I chose to apply my finish without deliberately induced “antiquing.” I don’t do it often, because I really like the antiqued look…but I like this one, too, so I may do some more like it.

Anyhow– that’s the story of the “One that almost got away.” …”The Forgotten Violin.”

Thanks for looking. 🙂

If you found this post helpful, please share with your friends!

A 3/4-Size Violin

Please share with your friends!

3/4-sized Violin On the Way

Fractional-sized Instruments (Rationale and progress report: pictures below.)

Most luthiers will not invest time in fractional sized instruments, on the (usually correct) assumption that the player using a fractional sized instrument is a child, and will soon outgrow the instrument, so the parent or guardian (person footing the bill) will not be willing to pay for a professionally built instrument, knowing that in a few months or a few years, the child will need a full-sized instrument.

That is valid thinking, and completely understandable. But there are two (fairly rare) exceptions:

  1. The virtuoso player, 10-12 years old who is physically not able to handle a full-sized instrument, but whose skills already exceed the capabilities of most factory-made instruments.
  2. The adult player with very small hands, and/or upper body mass, for whom a full-size instrument is uncomfortable, but for whom a superior 3/4-sized instrument (for example) would be ideal.

It is not terribly difficult to surpass the quality of most factory made instruments, but people usually don’t want to pay the price of a full-size instrument to buy a fractional size of the same quality, by the same maker. That is not a logical response, because:

  • The materials cost exactly the same, and
  • The labor involved is nearly exactly the same.

There may be a few hours less labor to make a fractional sized instrument, but the difference is very slight, and the financial risk in building such an instrument on speculation is much greater because the market is so small.

So…What’s a Luthier to Do?

In my case, I intend to go ahead and make them, and see whether they sell. There must be a few players out there who need (or at least prefer) a good 3/4-size violin, but have trouble finding one. I have a friend who makes a few, knowing that usually the targeted customer will be the child-prodigy player, so he only charges 1/2 the price of his full-sized violins, with the provision that if they bring the fractional size violin back, he will give 100% credit toward the purchase of a full-size instrument. That seems to be a good idea, too.

Earlier this year, at a show I regularly attend (Marlyhurst University Musical Instrument Show), an adult player came looking for a 3/4-sized violin. I did not have one in hand, and she would not give me her contact information, so I could not let her know that one is on the way. I can only hope she turns up at the show again next year. Perhaps she will.

But: that experience alerted me to the fact that there is at least a small demand for such instruments. A “niche-market” perhaps.

Simultaneously, there were several violists who came through and were amazed at the volume and tone quality of a tiny (14-inch) viola I exhibited this year. So, I think there really is a market for smaller instruments, provided they give good response.

I just completed another (better) 14-inch viola (see previous posts), so I hope to arm myself with the fractional violin, the small viola, as well as my usual standard-sized instruments, and then start visiting local teachers, so that they can see what it is I produce.

The Beginning (Progress report for the 3/4-size violin)

I began this fractional-size violin a few months ago, but I have been swamped with other responsibilities, so it has hardly progressed at all.

  • The ribs are bent and installed,
  • The front linings are installed, and
  • The garland has been leveled.
  • The back plate has been book-matched, but not cut to shape.
  • The front plate has been cut to shape, and
  • The work-cradle is complete, to hold the plates securely while I carve the arching (outside) and graduations (inside.)
  • The neck block has been roughly cut out, but not carved.

We’ll see how it goes from this point forward. I still have a lot of other things going. (Home repairs and remodels, repairs for customers, etc.)

3/4 size fiddle beginning.
3/4 size garland on mold with linings, back plate, front plate in work cradle, and rough-cut neck.

I did build a closet to hold my completed instruments, all in cases. 🙂

closet, closed
The closet is 39″ deep by 53″ wide and 90″ tall; it would hold nearly 50 cases, if that is all I store there.


Closet, open
Obviously, instruments are not the only things stored in the closet: patterns, plans, tools, and wood, etc., are there as well.

That makes the room more usable, and it gets the instruments up off the floor. 🙂

Thanks for looking.

If you found this post helpful, please share with your friends!