When we last posted, I had just applied the sealer coat, and it was pretty fresh, still.
Back with freshly applied sealer.
The sealer does lighten a little bit as the turpentine evaporates…and, of course, the smell changes a lot. I happen to like the smell of turpentine, but it is pretty overpowering when the sealer is still fresh. Once the sealer was dry, I took a few more photos, then did some varnishing. I think you can see the difference, here:
Dry Sealer
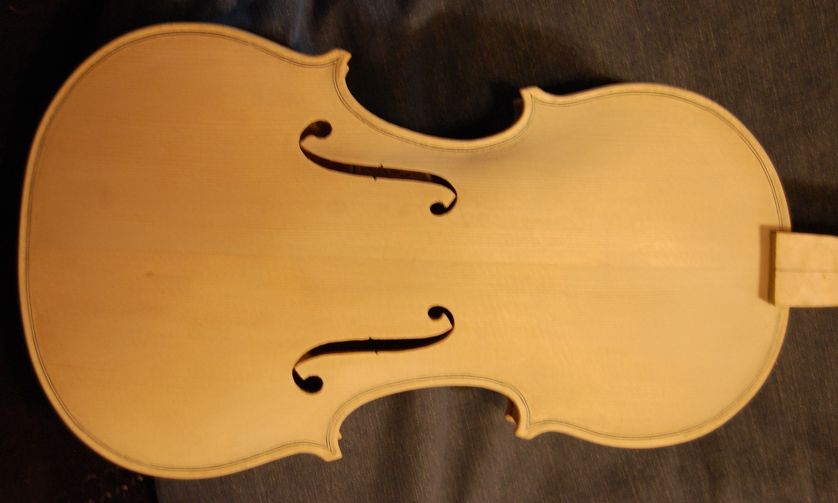
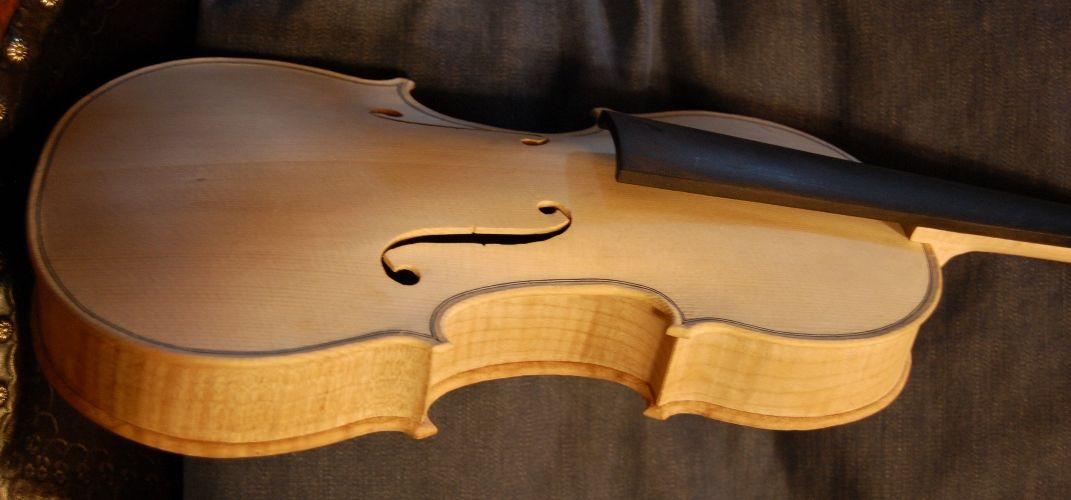
Dry sealer on the front plate.
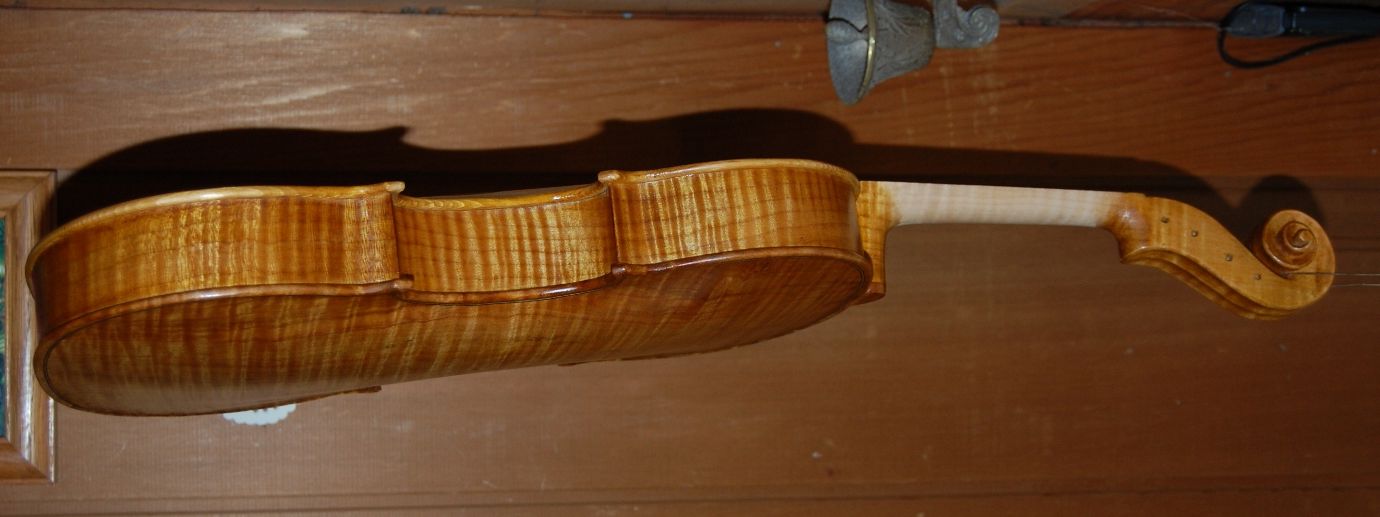
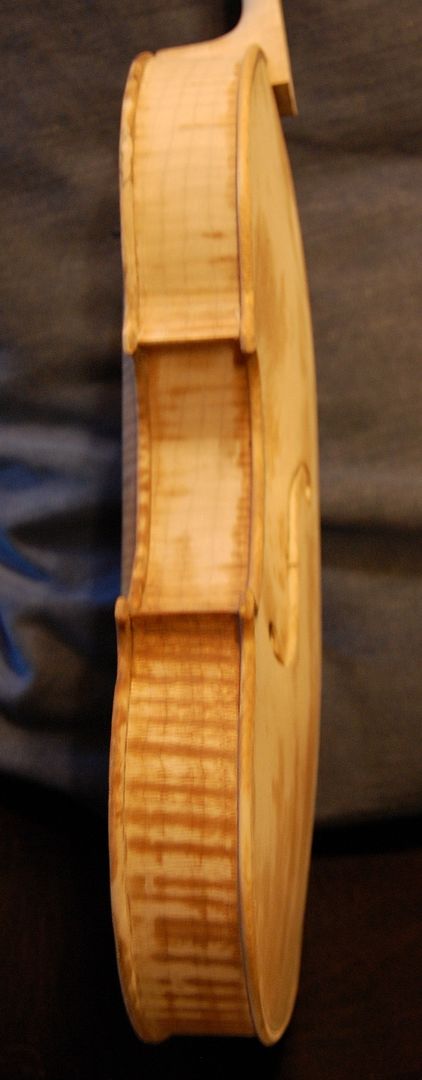
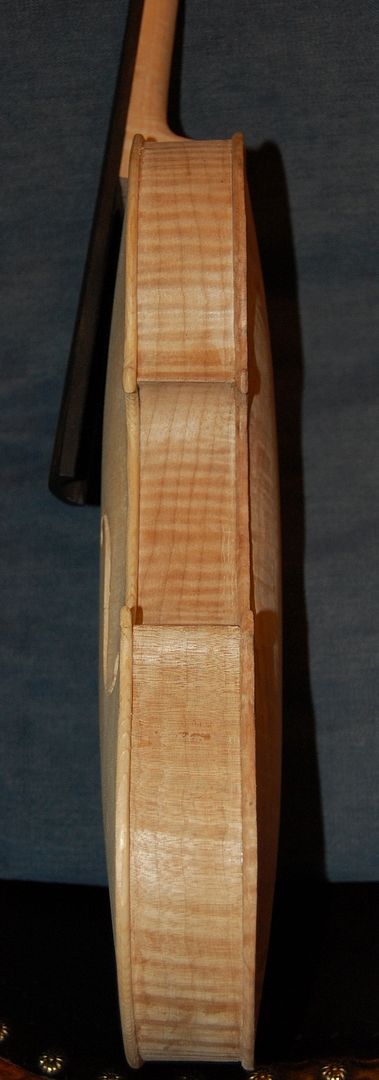
…and the side view…
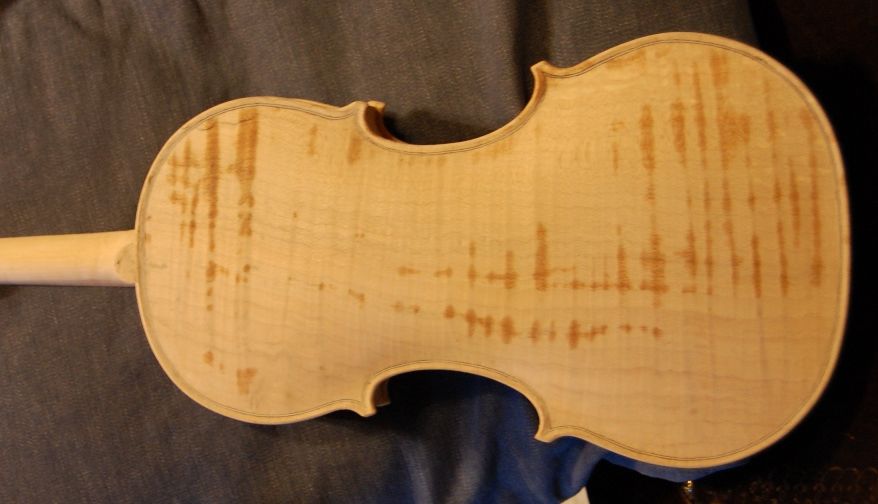
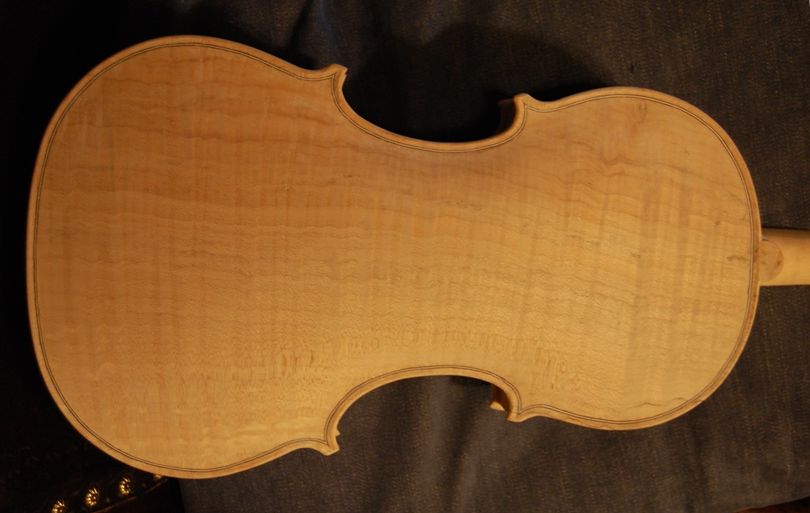
…and the back.
Beginning Varnish
But then I began the varnish. I usually try to lay down a golden base-color, and then add whatever other color I am working toward. I have ranged all over the board, trying different colors, but usually I end up in the browns or red-browns. I tried a really red violin with a student who demanded it, and he was thrilled with it…I was not. 🙂
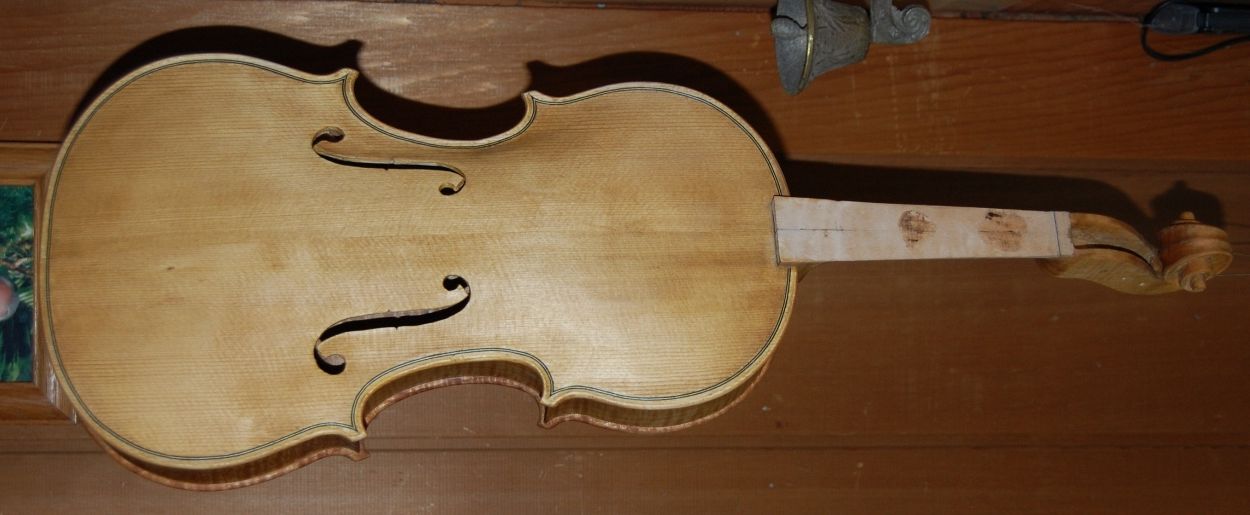
So here is the viola after two coats of yellow-gold varnish.
This is the first two coats… Not a lot of change, initially. Varnish takes a while to build up a good film.
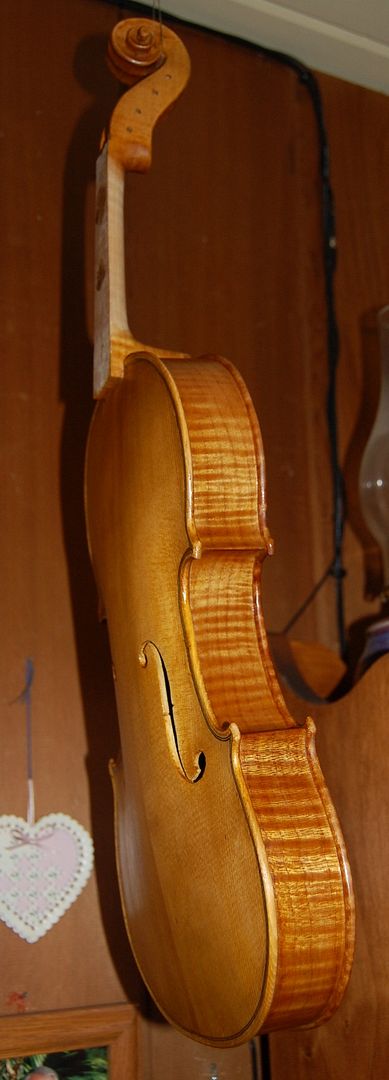
Side view with two coats of yellow-gold varnish.
Back of viola with two coats of yellow-gold varnish.
I let it dry for a few days (partly because I had a great deal of other responsibilities that week), and then sanded it gently with worn 400-grit abrasive, rubbed it clean with a dry rag, and added another two coats of varnish:
Subsequent Base Coats
Viola front and side, with four coats of yellow-gold varnish.
Viola side and back with four coats of yellow-gold varnish.
The appearance changed a lot more dramatically with those coats, didn’t it? The colors are getting richer, and the finish is much more glossy. I used the flash on these last two photos, so, to stay consistent, I will try to use it (and the same background) on all the remaining photos of the varnish.
Color Varnish and (Maybe) Antiquing
The next step will be to decide just how far down the “antiquing trail” I want to go, this time. I will unquestionably do at least a little…but I really like the look it is developing right now, so I want to be careful to not lose it. (The neck stain and seal is the very last thing to go on, just in case anyone is wondering. I will explain that later.)
At the very least, I will begin adding some red-brown varnish, to darken things up a little. I will most likely do at least a gentle shading toward “antiqued,” but I am leaning toward minimalism this time. Nothing drastic.
We’ll see. 🙂
Thanks for looking.
If you found this post helpful, please share with your friends!
We looked last time at the viola with the edgework incomplete, and final scraping not done.
Edgeork incomplete
Edgework
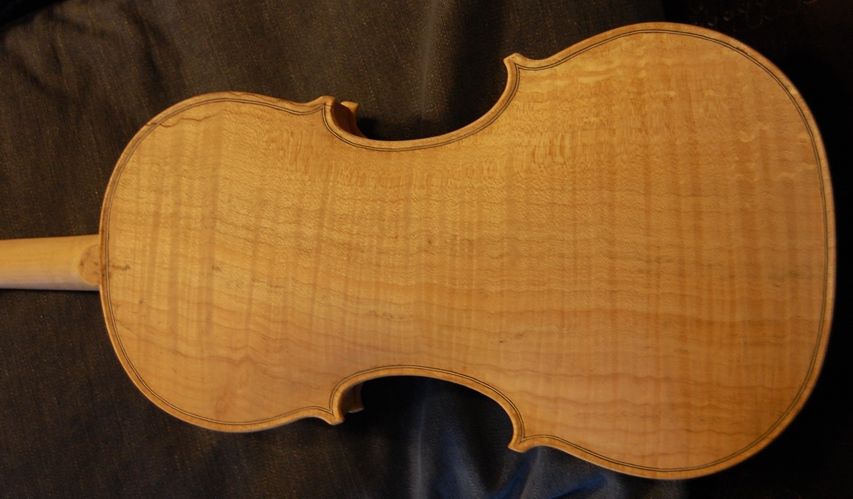
Here is the viola with the edgework done. Notice that the outer edges have been rounded inward to meet the edge crest, so that the junction between edge crest and purfling channel makes a clean ridge around the perimeter of the viola. This is just something I do, because I like it…as far as I know, it has no functional value. Many old master instruments have a much less clearly defined crest.
Edgework complete, back view
Edgework complete; angled view.
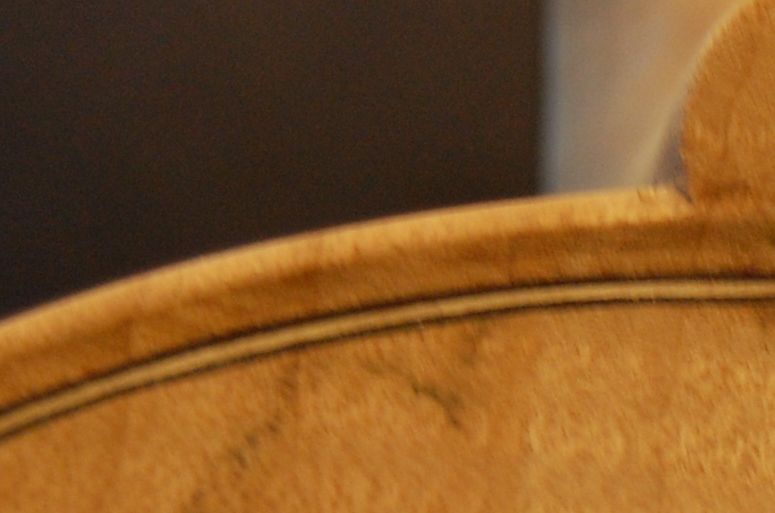
Edgework detail
Coffee Stain and Re-smoothing
Then I wet the fiddle down with coffee, to raise the grain and add some color. One result is that my edgework all needs to be reworked with a small, sharp scraper. The other is that the wholeinstrument needs to be re-sanded, using 400-grit sandpaper. The water in the stain raises the grain, so that every random fiber that is not closely tied to the surface will swell, and raise up, making the whole surface very rough. So I deliberately raise the grain, and then scrape or sand off the rough surface. Using a very sharp scraper, very lightly, just “brushing away the rough stuff” is probably the best way to do this. I use a scraper for the areas where I want detailed, clean edges, and 400-grit abrasive paper for the broad surfaces. I perform this step at least twice, before moving on to the mineral ground. The result is a surprisingly light, yellow-tan color, all over. Almost just a cream-color. It will darken up nicely under varnish, though, and not glow white from under the varnish.
Come to think of it, the above photos already have the coffee stain, too. I forgot to take photos of just the edgework, I guess. So–those photos are right before I applied the mineral ground.
Mineral Ground
This is a suspension of very fine particles of gypsum…in a coffee-solution, because I still want to add more color, if I can. Other people use other minerals–finely ground mica, finely ground glass, microscopic beads of glass, clay, volcanic ash or other non-organic nano-particles. Some omit this step entirely. Roger Hargrave shared this as having had an important effect on his sound, so I have tried it, for the last several instruments, with what seem to be positive results.
I keep the solution well-stirred-up, and brush it on liberally, then rub it into the wood with my fingers, as vigorously as I can. Finally, I wipe off as much of the excess as I can, using a rag. The stuff goes on looking brown, because of the coffee, but dries to a chalky-white film. I don’t particularly want it on the wood– I want the microscopic particles to fill the pores in the wood, so that the varnish will be less likely to soak deeply into the wood, and deaden the sound of the viola.
The ground dries rapidly, leaving the whole viola a chalky-white, ugly object. I go over the dry instrument, checking everything, and scraping or sanding off all the excess ground. When I can see the grain of the wood everywhere (though dimly) through the gypsum film, I apply the sealer coat.
Mineral Ground, wet…back view.
The ground dried rapidly– this was only about three minutes after the above picture.
And this was only about five minutes.
Here it is, dry–without the flash. In daylight this is chalk-white. See how the grain is obscured.
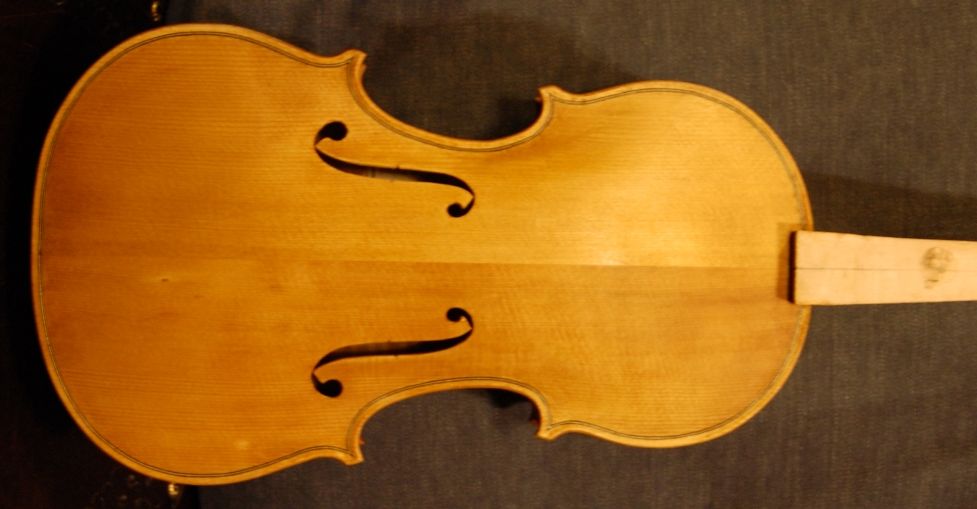
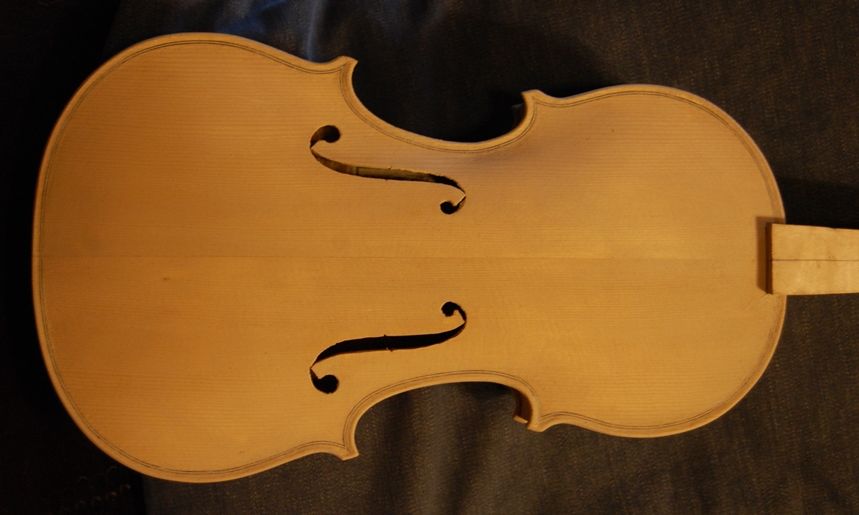
And the front– you can see the excess pretty easily.
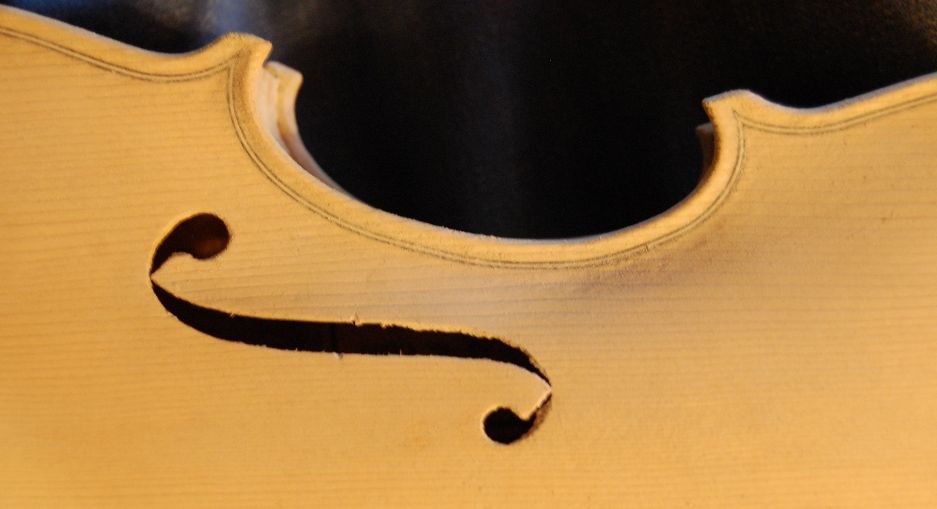
Here, you can see the excess ground in the f-holes, and along the purfling.
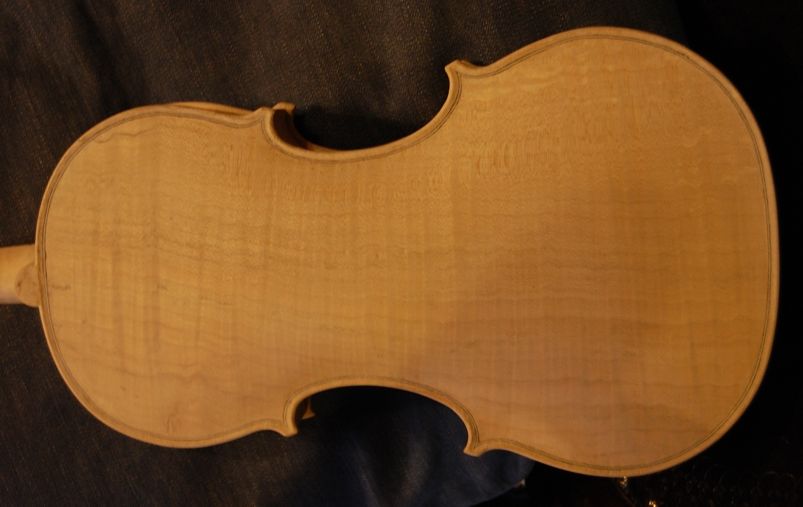
All that excess gypsum had to come off. It took a while, but I got it ready to seal:
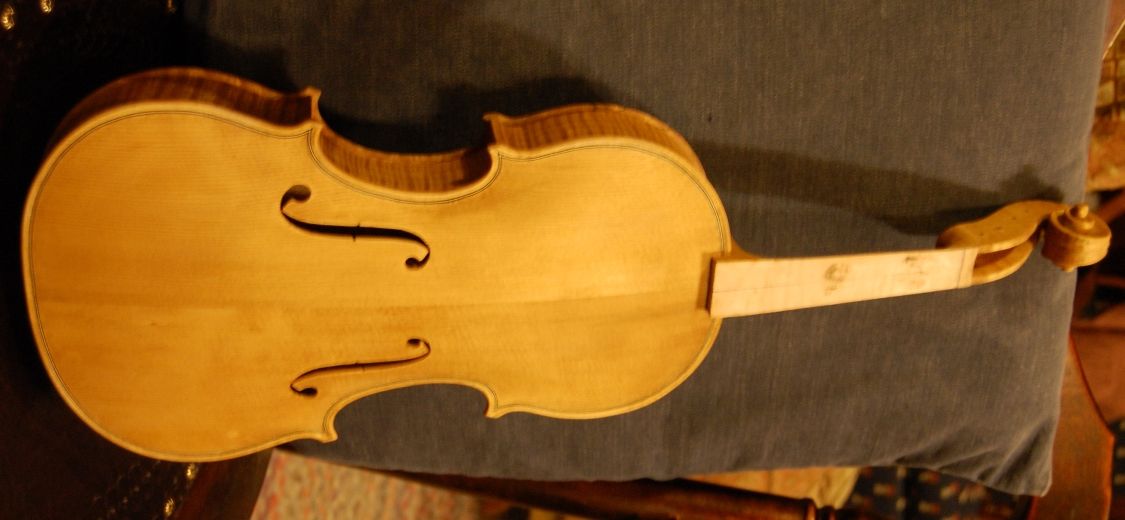
Viola front is ready for sealer– all the excess mineral ground has been cleared away.
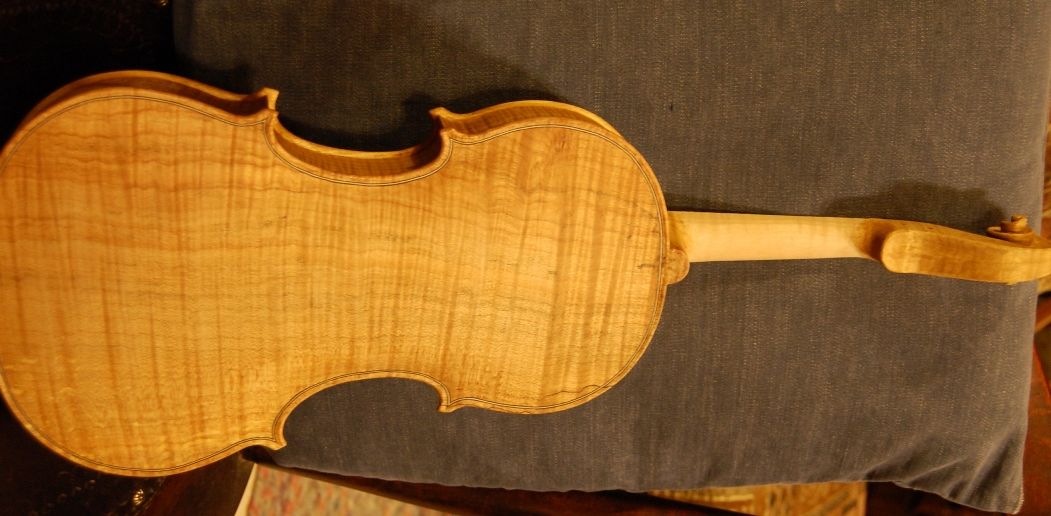
The back, ribs and scroll have been prepared, too. All are ready for the sealer.
Sealer–What kind?
Different makers use different sealers:
Some use a very thin varnish.
Some use Rosin-oil (I’m not even sure what it is….)
Some use shellac.
Some use commercially available sealers.
Currently, I am using a very thin mixture of pine pitch and turpentine, with a little alcohol. The alcohol and turpentine cause the mix to penetrate deeply. The pine-pitch goes into the wood along with the solvents, and remains there. It is interesting to watch the sealer going on…the chalk-white gypsum instantly turns transparent, and effectively disappears, leaving the natural color of the wood, along with whatever staining was added.
Without adding any color to the sealer, this would leave the wood a somewhat pale color. Usually, I have been satisfied to add color later. I added a little amber color to the sealer, this time, though, because my last instrument was a little too light-colored, initially, and I didn’t like the result.
The alcohol evaporates nearly immediately, while the turpentine takes a few days to evaporate, and (I am told) it leaves a bit of residue, as well. But that is OK. Turpentine is a natural wood extract, and I don’t mind it being in the wood.
The pitch dries in the wood, locking the gypsum in place, and sealing the wood against any other substance. Again, the pine-pitch is a natural wood extract, which eventually dries hard, and I don’t mind it being in the wood. Besides, it smells nice. 🙂
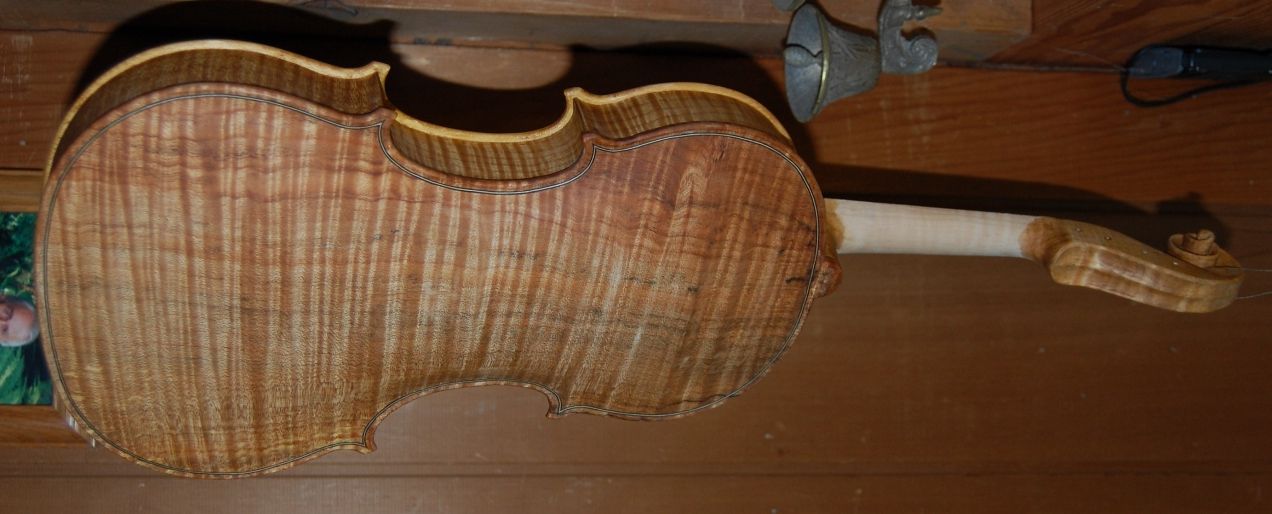
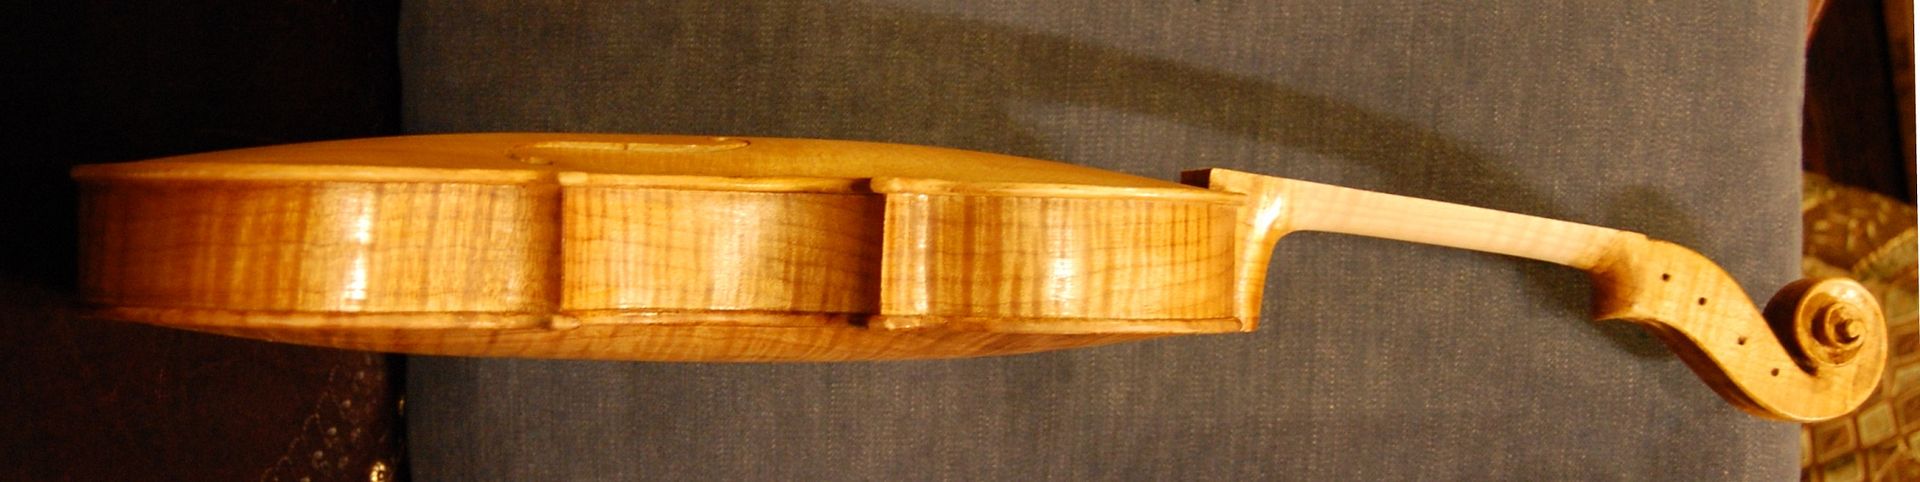
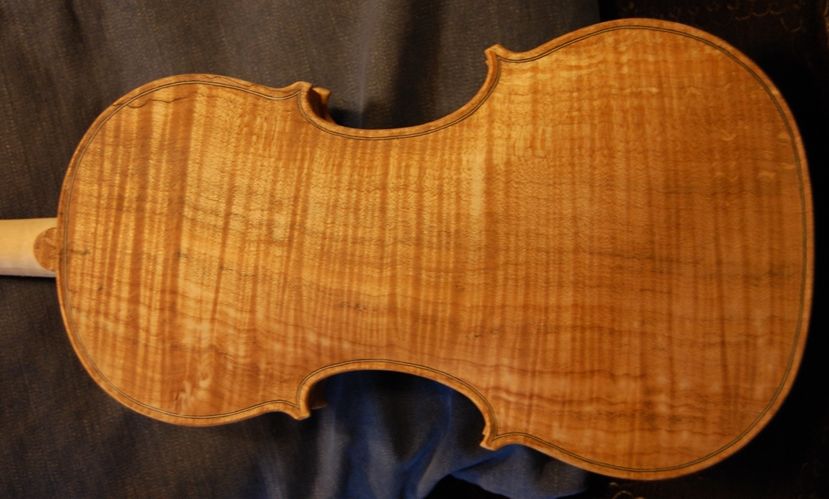
Here is the viola with just the sealer. I will show the varnishing sequence in the next post.
Sealed Front., using the flash.
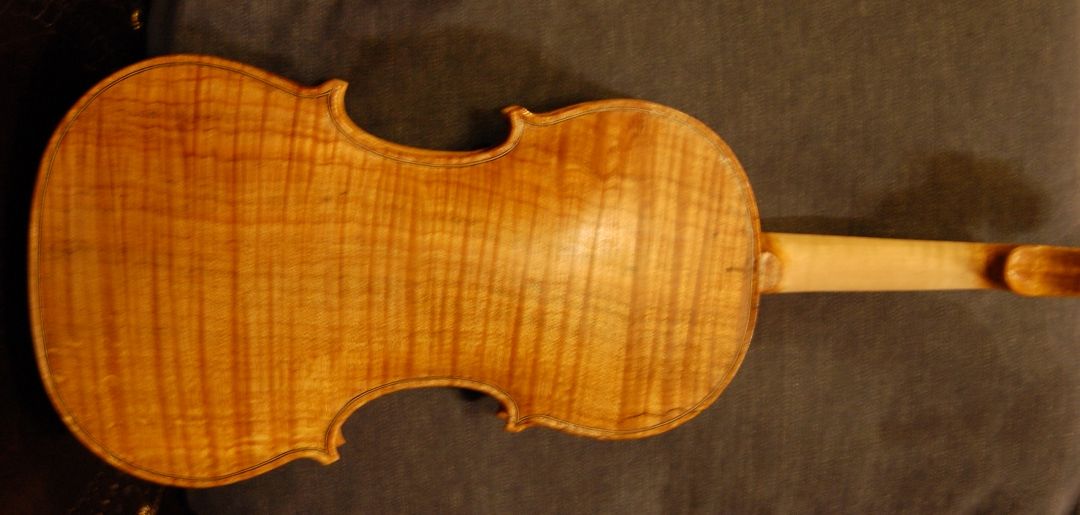
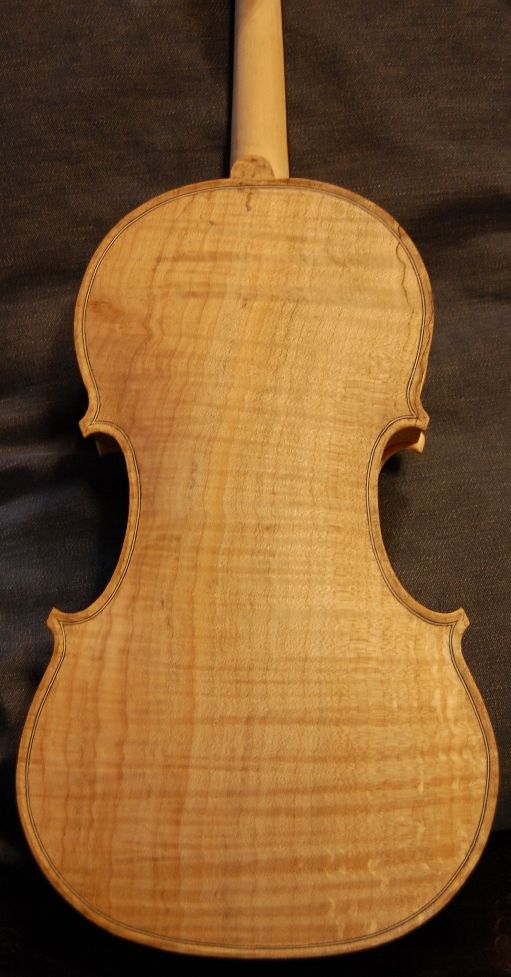
And…here’s the freshly-sealed back; again, using the flash.
The wood will change color just a little as the sealer dries. But it will never go back to the dull-looking finish where the grain is obscured again. The varnish I apply will enhance, not obscure the figure in the wood…I hope. 🙂
Varnish (coming…)
I use a spirit-varnish, currently, though I have used oil varnishes in the past, and undoubtedly will again. I will start off with a yellow varnish to enhance the figure in the wood, then use darker coats to finish. I use enough coats to get the color the way I want it, including whatever shading I choose to do, then add enough clear coats to give it the depth and sparkle I want. Usually 6-8 coats, I guess. I sand lightly after virtually every coat, to reduce any bumps, sags, runs, or brush-marks, as well as looking for brush hairs or bugs, stuck in the varnish film (it happens….)
Finally I rub the surface with extremely fine abrasive (12,000-grit micro-mesh), and then polish it all over, using the dry skin of my palm, or thumbs, rubbing hard enough that the varnish gets uncomfortably hot. This takes away the “glittery” look of the fresh varnish, and leaves the glow of hand-rubbed work. Pictures in the next weblog post.
Thanks for looking.
If you found this post helpful, please share with your friends!
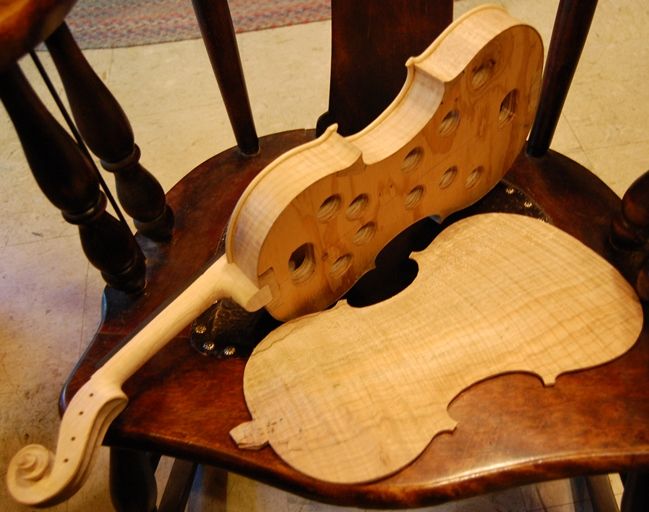
The 14-inch Viola is getting closer to completion!
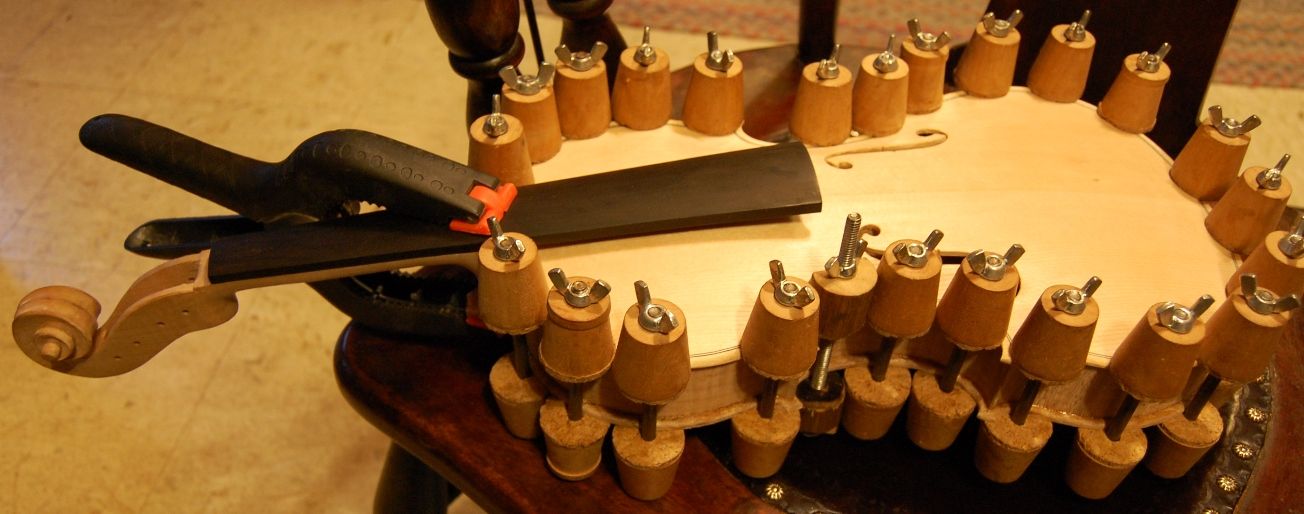
When I last posted, the viola was still in the spool clamps. The back plate was installed, but that was as far as I got that night.
Lots of promise, but not much “grace” in this picture.
Spool Clamps Off: Lots of Work to Do, Preparing for Purfling
So…the next step was to remove those clamps, adjust the overhangs as needed, and get on with the purfling. That sounds pretty straightforward, but there is always more to anything than meets the eye.
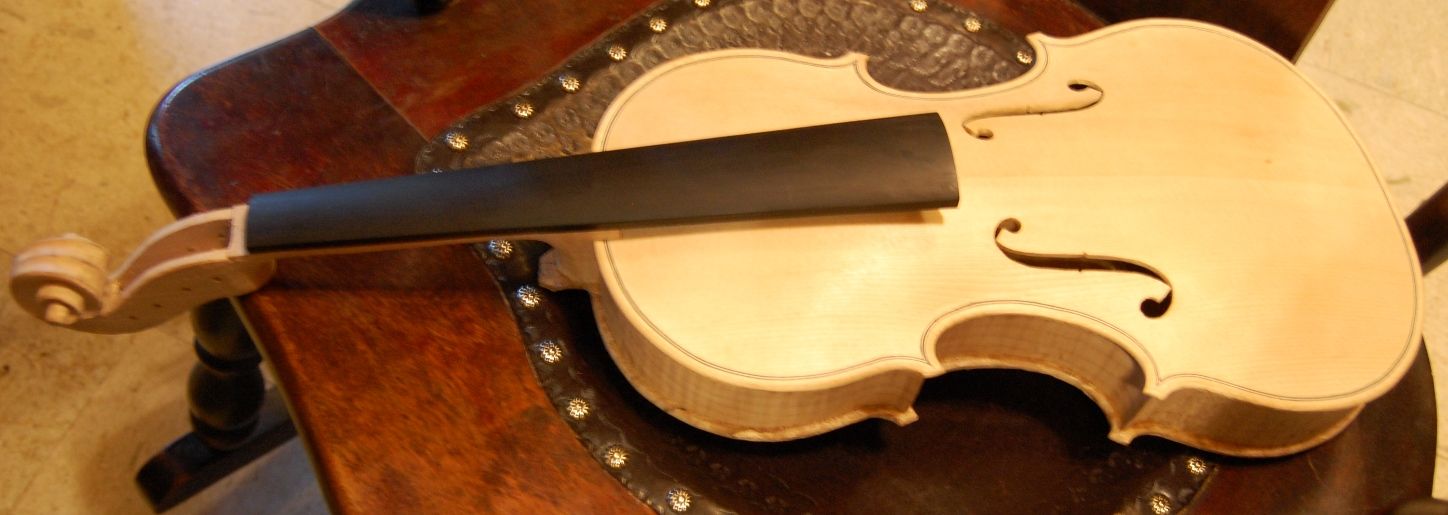
Looks nice, at first glance, but take a look at the neck button (where the back plate overlaps the heel of the neck.)
Side view of the same state of the viola.
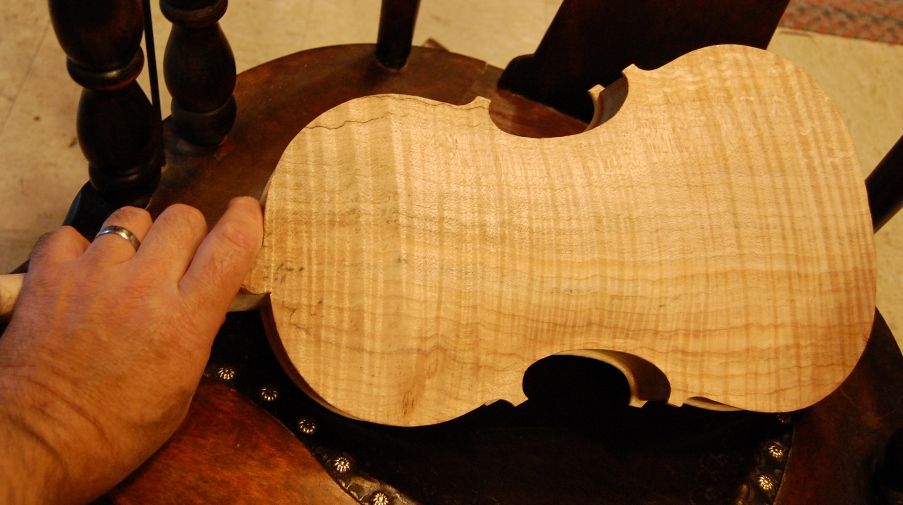
Back view: button hidden by my hand. No purfling, and no shaping done.
Purfling Groove
I marked the purfling groove, using what is frequently called a “Purfling cutter“, but which is actually a marker. It has two blades that simply lay out the sides of the groove, by scribing them a set distance in from the outer edge…which is why I want the outer edge perfect, before beginning purfling. I have modified my cutter a bit, to make it work more reliably, but the link above shows the type of tool I use. I don’t think I have that brand. I can only use the marker to get within an inch or so of the corners. I lay out the corners by hand, sometimes using a frnch curve to achieve some repeatability.
Afterlaying out the groove in pencil and scribe marks, I incise the lines with a small sharp knife, then pick the waste wood from between the cuts.
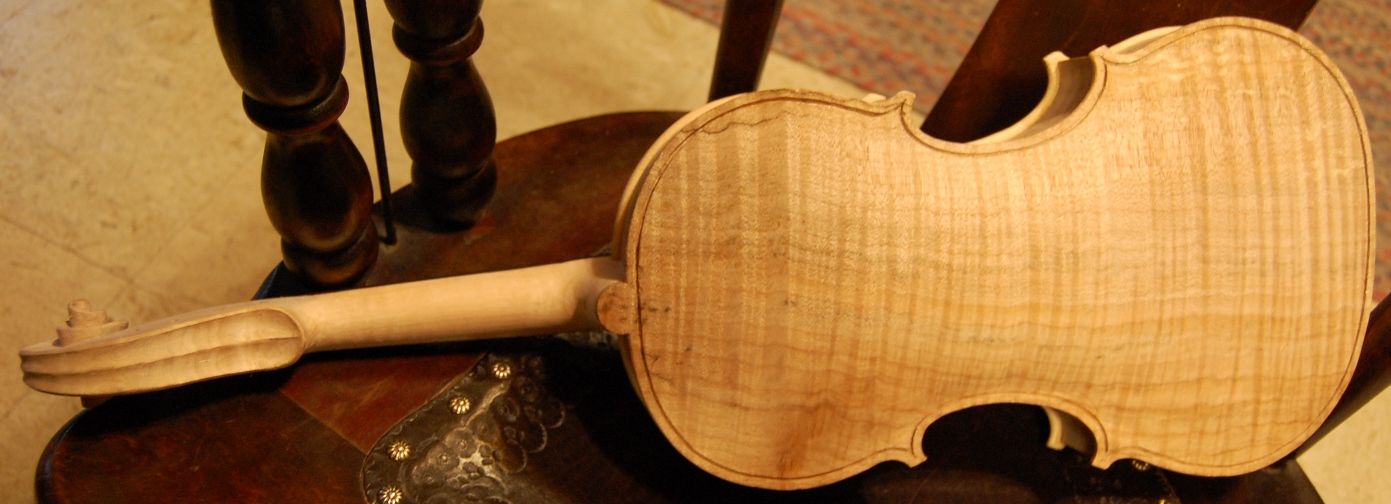
Here is the completed groove:
Purfling groove complete. Notice that the button is taking shape as well. The neck, too is getting slimmer, and smoother. Lotsa work…
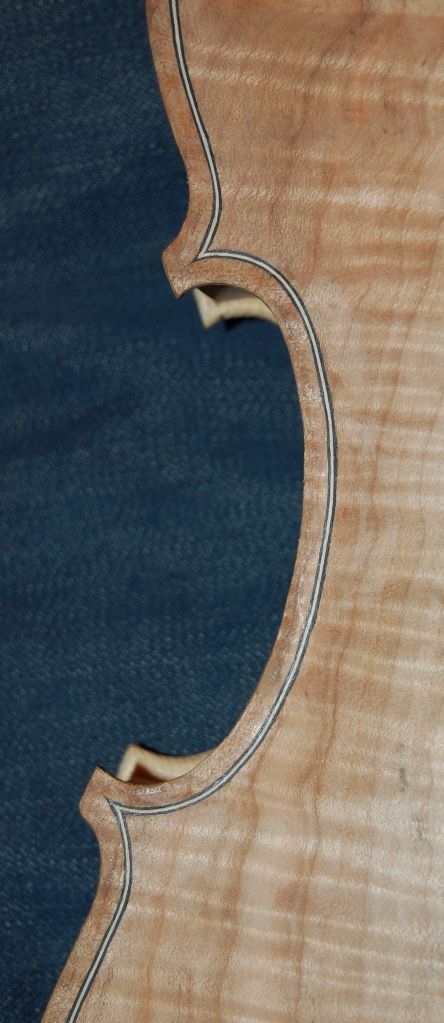
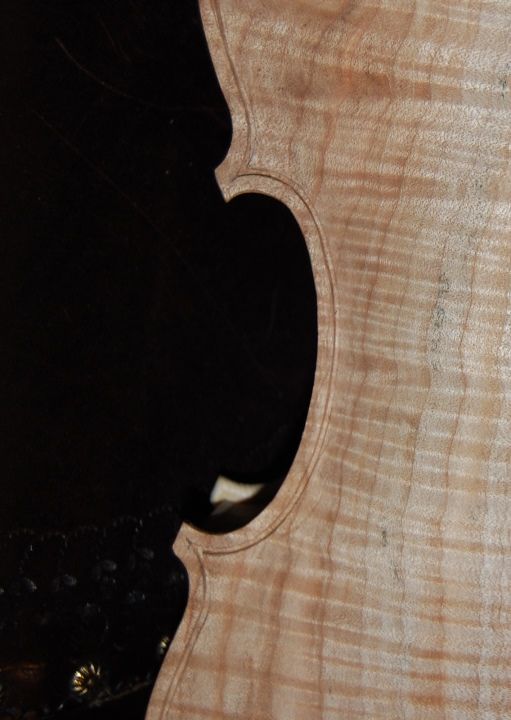
Here is a detail shot of the groove:
Detail of the purfling groove.
The Purfling, the Channel, and the Finish Work.
Finally I can start cutting and installing the purfling itself. I use a wood purfling, which is very brittle when dry, but bends nicely with a little moisture and a lot of heat. Once the purfling fits correctly, I lift each stip out partway, and insert hot hide glue under it, then force the strip back into the groove. Afterward, I mark the crest of the channel, and cut the channel using a sharp gouge. Finally, I use a tiny plane as well as gouges and scrapers to bring the convex curve of the plate into a fair, smooth agreement with the concave curve of the channel.
The purfling is complete, the channel is cut, and the back curve faired into the channel.
Purfling detail: look closely, and you can see the edge-crest line in pencil.
It is a fairly high-ribbed viola: 35mm. I think it will sound good.
And, it is looking more and more like a viola!
On the Home Stretch!
What is next? Edgework, and final scraping; coffee stain, mineral ground, sealer, and varnish…and then fittings and set-up. (The outer edgework is not even begun on the back plate.)
This is definitely as far as I am going tonight, though…. Getting too tired.
Thanks for looking
If you found this post helpful, please share with your friends!
When we last looked, I was ready to remove the mold but had not yet done so.
Ready to remove the mold.
Removal of this sort of mold (French style) is very simple: I insert a tool (parting knife, usually) between each block and the mold, to break the glue that had secured the molds to the blocks, then I just gently lift the mold straight out.
Installing the Back Linings
So, here is the viola body with the mold freshly removed:
The mold is gone, but the linings are not yet in place, and the blocks are still not shaped.
The viola still needed the back linings, so, I cut a tiny mortise in each side of each block, to receive the linings, bent the linings to shape, and installed the linings.
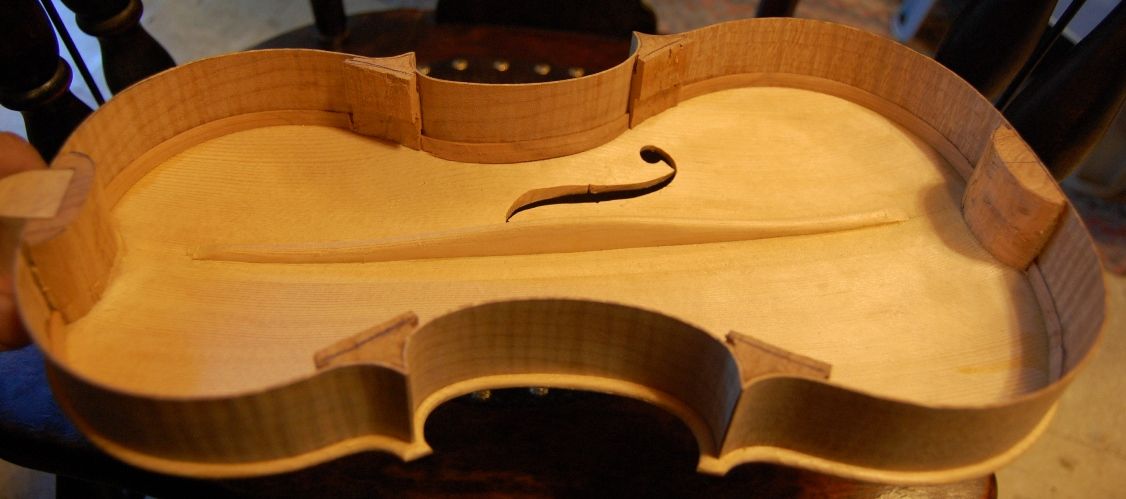
Here’s that side view of the completed bassbar that I promised a week or so ago. You can see the two mortises in each block, prepared for the back linings.
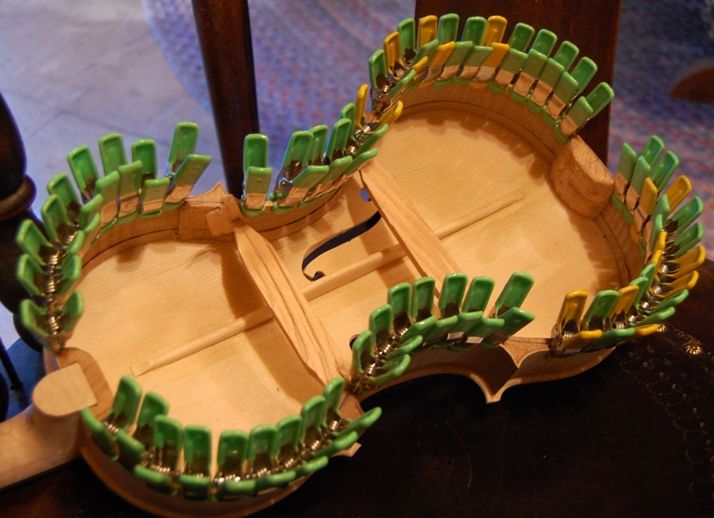
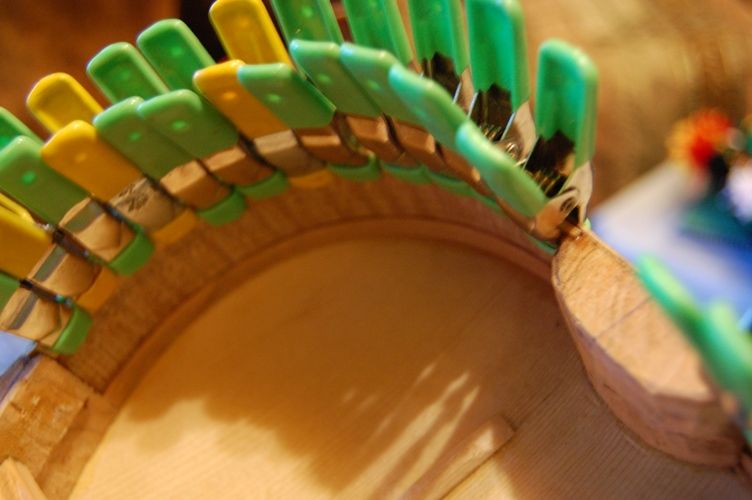
Linings installed, using hot hide glue and lots of clamps. Those braces were just temporary insurance that the garland would stay the same shape.
Closeup view of clamps and linings.
Shaping the Blocks and Linings
After the glue dried, I removed the clamps and shaped the linings and blocks. I carved the linings to a smooth taper, and scraped them to a clean, smooth curve. I sanded all of the inside to remove splinters, etc. I also leveled the back of the garland and the heel of the neck before moving on. It had to be dead flat and smooth:
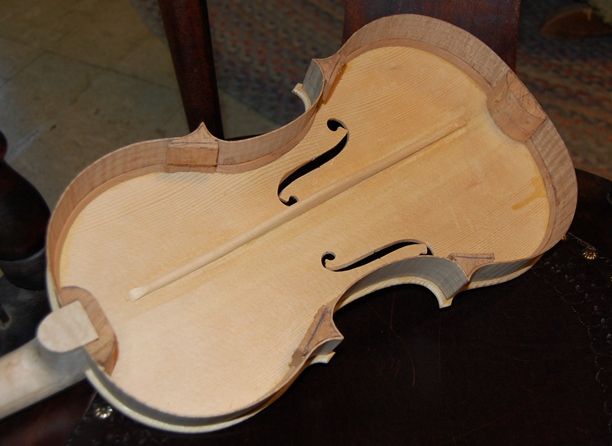
So, there it is, ready for the back plate to be installed.
Installing the Back Plate
While the glue was drying, I had installed the label on the inside surface of the back plate, located so that it will be visible through the bass side f-hole. (Forgot to take a picture…sorry.)
Once all was ready, I clamped the back plate in place, dry; then, using a thin-bladed palette knife, I inserted hot hide glue all around the perimeter; quite liberally at each of the six blocks, and clamped it up tightly. The last clamp to be applied was the neck block clamp. I checked the angle of the neck one last time before adding still more glue under the button, and adding that clamp. But here it is, all clamped and drying. My wife always says the clamps look like old-fashioned hair-curlers. (Yeah, I remember those things….)
These spool clamps were given to me by my friend and mentor Jake Jelley. I don’t know whether he made them himself, but they are definitely handmade, and they work very well.
I will try to get the back purfling done this weekend. Then we will be on the home stretch.
Thanks for looking.
If you found this post helpful, please share with your friends!
As I work by myself, I frequently fail to take pictures. I did take a few, though. (If you are impatient, you can scroll down and peek at them.)
F-holes Cut Out
I used a special tool to begin the cutting out progress: It is called an “f-hole drill”, but all it really amounts to is a specialized twin-blade hole-cutter. My children bought it for me, one year, and it has been a wonderful tool. In the first place, obviously, it is a time saver, but the biggest difference is that I can now make the upper and lower eyes of my f-holes perfectly round, to begin with, and work any special shaping in, starting from the already round holes.
I remove the waste wood from the uprights of my f-holes with a small sharp knife—many makers use a saw, and I have done so as well, but I eventually reverted to the knife. Just personal preference, I suppose.
Bass Bar
Once the f-holes are cut out and close to perfect (always allowing for later nit-picking), I install the bass bar. The bass bar is a gently-arched brace supporting the bass-side foot of the bridge. Guitars have a whole collection of similar bracing, supporting what amounts to a nearly flat (and very thin) plate. The violin family instruments depend primarily upon the compound curves of the arching to supply strength, and only need the one brace to support the bass-side bridge-foot. The other side of the bridge is supported by the soundpost, which, while it is not directly under the treble-side bridge-foot, it is very close to it, and is in a location on the treble side matching the lateral position of the bass-bar on the bass side.
I lay out the position of the bass-bar, and then use a compass to transfer the shape of the inside of the front plate to the bass-bar blank. Then I use a knife to remove most of the waste-wood, and begin checking the results against the inside curve of the front plate. When the fit is getting close to correct…close enough that it is becoming difficult to see what needs to change…I apply a strip of paper-gauze adhesive tape (available in pharmacies) to the inside of the plate, covering the bass-bar position, and I rub blue chalk into the tape. I happen to use a product sold as “sidewalk chalk;” they are big sticks of chalk, and supposedly are easy to wash off of sidewalks. But they work well for me, and the blue is high-enough contrast that I can see it easily.
I press the nearly correctly-shaped bass-bar into the chalked tape, and check to see where the chalk transferred. I cut, plane or scrape just the chalked places from the bass-bar, repeating until, finally, when I press the bar into the tape, the whole thing comes up lightly coated with chalk. Then I remove the tape, clean off any remaining chalk from both pieces of wood, and install the bass-bar, using hot hide glue and clamps. I have a specialized set of wooden clamps made for this task.
When the bass bar glue is completely dry, I remove the clamps and trim the bar to the desired shape. I make my bars a little higher than most luthiers do, in the center, but tapering to about 5-6mm high for the last few centimeters of both ends. (I will take some pictures after I remove the inside mold, so you can see the final shape.)
Edge Preparation
It is much easier to do the inside edge-work if I do it before I install the plate on the garland. So, I use a tiny finger-plane, along with round and flat files, to round the inner edge of the plate, all the way around the perimeter. I may have to do a little correction later, but I want it as close to perfect as is possible, before gluing the plate to the garland.
Installing the Front Plate
I line up the plate on the garland as accurately as I can, matching the center-line of the plate to the centerline of the garland, and then use spool-clamps to hold it in place. I was originally taught to use tiny pins to assure good placement, but eventually discontinued the practice. We know for a fact that the old masters did this, as we can see the remnants of those wooden pins in their violins, still today. Perhaps I will eventually resume using pins. For now, I do not.
Once I have the plate perfectly aligned and securely clamped, using a very thin palette knife, I slip hot hide-glue into the joint between plate and garland, and then add more spool clamps to draw the joint closed. This is a very “stress-free” way to glue plates in place. I used to experience near-panic every time I installed a plate, racing to clamp the joint before the glue gelled, but now it is a very easy and relaxed task.
Purfling
As you may remember, I have not yet installed the purfling. I wait until the plate is on the garland before purfling nowadays, because the purfling “locks-in” the location of the plate edge, and I have had problems in the past with the rib garland changing shape a little, between my tracing the plate and trying to install it. so, after gluing the plate to the garland, the first step is to double check my over-hangs, to see that they are all pretty close to the same. If I need to change them, I do so: I am free to adjust the shape of the plate to match the garland again. When the overhangs are all acceptable, I begin purfling.
Purfling is fairly simple-sounding:
mark the groove location
cut the groove,
fit the purfling,
glue the purfling,
mark the edge crest, and
cut the channel.
It sounds easy, but I still find it a hard job to do perfectly. I want my miters perfect, my bee-stings clean and sharp, and all my borders parallel. This is my 30th instrument from scratch, and I am still finding it to be challenging. Guess I am a slow learner. 🙂
Cutting the Channel
Before I begin cutting the channel I use a compass to mark a line all the way around the instrument, 1.6 mm in from the outer edge. Then, using a sharp, curved gouge, I cut my channel to that edge crest line, trying to cut the whole channel to intersect the surface of the purfling and that pencil line.
Fairing in the Channel to the Arching
Once I have the purfling completed and the channel cut, I still have to fair-in the surface of the rest of the plate to match the curvature of the channel. I do not want there to be any sudden changes; humps and hollows catch the eye of the person looking, and call into question the skill of the maker. (Besides, I think they are ugly….) I use a very sharp finger-plane to begin shaping the surface of the plate and approximating the final curves I want. Finally I use sharp scrapers to bring the curvature of the whole plate to its final shape. I use a low-angle light to cast shadows from any humps or hollows, so that I can spot them and scrape them away. At this point, the scraper has to be sharp, and I have to use a gentle touch. The changes I am making are frequently much thinner than a piece of paper.
Outer Edgework
After the whole plate is the shape I want, the last task is to shape the outer edge. I begin by using a tiny finger-plane to take the outer corners down at a 45 degree angle, then use half-round files to shape the edge all the way around, bringing the curve of the outer edge up to just intersect the edge-crest line I established earlier. I get it as smooth and even as I can, using a file, but I know when I stain the wood with coffee, it will raise the grain terribly along these edges, so I will eventually re-smooth all of them, using abrasive paper of some sort. In this particular case, I did the outer edgework after setting the neck. No special reason…that is just what I did.
Neck Set
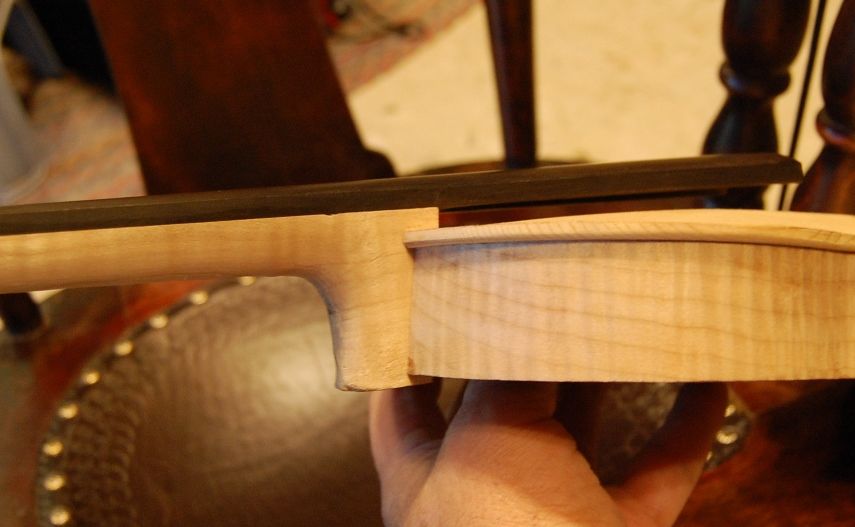
I measure carefully, and cut the tapered mortise using a razor-saw, then use a sharp chisel to remove the waste wood of the mortise. If I do the job correctly, it works very well. I check the sides and bottom to the mortise to see that they are flat and straight, then begin attempting to fit the neck. I have already joined the fingerboard to the neck and have shaped the heel where it will join the neck-block. So, from this point forward, all the shaping and adjustment will be done to the mortise, not the neck. When I am satisfied that the fit is correct, the neck will have to be centered. straight with the centerline of the front plate, straight with the centerline of the end block (not twisted at all), and at the correct angle to place the end of the fingerboard at the right height. Also, of course, the neck has to be set so that the distance from the nut to the edge of the front plate is correct. I check and re-check, until everything works correctly. Since I set the neck before installing the back plate, I want the heel of the neck to protrude past the back end of the neck-block. I will plane it flush after the glue is dry.
Here is the completed mortise, cut for the neck. The outer edgework has yet to be completed. You can see the edge-crest marks.
The mortise is complete, and I am ready to set the neck.
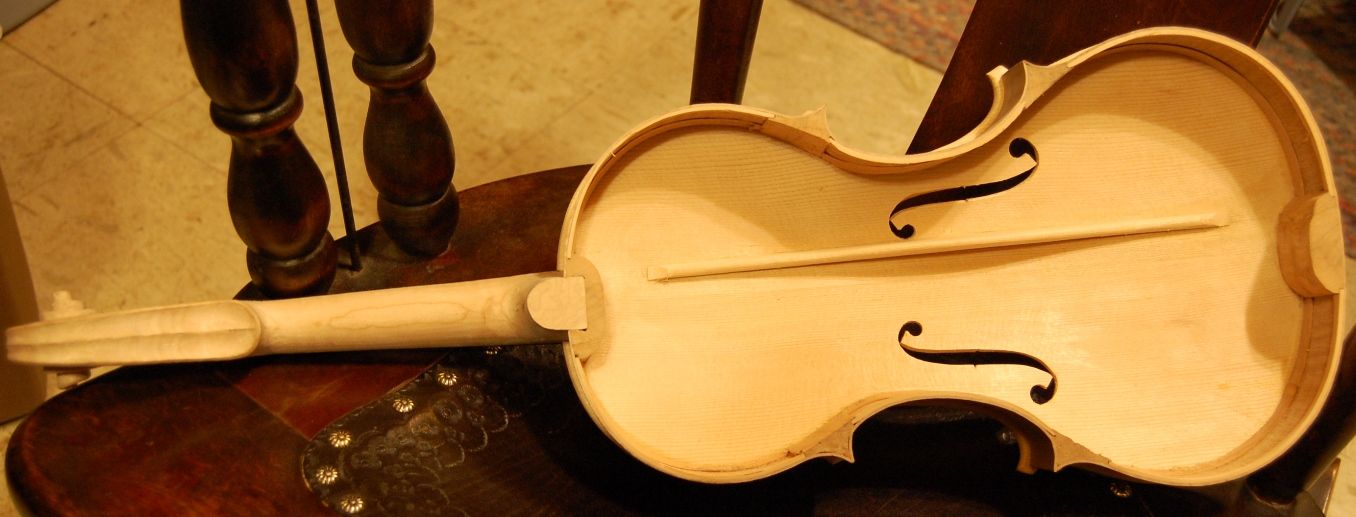
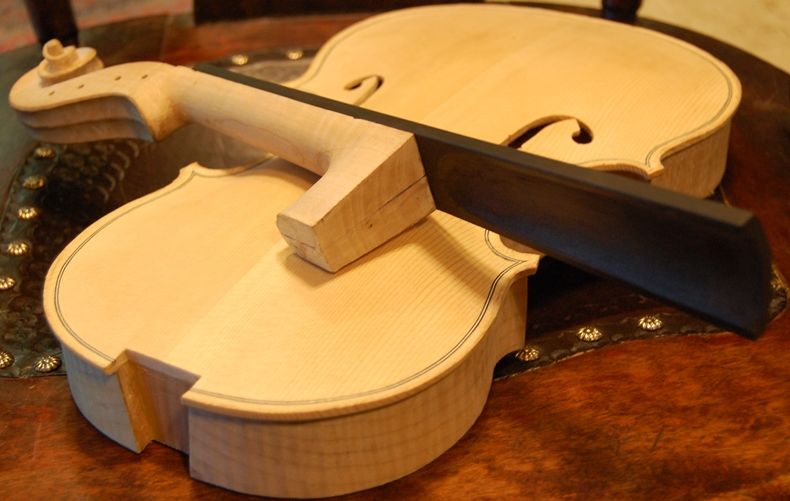
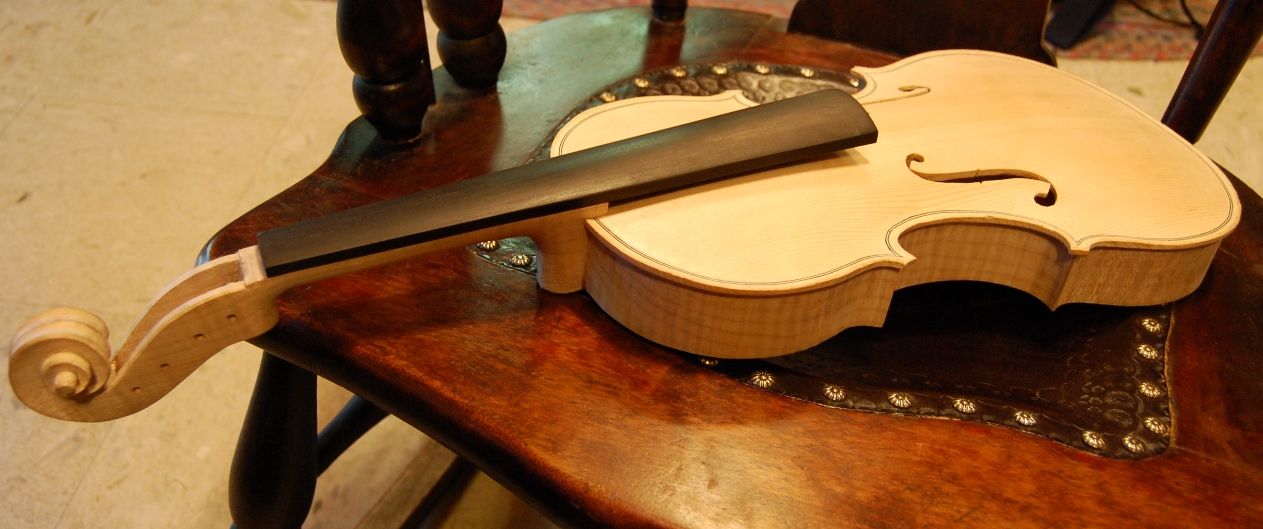
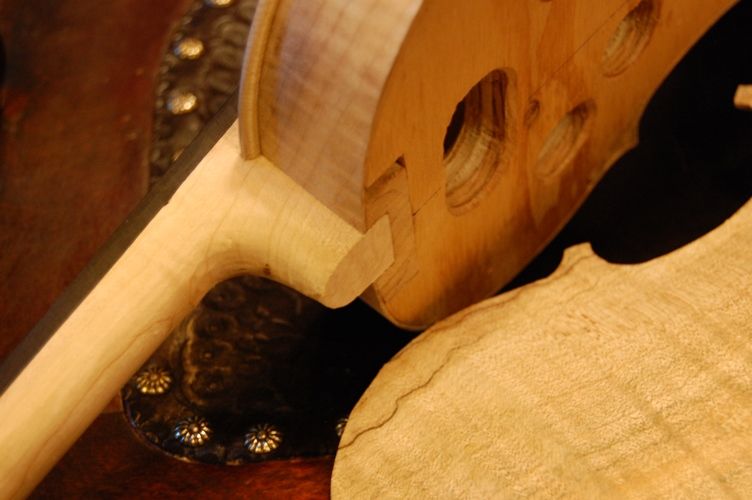
There is the dry-fit neck set. Notice the overhang of the heel of the neck beyond the neck-block. That will be planed off after the glue is dry.
So there is the dry-fit assembly. It is starting to look like a viola!
When every measurement is correct simultneously, and the fit is tight, I remove the neck one last time and slather hot hide glue into the neck mortise. Immediately I jam the neck into place, and quickly check all those measurements again. Bingo! They are all correct, and I can relax while the glue dries! Once the glue is dry, I plane off the neck heel overhang, flush with the neck-block.
The glue is dry, and the neck-heel overhang has been planed flush with the neck block. I am ready to remove the mold.
In this picture, I have filed the outer edge curvature already, and, though you can’t see it in this photo, I have also completed the graduations on the back plate, and have filed its inner edges, so it is ready to install. But; before I can do that, I have to remove the mold and add the back linings.
Ready to remove the mold.
Dreaming of the next step!
I am getting tired, though, and have some other things that need doing, so the viola will have to wait until another day to move any further toward completion.
Thanks for looking.
If you found this post helpful, please share with your friends!
The outside arching for the front plate is essentially complete, though there will be a lot of scraping, later on. I began the graduation (inside arching) of the front plate about the same time as I took off and “sprinted for the finish line” with the “Plowden” Guarneri-model violin (see recent posts), but all I accomplished was that the center of the plate is about the right thickness– everywhere else it was still way too thick.
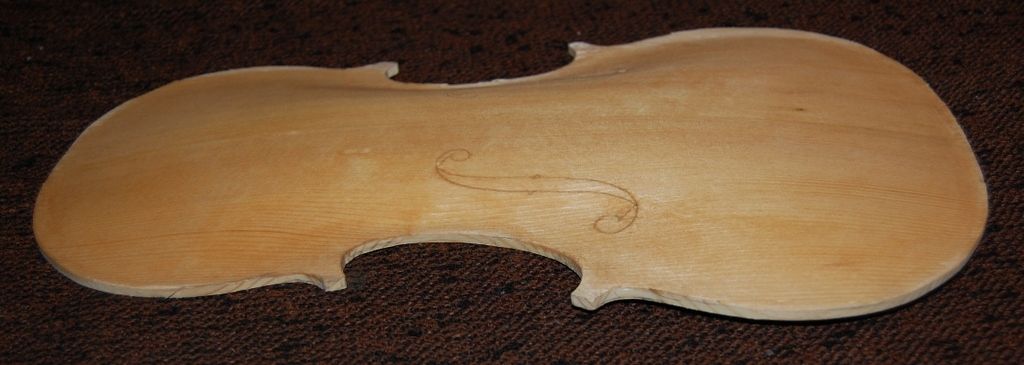
So! Back to work! You can see (below) that the f-holes have been laid out and deeply incised, which allowed me to accomplish the last stage of the front arching (explained in an earlier post.) Now I need to carefully carve away the interior, until all the plate is the thickness I want it to be…which varies by region, all over the plate. I have to be very careful to check certain areas with a caliper before I begin to carve, or I may easily go too far and make the plate too thin. (Voice of sad experience….) The area around the lower ends of the f-holes are very likely victims of this error, so I try to check regularly, and avoid carving away too much in those areas, especially.
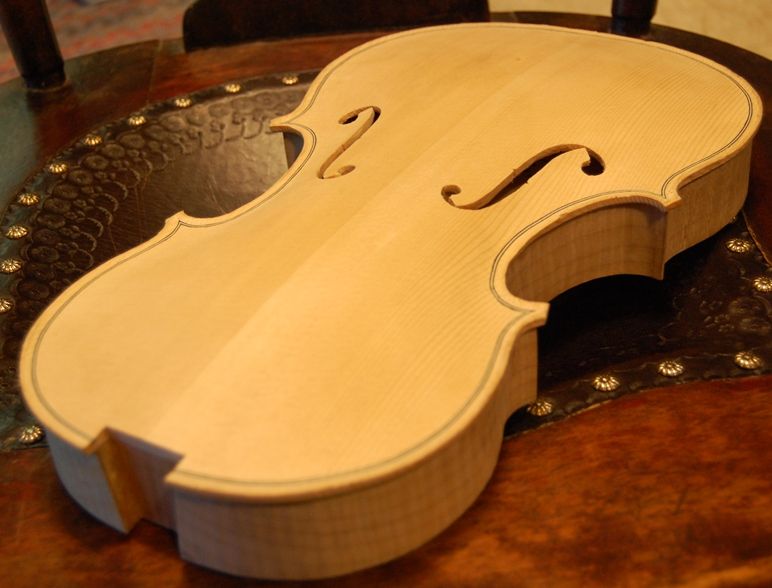
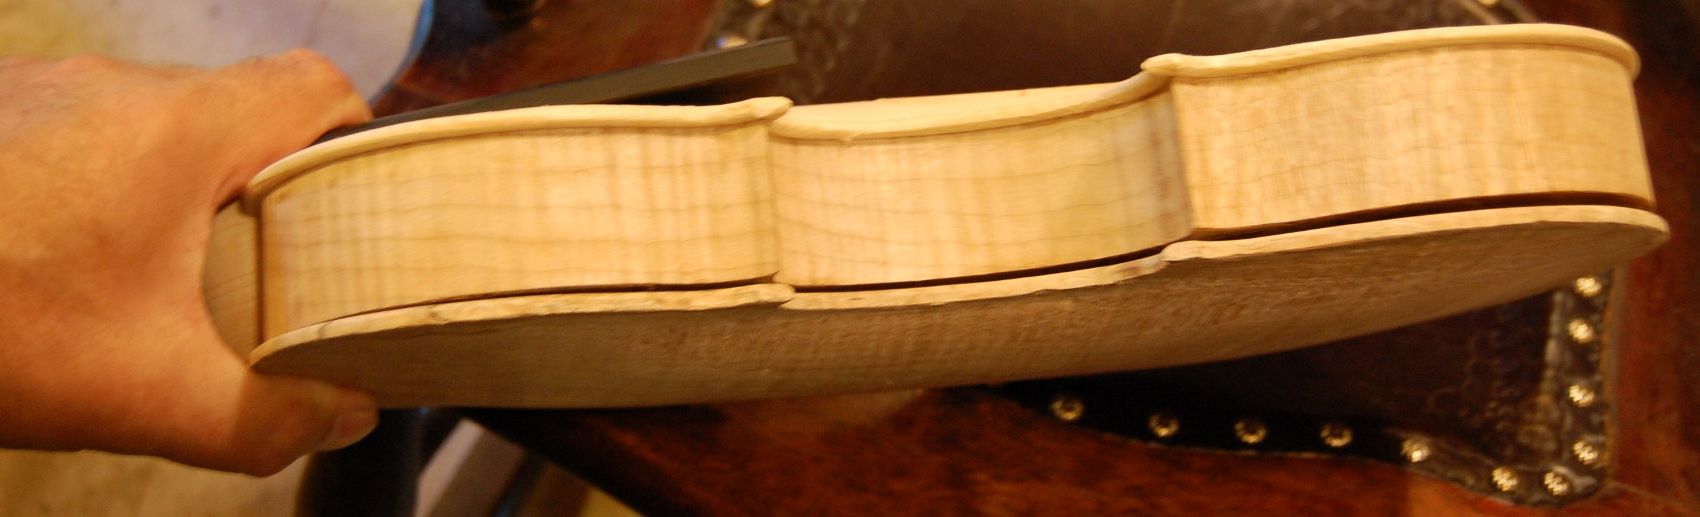
The outer arching of the small viola is complete, not counting the purfling channel.
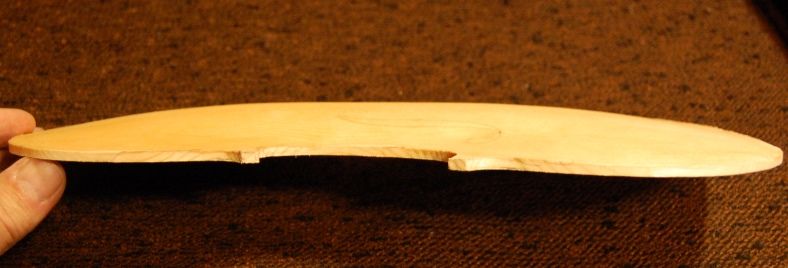
Side view of the small viola’s arching, before purfling and edgework is done.
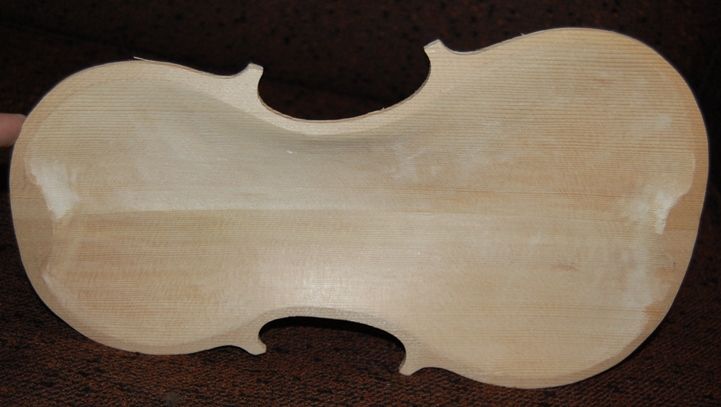
Inside arching of the small viola. The Graduation is complete. Next, I need to cut out the f-holes, and add the bass-bar. I do realize the corners are too long…I will trim them later.
Coffee Stain
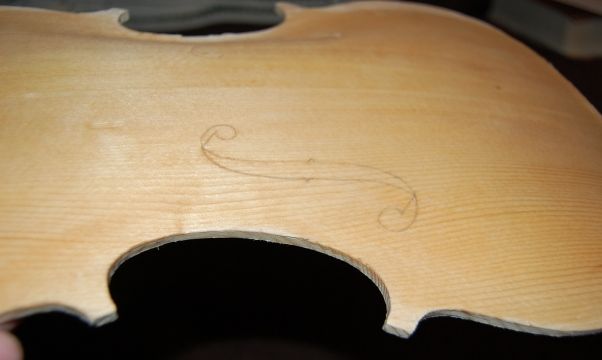
One thing I decided on this instrument was that I should begin the coffee staining very early, so that, ifthere is any distortion, due to the wetting of the wood, I can correct it before the plates go on the garland. In this photo, it is hard to see how much the grain is raised, but, those wide summer grains of the Sitka Spruce are all swelled up like corduroy!
Accentuated grain lines, due to coffee stain.
I will let it dry, and then gently scrape it smooth again. The issue, here, is that the summer grain swells more than the winter reeds, but when we scrape the wood, the summer reeds compress, while the winter reeds resist the blade and are cut away. The result is that the summer reeds are already raised, even before I wet it down and deliberately raise the grain, before leveling it again.
Things remaining:
When the plate is nearly perfect all over, I will finish cutting out the f-holes, and finish their edges as well as I can. I nearly always see something later that I have missed, so I just accept the fact that I will be making corrections right up until the time I begin varnishing. The same thing applies to the scroll. It will never be “perfect”, and I accept that.
I will lay out and fit the bass-bar, trying for an air-tight fit between the bass bar and the inside of the front plate. I install it using hot hide glue and clamps, but will trim it to the proper shape after the glue is dry.
After the bass-bar is fully completed, I round the inner edges of the front plate, so that it is ready to install on the garland.
Post Script:
All of the above was accomplished three weeks ago, before we left on vacation, so it should have been published then, too…but I kept thinking I would get a little more done before we left, so it simply did not happen.
We are back, and progress is once again happening, so I will post more in a day or two.
Thanks for looking.
If you found this post helpful, please share with your friends!

 Follow