
 Follow

Repairs to Irene’s Violin
(Completed 5/27/14)
This was only intended to be a functional repair, not a full “restoration”. It turned out to be quite extensive, though, and somewhat intimidating at times. The owner is very happy with her “resurrected” violin, so all is well.
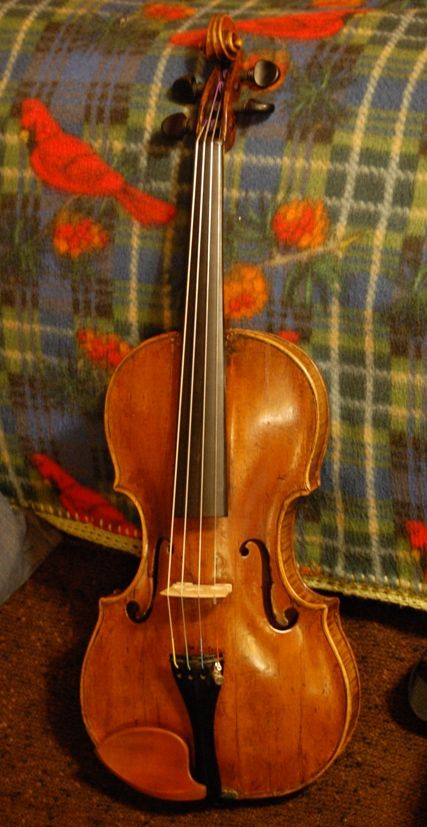
Before:
The violin came to me after a mishap involving a water-heater failure, which had resulted in a heavy steaming of an already fragile, old violin.
The violin had several open seams, obvious from the outside, and numerous older repairs. Some of the repairs were done in a workmanlike manner—some were not. (I am not pointing fingers; just stating a fact…it is a very old violin, and has had encounters with a variety of repairmen.)
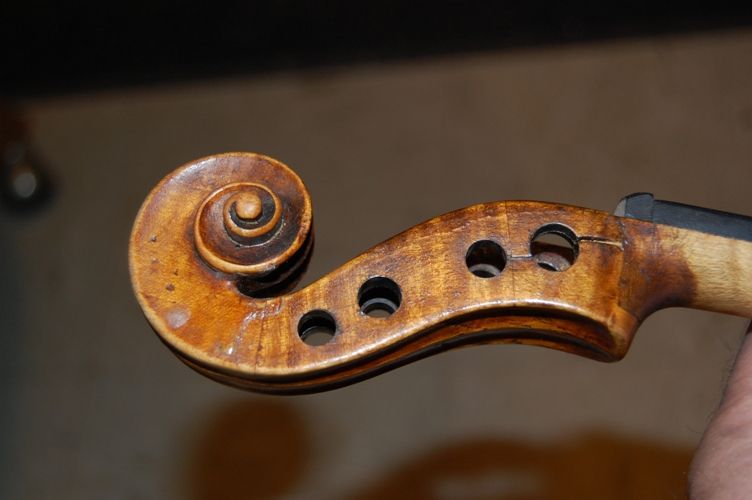
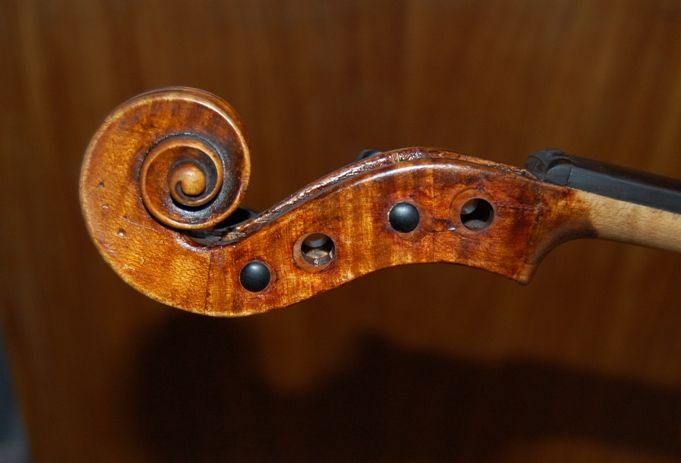
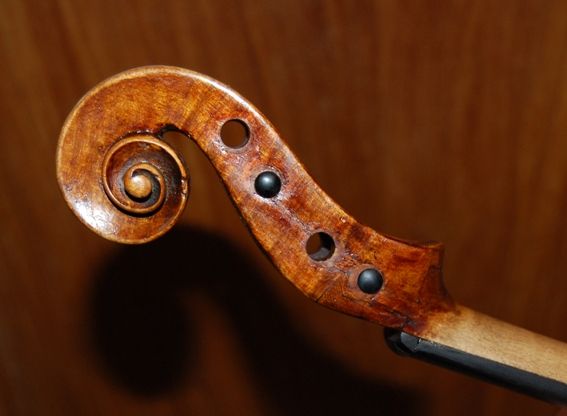
I could see that the pegbox had sustained some pretty severe damage, but did not immediately detect the cause: as it turned out, the scroll had been grafted (guessing around 1850, just because so many were done about that time, and this fiddle is old enough to have been around for that), and it was/is the poorest job of a scroll-graft that I have personally ever seen. Someone tried to correct it with some patches, but it was in pretty sad shape. I wasn’t sure I could do much to help it.
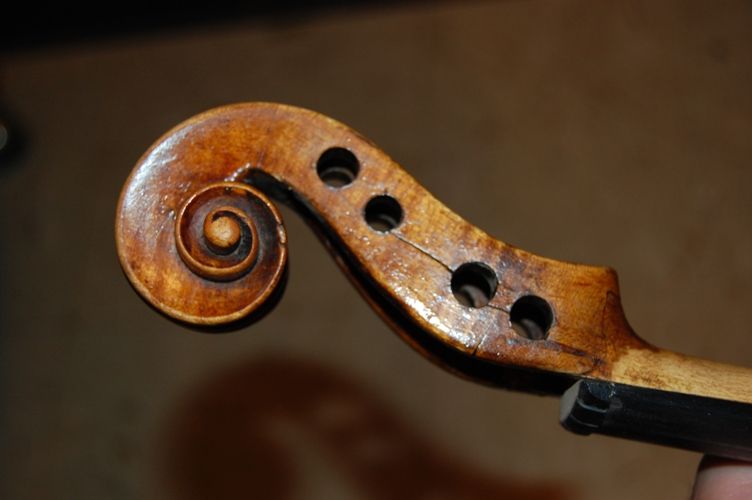
The peg-holes were so badly worn that they absolutely required bushing and re-drilling, reaming, and installing new pegs. (As it happened, the old pegs were in fair condition, so I simply shaved them to the correct size after all the pegbox repairs were completed, and so maintained some small sense of continuity.)
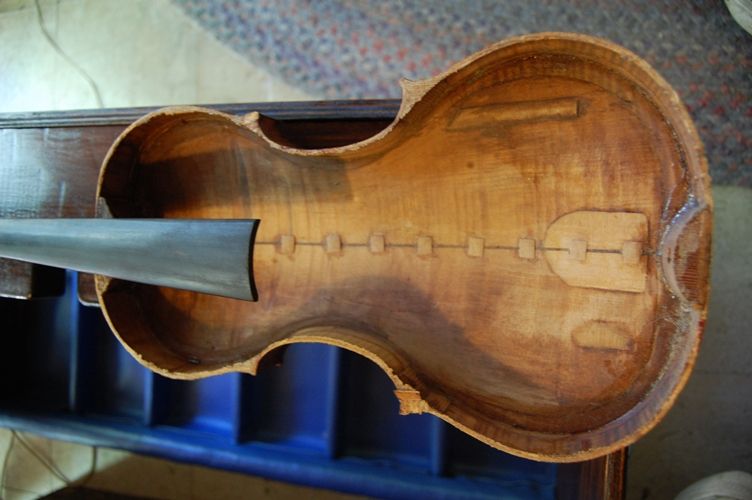
When I opened the body (by removing the top/front) I found that there were nearly 50 cleats inside, each to help reinforce the various cracks that had been repaired over the life of the instrument. The entire area around the neck block simply fell off. Some of the old cracks had re-opened because of the steam-bath, but most were holding, it seemed. The whole area under the soundpost area had (and still has) a patch about a millimeter thick, and 35mm by 50mm. Missing wood had been replaced haphazardly in many places, including the entire edge of the plate all the way around.
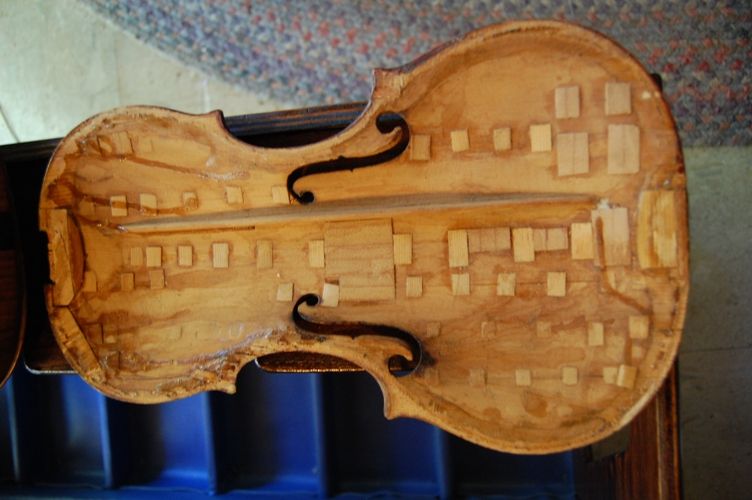
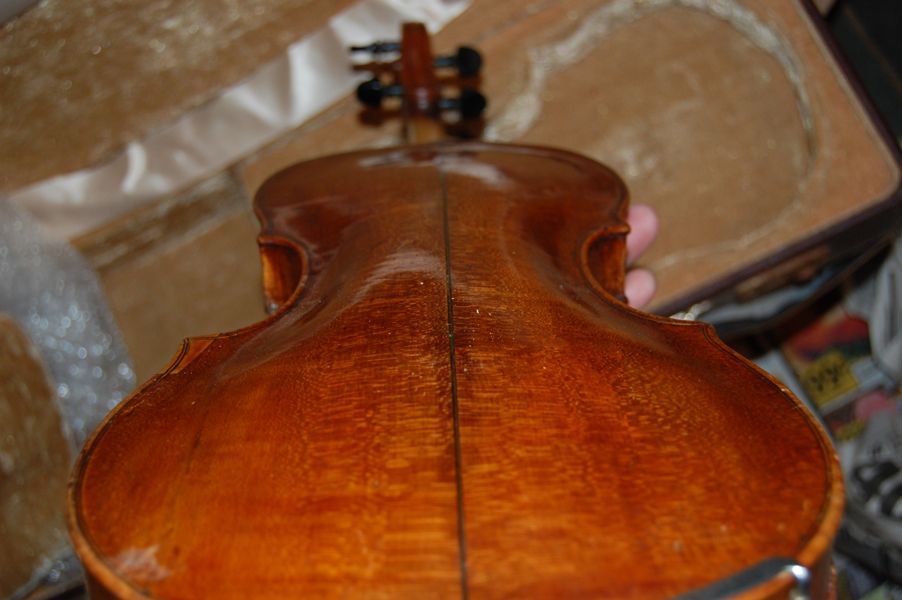
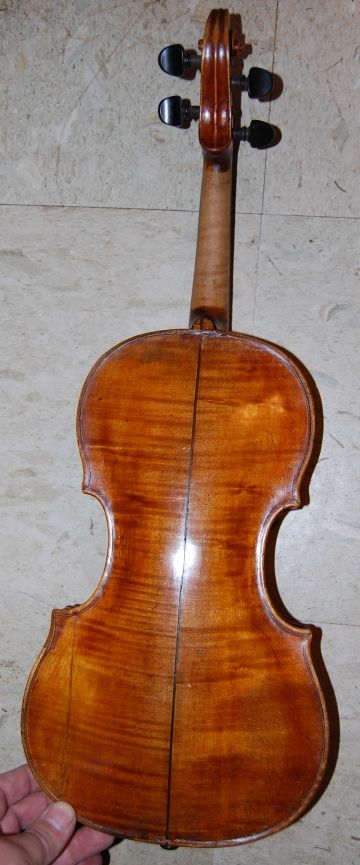
Same on the back plate, though not quite so severe:
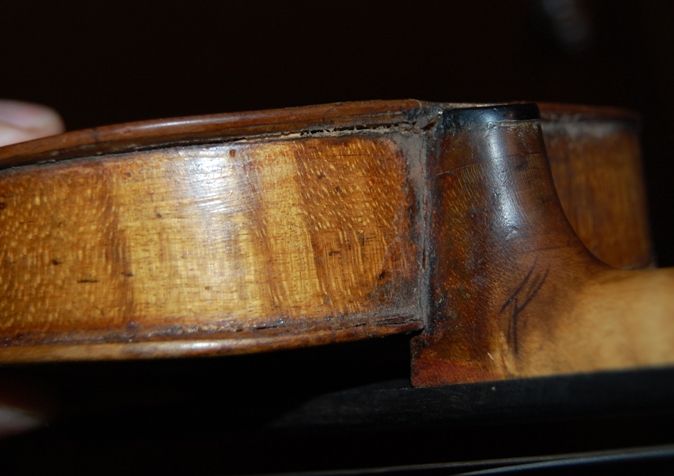
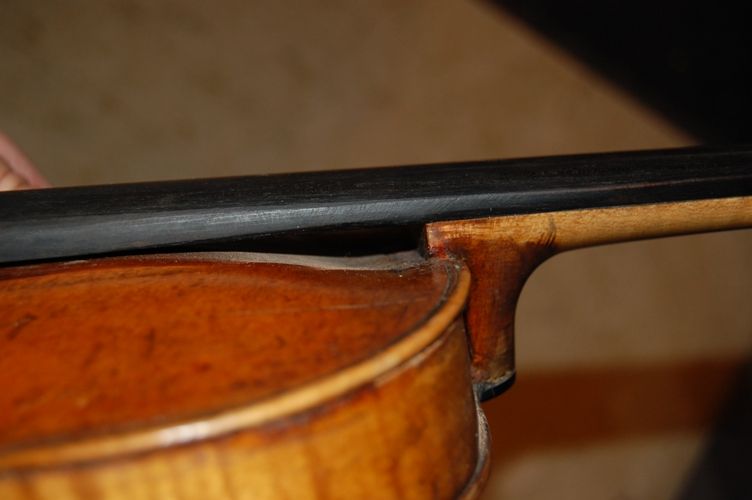
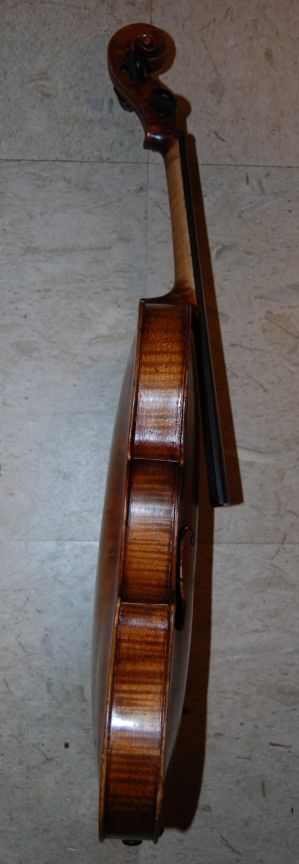
The neck was set incorrectly, with an extremely high overstand (10mm), and low projection, as well as being quite crooked. The ebony crown on the heel of the neck was broken, and simply crumbled, necessitating making a new one.
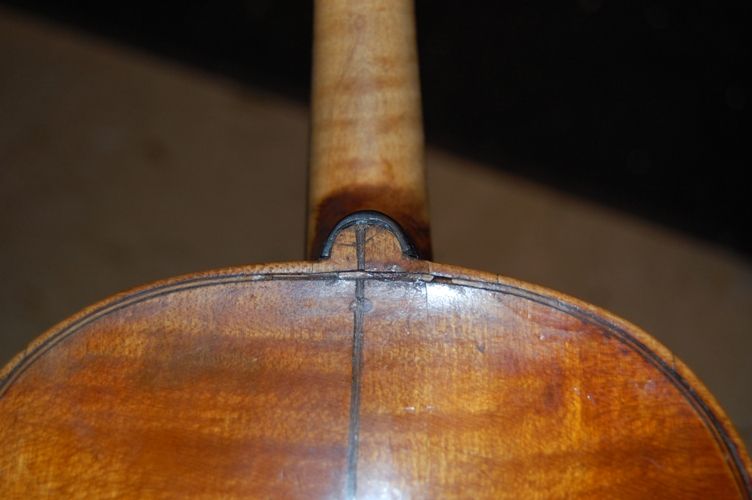
I am not sure what the rationale was with the insert up the back center seam, nor why it had been relocated so far off center. I wonder whether the instrument was originally something larger and was cut down to be what we see today, especially because the f-holes are so far apart.
The button was broken off at the purfling line, which seriously weakened the neck, so, after complete repair of the front plate, I removed the back plate and patched the button by removing a section of wood across the break and replacing it with a perfectly fitted patch, restoring strength to the joint. (Explained later)
The Repair Process:
(Forgot to take pictures of the actual process…wasn’t in “Photography Mode”… sorry.)
First, I re-glued the section around the neck block which had dropped out—there were several patches from previous repairs that had come loose, but I glued them all back in just as they had been originally, and the joint now seemed secure. There were also some missing sections of spruce, so I replaced them, gluing in new wood. That also seemed to stiffen the area a good bit.
The cleats along the longest cracks were still holding, though the cracks had opened, so I cleaned the cracks with water, then worked hide-glue through the cracks and clamped the plate flat, so that the cleats forced the cracks shut, squeezing out the excess glue. I cleaned off the excess with a warm damp rag, and let it all dry.
Then I could tap the plate and listen for buzzes. There were lots of them! I would tap and listen, tap and listen, and then use a thin blade (palette knife) to pick at various things to find out what was moving. To begin with I found that many of the cleats were only barely holding, and were starting to come loose, so they were vibrating. I glued all the loose ones, one by one. Then I found cracks around the edges, and loose purfling, etc. and glued all of those sources. Finally I found enough of them that the buzzing stopped, and I glued the top back on the violin, after first removing the neck which I had determined to be crooked.
Once I had the body closed, I re-set the neck correctly and straight, ending with a 6mm overstand and a standard height (21mm) at the end of the fingerboard. The result is that I could not use the original bridge (not a surprise), so it got a new (taller) one. As I said, the ebony crown on the neck heel was very thin and cracked, so it simply crumbled off in pieces. I made a new one. It is also very thin, but not broken. At some point in the violin’s lifetime, someone decided to move the neck (or the back plate?) off to one side…I can’t change that, but you can see the effect at the button—the center line seam is no longer in the center.
After setting the neck, I removed the back so that I could repair the broken button. I carved out a shallow curved scoop almost the full width of the button, and all the way through the neck-block gluing surface—about 1-1/4” long and almost ½” wide, by about 1/8” deep at the center. I used a curved scraper to perfect the shape, then chalk-fit the patch to match it perfectly, and glued it in place with hide-glue. After the glue was fully dry, I planed the patch down to be absolutely flush with the surrounding wood of the back plate. This patch restored the strength of the button, which (unknown to many) is the main strength of the neck joint. (Forgot to take a photo of this—too bad; I was very pleased with it.)
I reamed the peg-holes far enough to get into clean wood, then shaved down some tight-grained Eastern Red Maple into tapered pegs to plug the holes. Once they fit perfectly, I glued them in place with hide glue, and allowed them to dry. Then I cut them off inside and out, using a tiny saw, and shaved them flat with a small carving gouge. I stained the inside with dark brown spirit varnish to match the existing color, and matched the color of the outside of the box to the best of my ability, sanding between coats, and trying to make the patches as nearly unnoticeable as possible. (Bushed peg-holes are always visible, but they don’t have to look terrible. Many older violins have had the holes bushed more than once. This is a first for this fiddle.)
I re-drilled the peg-holes, shifting them a little, to establish a more normal location for each, then reamed them to a small size, and shaved the original pegs down to match the new holes.
I got looking at some of the gaping cracks in the pegbox, and decided I wanted to try to repair them, so I cleaned them out with a small knife and then shaved a small piece of red maple to fit and glued it into the crack. It worked surprisingly well, and I was pretty pleased with the results. Naturally, that required smoothing the patch down to be flush with the original surface, and retouching to match the varnish as best I could.
The original saddle and endpin were still useable, so they are in place—I think I probably could have used the original soundpost, but I made a new one before I thought of it, so, for the moment, it has a new soundpost. But I suspect that the original is nearly identical, though I used a very thick soundpost. Perhaps later a thinner one could be put in, if it seems too dampened by the thick post.
The nut, however, was very poorly made, and cut so deeply at the E-string that the string rested on the fingerboard. It broke when I tried to re-shape it, so I simply made a new one.
I was able to use the original fingerboard, though it had been coming off, and required some re-work to get it to fit well. I had to do extensive re-shaping and dressing of the surface, too, as it had a very round contour close to the neck, though normal at the wide end. Whoever originally put that fingerboard on did the violin a real disservice: there is a deep gouge of wood missing from the neck itself, all the way up the middle, and a similar deep gouge out of the inside of the fingerboard, so only about the outer third on each side has any contact. This wasn’t something I could change, so I cleaned it up and glued it back together. I assume they thought they were making the instrument lighter. (Not Good.)
Finally, I retouched the varnish anywhere it had been damaged, and tried to give it a good (gentle) polishing all over. I think it looks pretty good, but I never saw it in its “glory days” so I have no idea how that would compare.

The Result:
The owner has a playable violin again. It still has many repairs, some dating before any of us were born, some more recent. I have no idea of its market value, and, in my opinion, that is not important. Its value is primarily that it is cherished by the owner because of who she is and from whom she got it. As long as it is well cared-for, it should still give many years of service.
I uased the original fittings except for the bridge and soundpost, so it looks essentially unchanged from before the damage, except for the peg-hole bushings and repaired pegbox cracks, which she assured me were there when she got the violin originally, nearly 50 years ago.
I never heard the instrument before the damage, so I can’t compare that, either: all I can do is adjust it to what seems optimal now, and trust that, as the owner plays it, it will settle in to sound as good as she remembers it to have sounded. To me, it sounds pretty good, and well balanced.
(Later footnote: The owner contacted me and is thrilled with her violin. She swears it sounds better (and brighter) than she remembers it ever sounding before it was damaged, and she is again playing it in her local orchestra. That is nice to hear…)
Well, I’m impressed. I have no knowledge of violins but it looks like it took a lot of patience to do those repairs. I know who to go to if I need any instrument repairs! 🙂
Thanks, Miss Lori!
Now we just need to get you started playing a cello, or something! 🙂
Wow. You really resurrected this one nicely. The owner’s judgement is key to any repair job. Her joy is now yours too.
Thanks, Mike!
What a masterful restoration. I can’t wait to hear it.
The owner is now playing it in an orchestra in Arizona…so, if you are in that area, I guess you could do so. I will not get to hear it again, as I live too far away. She says it sounds better now than it ever did in the time she has had it. It’s the ONLY time I ever heard it play, so I really can’t say. But it sounded good, at least, and I am sure it is opening up again, after the long silence.
Here’s an excerpt from an email the owner sent me a few days ago:
“Do you have any idea at all how much I appreciate you for restoring that old German violin? I could thank you a hundred times each day because you made it so much better than it ever was in my lifetime. Maybe a hundred years ago it was this good as it is now, but by the time I acquired that violin in 1971, it was…….well, you know very well what had been done and what had not been done, then the final last straw when it got the steam bath (when the hot water pipe got the pin hole in the wall behind the closet and you know that story).”
Sounds as though she is happy with it!
I’m satisfied.
That violin is so beautiful. I know the young!! lady that is playing that and it is wonderful. Thank you so much for the spectacular job you did.
Thanks, Mr. Donnelly! I hope it continues to be a blessing to her for years to come.
Finally, I may have learned how to post a comment. I am the “Irene” in the story and cannot put into words how grateful I am to Mr. Bishop for not only repairing the old violin. As far as I know, the violin was made in 1750 by George or Sebastian Kloz. You can imagine how low I felt when it was seriously damaged about 3 years ago. Here I’d been given custody of this heirloom and treasure, and had dropped the ball, had allowed it to get totaled out.
I did not imagine it could be repaired because of the damage so overwhelming. I’m sorry that Mr. Bishop did not put “before” pictures on this site.
I do not have any idea how to express the thrill for me every time I see that violin now and especially when I pick it up to play it because it is way more resonant and brighter than it had ever been in my lifetime.
Irene
I saw photos of Irene’s violin after the accident and I honestly didn’t think it could be saved. Irene and her violin are now back playing in the White Mountain Symphony Orchestra first violin section and the instrument looks and sounds great! You did a wonderful job on it, Chet, and I know Irene is very grateful, as are her fellow musicians in the WMSO. Thanks for the great job you did on this instrument!
Well, thanks for saying so, Nick! I wish I lived close by and could come and listen.
I had not known which Orchestra, and wasn’t even sure where it was– just someplace in Arizona…which is roughly 1000 miles away from where I live. There was a time when I drove to Tucson every year, for a violinmakers workshop there, or for a competition, but that was 1500 miles each way, and I finally quit doing it. Irene contacted me online, so I have never even met her…just the violin. 🙂
It is very impressive to see what you have done here. Managing these old time repairs can be a real headache. This is once again a masterpiece violin and I know personally that the owner is thrilled with the work that you have done.
Thanks! that is encouraging!
Chet
Greetings, My honey and I came across on old violin at a yard sale and brought it home. I know it was a fine instrument at one time and it needs restoration. Looks like a short neck with no graft and could almost be a clone to Irene’s. It seams to be in much better condition though. We don’t play and to restore a fine instrument such as this needs to be done by someone with more knowledge then I. It’s neck is detached and upper bridge is missing along with a few other pieces. Do you know anyone looking for a project? Also has a very old wooden case with it. Please email us if you have questions — want photos or more info. —– Jim
I might very well be interested! I sold my last one, and today someone asked if I would write a tutorial on restoring an old fiddle…so I need one for the project. 🙂
What would you ask for it?
Chet