I decided to make two new molds, so that I could have more than one handmade five-string fiddle in the works at any given time. The new molds are made from the same half-model template, so they are very similar in character, but I did notice that somehow my original mold had been a little narrower in the center bouts than I had intended (don’t know how it happened), so the new ones are wider there, which may make the sound even more deep and clear. The instruments from the first mold have all been very good, so I am hoping the ones off the new molds are even better.
Different Materials
The original Oliver 5-string mold has the ribs and linings in place, and the chosen material for ribs, back and neck is spalted maple. This is an unusual choice, from a classical perspective, but a five-string fiddle is an unusual instrument, and I think it will prove a good choice. I really like the looks, so far. The second and third Oliver Molds (essentially identical, otherwise) have higly figured Oregon Big-leaf maple and Oregon Myrtle, respectively, for the backs and ribs. The Myrtle is a two-piece back, and the neck on the Myrtle fiddle is Big leaf maple; otherwise all the fiddles have matching ribs, backs and necks. The other two are each a one-piece back, also.
I am planning to use Port Orford Cedar for the two-piece front plate on the Myrtlewood fiddle. This will be the first time I have used anything other than spruce for a violin top, but I have been told it is exceptionally good for other types of instruments, and a friend gave it to me to try in a fiddle. I plan to use Sitka Spruce for the on-piece top of the curly big-leaf maple fiddle, as well as for the spalted maple fiddle. I am hoping to experiment with front plates made of Alaskan Yellow Cedar sometime soon, too.
Different fittings
Depending on the way they look when completed, I may vary my fittings a little, too…haven’t decided yet. I tend to like simple fittings, but I have used fancier fittings, once, and they did look nice– I am just not sure they belong on a bluegrass five string fiddle. Perhaps I can get a set of Oregon Mountain Mahogany pegs, or something. Mountain Mahogany is a very hard wood native to Oregon, but much lighter in color than Ebony, so it adds a different look.
Same Workmanship
I intend to use the same methods as always, including the double purfling that adorned the previous five-string fiddles. I will still use a scraper for the final contour and texture, though perhaps I will leave a little less “corduroy” texture on these than on some others. Some people like less.
Same Varnish
I will use the same Spirit varnish that have always used on all three fiddles, as well as the same graduation scheme and internal arrangements (bass-bar shape and size, etc.), so the sound should be the same.
Same Strings
I will use the Helicore five-string sets, as usual, though I have found some other combinations that work remarkably well.
Progress reports to come
As things progress, I will post photos, so you can see each of the three fiddles grow from a small stack of wood to a completed instrument. Each will emerge as a brand-new, handmade bluegrass 5 string fiddle when complete.
Stay tuned… (no pun intended). 🙂
If you found this post helpful, please share with your friends!
When my maternal Grandfather (Dr. L. E. Green, of Mississippi) was nearing death, he gave me his Grandfather’s (hence, my great-great-grandfather’s) fiddle. It was, coincidentally, the violin on which my mother had also learned to play. She had later been given a much better violin when she graduated from college, but this is the one her great-grandpa Gray played, and the one she learned on. I had been told about it, but had not seen it until it arrived at my house.
I knew nothing about violins, at the time, so I strung it up, and wondered why it sounded bad. I noticed there was a little piece of “dowel” rolling around in the case, and asked around…it turned out, of course, that the soundpost had been removed, and that was it. I took a stiff piece of fencing wire and sharpened it, bent it into an appropriate curve, and taught myself to set a soundpost. It still didn’t sound great, but it was great-great-Grandpa’s fiddle: thus, precious in its own right.
Grandpa Green had sent me the original bow (repaired by some well-meaning amateur– (bullet-casing reinforcement around the shank where the button screws in, because of a crack, etc.), but it had no hair, and was unusable at the moment, so he had bought an (extremely) cheap bow, and sent it along, as well. The case was just a typical, worn-out molded wood and fabric hard-case.
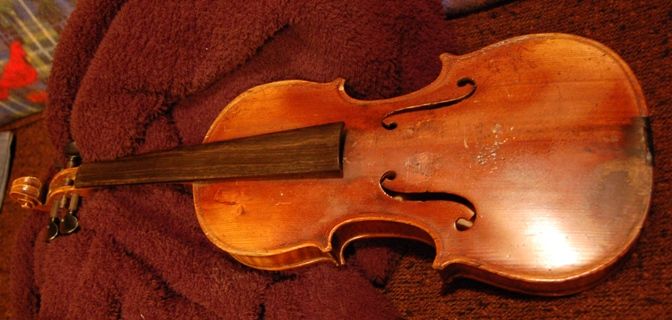
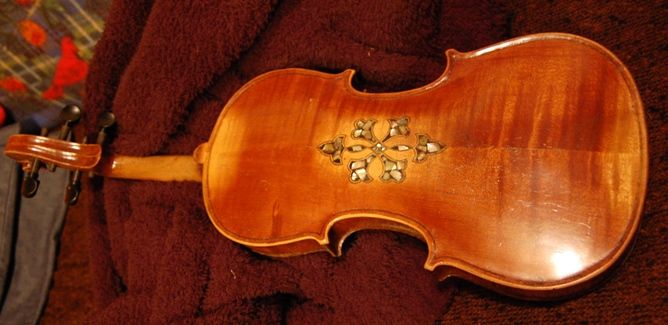
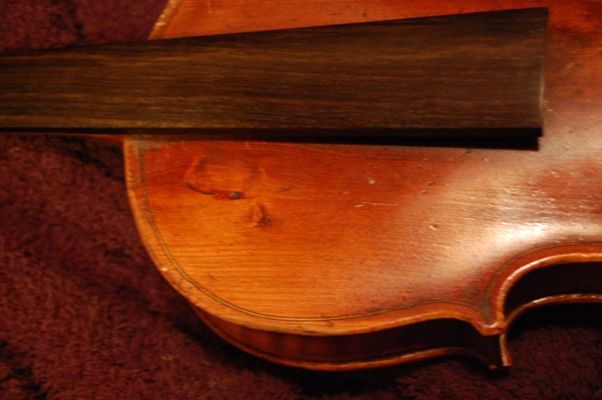
All we knew about the history of the fiddle was that great-great Grandpa Gray had bought it second-hand, in New Orleans, in 1900. I did enough snooping around to figure out that it had probably cost $2-3 or thereabouts, 5-10 years earlier, brand-new, being imported from Germany among hundreds of thousands of others, in the late 1800’s. The only things that made is “special” were the fact that it had been Grandpa Gray’s fiddle, and the fact that the back had an unusual inlay pattern involving a very fine “weave” of purfling with chips of abalone shell adorning the spaces between them. The gaps around the chips of shell were filled with a mastic evidently composed of hide-glue and ebony dust, or the like…possibly just charcoal dust and glue. It was somewhat crudely made, of mediocre to poor wood with a prominent knot in the soundboard (!) and a typical cheap 19th century German trade-fiddle finish. (see Photos)
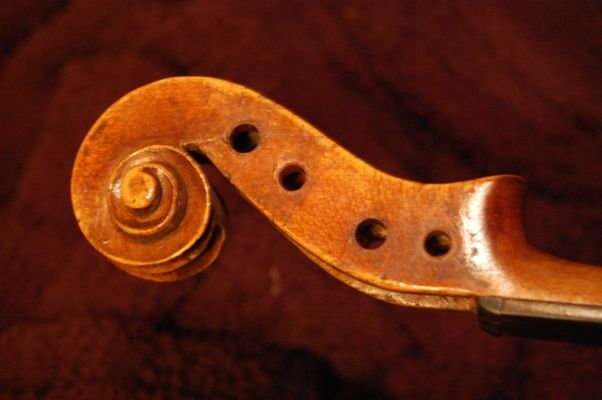
Fiddle FrontFiddle BackScroll, showing repaired A-peg crack, and spiral-bushed peg-holes.
Waking Up to Sing Again
I played that fiddle off and on (mostly off) for a while, and the sound didn’t improve a lot, but it was acceptable, because…it was Grandpa’s fiddle. During that time, all three of my chidren were learning to play, as well.
About a year and a half later, I heard my daughter playing a tune in the kitchen. The music was the same as she always played on her own violin, but it sounded different–considerably better, actually. So I walked in to see what violin she was using. It was Grandpa’s fiddle!
I couldn’t understand why it suddenly sounded so good, so I took it from her and I tried it myself, thinking that it must simply be that she was a better player than I; but it sounded good for me, too. Evidently, part of the problem had been that the poor thing had sat neglected for 50 years, and had never been played at all during those years, so it took over a year of being under full string pressure, and sporadically played, for it to “wake up” and “remember that it was a violin.” It was quite an eye-opener. I had heard about the need for violins to be “played in”; probably had I played it more aggressively and much more frequently, the change would have come sooner. Good lesson there, somewhere.
A Little More History:
Years later, after I had begun building violins and other instruments, I took Grandpa Gray’s fiddle to Paul Schuback, a local expert (“local”, only in the sense that he lives and works near me– he is internationally reknowned as a violin expert), to see if he had any insight into the background of the instrument.
When I opened the case, Paul’s eyes lit up. He exclaimed, “I know exactly where that came from…I’ve been there, many times.” He went on to explain that the cow-herders near Mittenwald, Germany, had nothing much to do in winter (as the cattle were safe in their lowland pens and barns for the season) so they made violins as a “cottage industry”. He had been there, personally, in the 1960’s or 70s, when the modern heirs of the practice brought in a gunny-sack (literally) full of unvarnished violins they had built during the winter months and sold them to the lutherie school at Mittenwald. The students there would complete the instruments, varnish them, set them up, and ship them to the USA for sale. The cow-herd made a little money, the school made a little money, the importers and dealers in the US made a little money, and the buyer got a cheap fiddle. Everyone benefited.
I have seen many of these instruments, as they seem to be about as common as houseflies, but this is the only one I have personally seen that had this specific inlay pattern on the back. (I’ve seen similar ones on the internet.)
I have no doubt that, if I opened the corpus, I would find that the front plate was extremely rough on the inside (“rough”, as in, “looks like chainsaw sculpture”) and that the bass bar is carved as part of the plate, rather than glued in separately. (As I say, I have met with this sort many times, over the last decade.) But I have no call to remove the top plate; only to repair the cracked pegbox…which I did do, eventually, and spiral bushed the peg-holes, so that I could intall new, better-quality tuning pegs. Other than that, I intend no changes. It is what it is… Great-great Grandpa’s Fiddle…and I’m the “Keeper of the Fiddle” for this generation.
In Imitation of the Original
When I began building instruments, my first was a small viola, for my son, Brian. I knew that he especially liked Grandpa Gray’s fiddle, and I thought that the inlay was what he particularly liked. So I carefully copied the inlay pattern, and even took it a step further, cutting the abalone shell to fit the spaces, and filing them flush, rather than just jamming chips into glue, and filling the gaps with mastic. Added an abalone cap to the button, too. Lot’s of peculiarities, due to ignorance and inexperience. But it played well, and sounded pretty good…and it is a pretty thing, even with all the amateurish “oddness-es”.
First instrument, a small viola, with abalone inlay and purfling weave.Brian’s Viola Back Detail
After I was nearly done, Brian was lovingly handling Grandpa Gray’s old fiddle, turning it in his hands and admiring its simple, rustic beauty. He said, “You know what I really like about this violin?” I said, “What?” and confidently waited to hear that it was the inlay….
He turned the violin face up, and tapped with his finger: “This knot, in the front…”
Knot in the front of Grandpa’s Fiddle
(Sigh…) 🙂
If you found this post helpful, please share with your friends!
(OK, it is too big to be a thumb-plane, but I was simply making a larger copy of one of my thumb-planes (also called “finger-planes”) so I thought of it as a large thumb-plane.)
Handmade tools are part of the Luthier’s Trade, too.
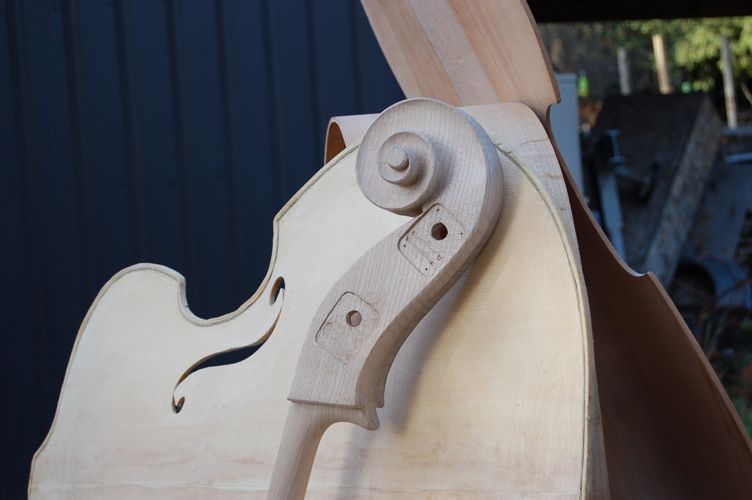
The tool shown here is a curved sole plane specially made for carving the inside of a compound curve—in this particular case, the inside of an upright bass viol—sometimes called a double bass. (That’s a standard violin scroll beside it, and a twenty-five-cent piece, to compare size) Many such thumb-planes are made of cast brass—this one is all steel. It features all welded construction, and a hardened high-carbon steel blade.
I began with a short piece of scrap 2.5″ I.D. steel pipe. I mashed it to the oval shape in a hydraulic press, welded the sole in place, added the plane bed and blade retainer pin, and hand-crafted the chip-breaker to fit.
The blade was made of a cast-off piece of a commercial scraper blade. I think it would benefit from a thicker blade, but it works well as it is.
New Hand-Plane with Violin Scroll
The sole of the plane is curved laterally, as well as longitudinally, to allow the blade to smoothly follow the surface of an inside curve. The blade, also curved to match the sole, is adjusted by loosening the keeper bolt and manually repositioning the cutting edge. In two tries, I had it shaving smooth ribbons of maple from the inside of the bass.
Curved Sole of Hand Plane
The plane weighs in at about two pounds, so it is not a featherweight, but the extra mass seems to make it cut more smoothly. On the other hand, it gives your deltoids a good workout…but that is part of woodworking.
First Bass Project
2006 Double Bass Project
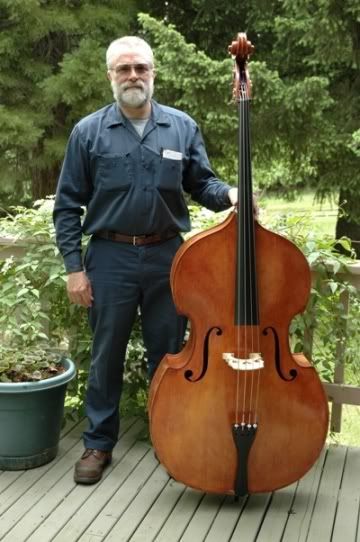
And then, there’s the project itself…. When complete, that bass will be 6’-3” tall—with the endpin retracted. But it will weigh only 20 pounds or so. The curved-sole plane is what allows the control to make the plates so thin—4.5mm in many places—9mm at the thickest. (Bass was completed and sold in 2006; I hope to build another one soon.)
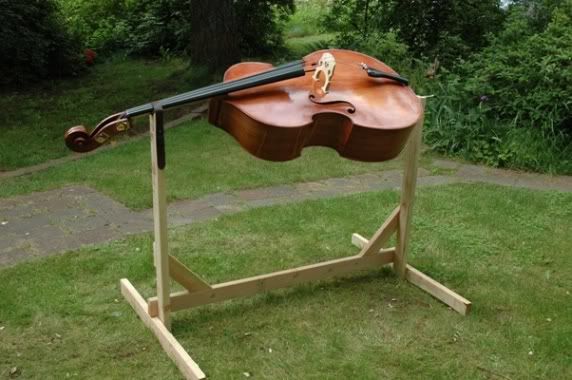
Here is what the finished handmade double bass looked like:
Double Bass in Varnish Stand
Double Bass Side View
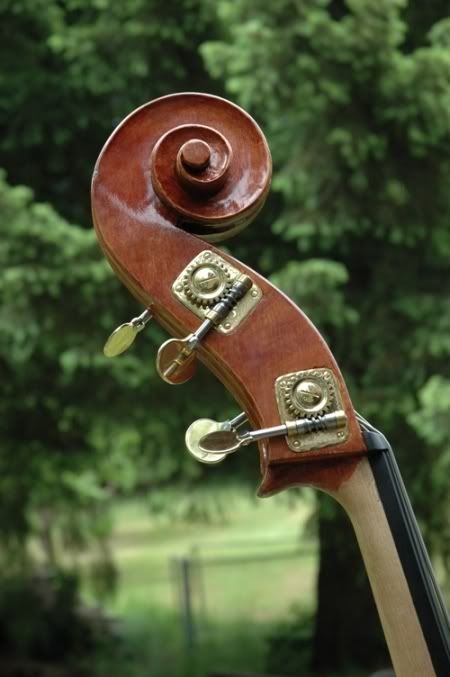
Double Bass Scroll
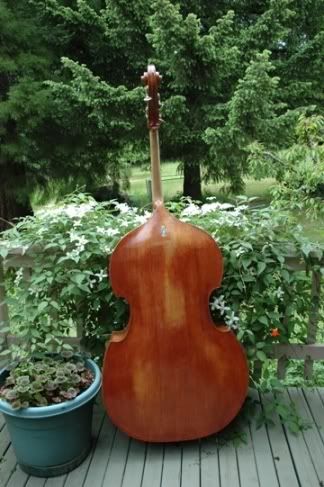
Double Bass Back ViewDouble Bass Back Detail
Double Bass Front View
Yes, I know now that the little white felt pads go on the inside of the tailpiece…but the photograph recorded my ignorance at the time, so I will let it stand.
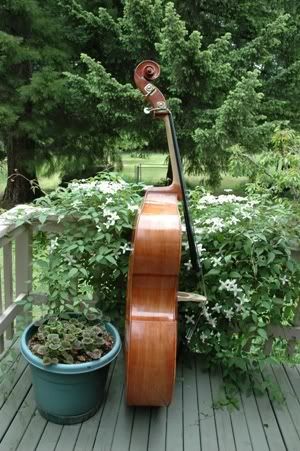
This Double Bass was handmade in Oregon. It plays very well, with a huge powerful tone. It was sold and now lives somwhere in Illinois, I am told. This was a “William Tarr” model, built from plans obtained from Peter Chandler. My next Double Bass will be a “Panormo” model, modelled after a bass by Vincenzo Panormo, and using drawings by the late Peter Chandler.
All my Double Basses are of Oregon Big Leaf Maple and Sitka Spruce.
If you found this post helpful, please share with your friends!

 Follow