Rough arching completed on back plate

Please share with your friends!

One-piece back, rough-arched, ready for purfling.

Final arching is yet to come

This is all I got done tonight. The edges are all at about 6mm, now, and the rough contours of the arching are complete. Tomorrow, I hope, I will finalize the edge footprint, so that it is exactly the shape I want the cello to be. (I waited until the edges were thinned, because it is much easier to make small adjustments to a plate when it is 6mm thick than to do so when it is 35mm thick, as it was two days ago.)

Flattening and thinning the rough plate

Two days ago, I worked the thick plate from 35mm down to 29mm, and decided to start from there on the rough arching. I may bring it a little lower yet…I haven’t decided yet just how high I want the back arching on this cello. I am thinking a little higher than the last one. The original Davidov is pretty flat…I may still emulate that curve.

Rough Arching

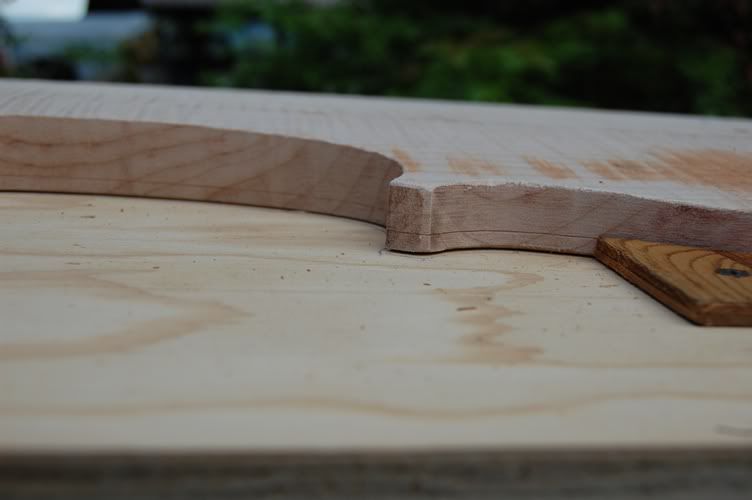
Tonight I simply worked a flat area all the way around the plate, at about 6mm (which I had marked ahead of time with a marking gauge), and then used a variety of tools to bring the shape of the plate to a “cello-shape”, though still a little plump.

Cello edge-thickness marked with marking gauge
Edge-thickness marked with marking gauge.

This (above) is actually a photo from the previous cello…I forgot to take a photo of the edge mark on this current cello before I began carving. Once I have the edge shape exactly the way I want it, I will probably take it down to 5.5 or even 5mm. The 6mm mark was just a good starting point for rough work. I ran a ball-point pen around the groove, too,  after scribing it with the marker, so I could see it more easily, as it was sort of dark out in the shop. So, this is how it looks now.

Rough arching on one-piece back-plate for cello.
Rough-arching completed–almost ready for purfling.

Purfling is next

Once the edge is exactly the shape and thickness I want, I will mark the purfling groove location, and begin cutting the groove for the purfling. Once the purfling is completed, I can finalize the outside arching before beginning the inside carving. When this is completed, it will be a maximum of 8.5mm-9mm in the center area, fading out to 4mm or so around the flanks, and back up to 5mm at the edge itself. I have a long way to go. It is certainly pretty wood, though. That is always encouraging.

If you found this post helpful, please share with your friends!
Why a Five-String Fiddle?

Please share with your friends!

Why not a Five String Fiddle? 

Traditioooonnn, Tradition!!

Violins have been codified in terms of form, size, materials and tuning for over 400 years. Orchestras have 30+ violins, between which the untrained observer would have a difficult time distinguishing, let alone identifying as having come from a particular maker’s hand. And yet experts can frequently tell at a glance when, where and by whom that violin was made. And ALL of them have four strings (count ‘em): G, D, A, and E. No five-string violins in the orchestra!

The violas, too, have their four strings, always at C, G, D and A. They are less tightly defined, however and are all over the board in terms of size and shape. Some are so large that most normal-sized people can’t play them, and some are not much larger than a violin. But they all have those four strings, tuned exactly a perfect fifth below those of the violin. No five-string violas, either.

NON-traditional is OK, too.

Really, a viola works best at what it does, and a violin works best at what it does, as specialized tools…but when they are so close in size—indeed, sometimes overlapping—what prevents us from having one instrument that covers the full range of both? A five-string fiddle?

Well…that isn’t as easy as it sounds. The physical size of a violin is barely big enough to really produce the open G-string tone, so simply adding a low C-string will not work well…and the viola is almost too big to make good high-pitched notes, so adding a high E to a larger viola is usually not very satisfactory either.

Five-string fiddles specifically designed for five-strings

But it CAN work…with some tweaking. Honestly, probably a five-string fiddle would work best in the size of a small viola—say, 15”—or even 15.5”. But country fiddlers and bluegrass fiddlers, who are waking up to the desire for a fifth string, and a lower range, don’t want a “five-string viola”–they want their instrument to fit in a regular fiddle case—not a viola case. They want a handmade five-string bluegrass fiddle. (See Five-string fiddles)

What has worked for me, so far, is to maintain the “footprint” of a regular violin, but increase the depth of the body a little; lengthen the pegbox, obviously, for the extra peg and string; thin the plates just a little more, and deepen the bassbar a bit. I may try widening the center bouts just a little, too, sometime. But for now, I have a working model, with which everyone seems very pleased: it is very easy to play, has good balance across all five strings, a big deep bass end on the C string, and clear, strong high notes on the E string.

So, when a fiddler wants to be able to go low and growly, he/she can do so. When he/she needs a high end for some special sizzle, it is there. All in one fiddle case. A five-string fiddle case.

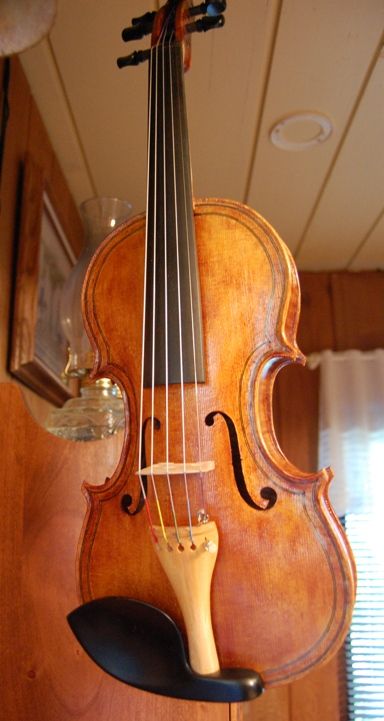
 Oliver Five-string fiddle, by Chet Bishop. Sold.
Front view of Oliver Five-string fiddle, by Chet Bishop. Sold.
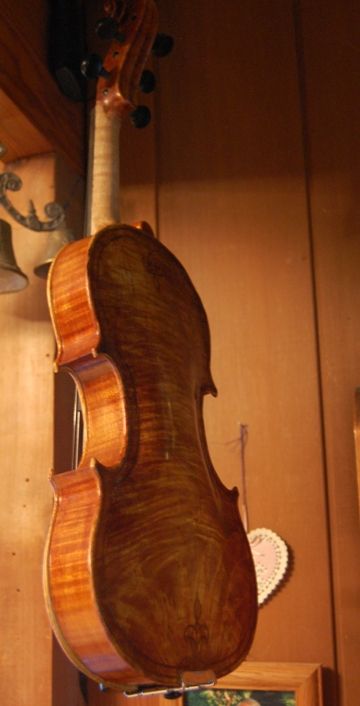
Oliver Five String Fiddle, by Chet Bishop (Sold)
Back view of Oliver Five String Fiddle, by Chet Bishop (Sold)
If you found this post helpful, please share with your friends!
Cello garland lined, and Back plate cut out

Please share with your friends!

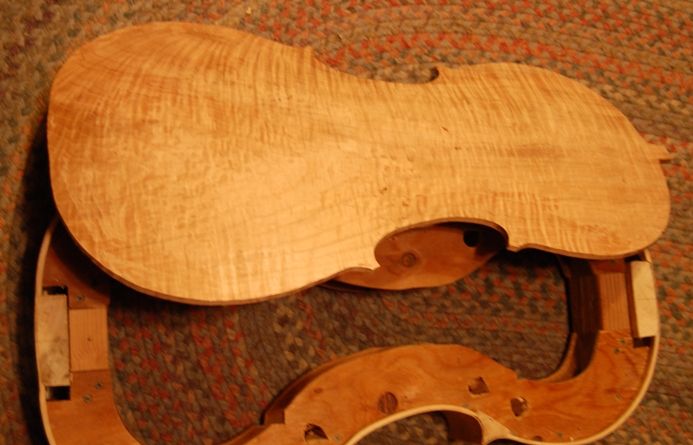
Cello linings completed; One-piece cello back plate traced and cut out…ready for arching

Back linings completed first

This morning I got up early and installed the back linings on the cello. While the hot hide glue dried, I set up a violin for a friend, whose grandfather had left it to him.

Tracing the plate

Once the glue was dry, I removed all the clamps, planed the ribs to be fairly level, and traced the outline of the back plate, using a very short section of aluminum tubing (5mm long, 25mm diameter, 3.5mm wall thickness) and a ball-point pen, to trace around the ribs and mark the maple slab from which the back was to be cut. The tubing is tall enough (5mm) to never slide under the edge of the ribs, even if there is an irregularity on either the ribs or the plate, and the 25mm diameter rolls along steadily and easily along the side of the garland itself, making it a fast, pleasant task.

Cutting out the plate and refining the edges

I cut the plate out on a bandsaw, only using a scroll saw for areas too difficult to access on the bandsaw. Then I smoothed all the edges on an oscillating spindle sander. I do not use many power tools, but the saw and the sander are two that I consider indispensable at my age. They save me a lot of wear and tear on my joints. I have built instruments using all hand tools…no power tools at all…but I do not consider it a virtue, and probably will never do it again, if I can help it. I still have the bow-saw I built for that fiddle project, and all the files, planes and scrapers. The only one I no longer use at all is the bow-saw. It hangs on the wall reminding me of that early violin.

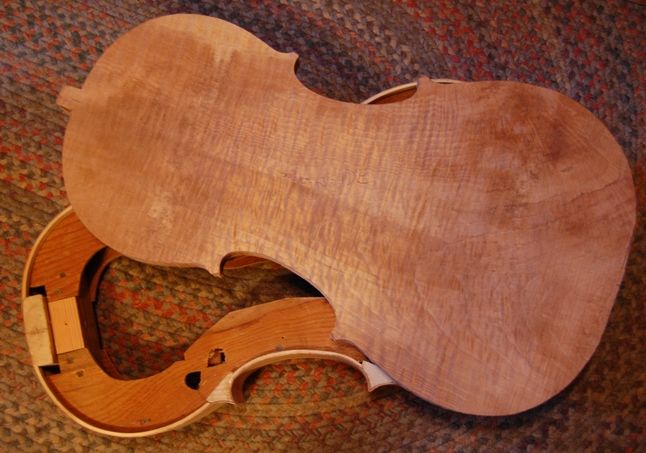
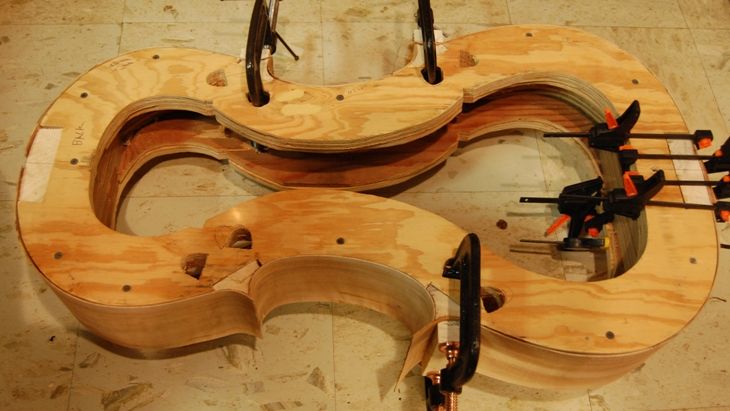
So…now the cello garland (still on the collapsible cello mold) and the back plate look like this:

One-piece cello back plate with garland on mold
Cello garland on mold, with one-piece maple back plate

Arching is next…but I am pretty tired, so I don’t think I will start today.

If you found this post helpful, please share with your friends!

Cello linings installed (front)

Please share with your friends!

Willow cello linings installed, glued and clamped.

Purpose of the collapsible cello mold:

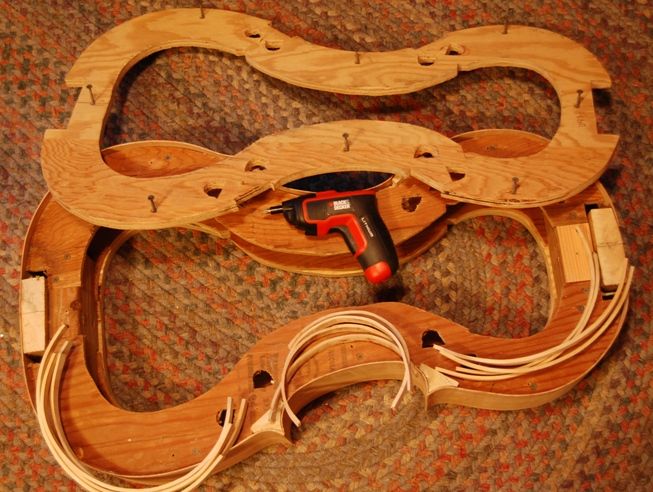
My cello mold is built with a front and back “spacer”, each of which is removable to allow installation of linings. Each is held in place by a few drywall screws. I got tired of the repetitive motion of turning the screws by hand, and bought a very cheap  electric screwdriver, barely sufficient for the task. I will later make a special attachment for it so that it can turn the tuning machines on double basses…that’s another task that wears out my wrists. Anyway– in less than two minutes I removed the front spacer, and the cello looked like this:

Cello mold with ribs installed, linings ready to install--front spacer removed.
Cello mold with front spacer removed and linings ready to install.

Dry-fitting the linings:

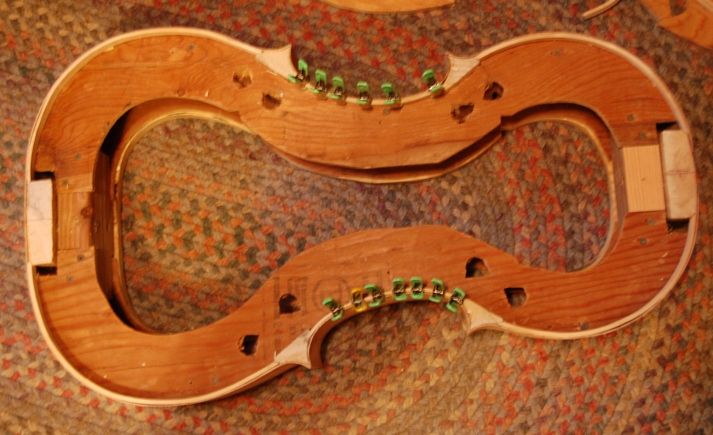
Then I cut the mortises into the blocks, fitted the linings (that I had bent earlier) into their respective places, and prepared for gluing. So, with the linings dry-fitted and ready for gluing, it looked like this (notice that only the center linings have clamps at this point; that is because they want to relax away from the rib, while the upper and lower linings straighten and tighten against the rib):

Willow cello linings dry-fitted, ready for gluing.
Cello linings (willow) installed dry, ready for gluing.

You can see the importance of the linings, by comparing the two photos above: without the linings, the ribs are only about 1.5mm thick…not very strong, nor is there sufficient gluing surface on that thin edge. So, with the linings in place the edge is about 5.5mm thick, which significantly strengthens the edge, and more than triples the gluing surface.

Hot Hide Glue and lots of clamps!

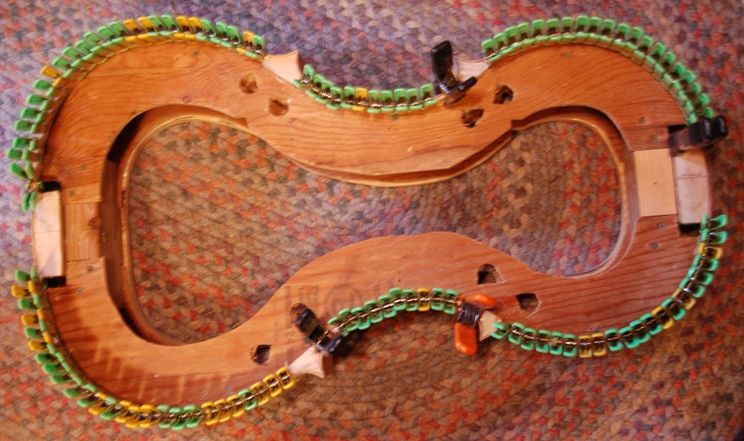
Once all the linings fit correctly, I heated up my glue, prepared a container of hot water, and my various brushes and palette knife, and, one by one, I brushed on the hot hide glue and clamped each lining in place. Those little spring clamps work pretty well. I got them from Home Depot, and they have served this purpose to my satisfaction. Occasionally there is a reluctant joint that needs more pressure, in which case I use a larger clamp, or one of those little f-clamps. (You can never have too many clamps!) After gluing and clamping, the cello looks like this:

Cello linings glued and clamped in place.
Cello linings glued and clamped.

Once these linings dry, I will remove the clamps and repeat the process on the back side. the back has a slight taper, from tail to neck. At the bottom block, the ribs are about 113mm tall. At the neck they are about 108mm tall. So I will want to plane the ribs to those approximate dimensions before I install the linings. One thing you can’t see in the photos is the fact that I fit the linings just a little high…slightly “proud” above the rib edge. I want to make sure that whatever planing needs to be done is primarily removing willow, not curly maple. I will accomplish final leveling with a sanding board, however, just before tracing the shape of the plates, from the shape of the completed rib garland.

If you found this post helpful, please share with your friends!

Bent Willow Cello Linings

Please share with your friends!

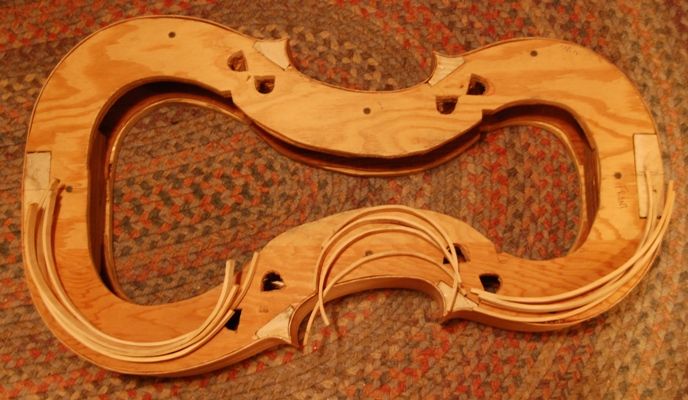
Cello Linings, Willow, bent and ready to install

The linings I sawed up yesterday are now bent and ready to install.

While the bending iron was warming up (which takes about 20-30 minutes, especially in cold weather), I used a very small hand plane to smooth the edges of the linings, since some were still a little rough, especially if they had been the outside edge of the strips I cut from that beat-up 4 x 4 I brought home.

Once the iron was hot enough to make water droplets dance on its surface, I dampened each lining strip one at a time, and used a metal bending strap to force the wood against the hot surface of the (aluminum) “bending iron”. These linings are about 4mm thick, so I gave each segment a full 15 seconds to heat up, or 20 in the case of the c-bout linings which were to endure a tighter bend. As I heated one section, forced against the flattest curve of the iron, I counted seconds, then shifted the wood sideways to heat the next section, still maintaining the curve of the first, and so on, until the entire lining strip had the curve I wanted it to have. You can see that I deliberately over-bent them: I do so because it is pretty easy to straighten them out a little, to adjust them to fit tightly against the ribs.

Here is what they look like now:

Bent willow cello linings ready to install.
Bent willow linings, ready to install with hot hide glue.

Tomorrow evening, depending on how tired I am when I get home, (or probably Friday, since I have to go to bed very early Thursday in order to get up at 2:30 AM and go teach a code clinic class before my regular work begins on Friday morning) I will remove the front section of the mold (notice the screws holding it), which will allow room for the linings to be installed. I will cut the little mortises in each side of each block, to receive the ends of the linings, then brush hot hide glue onto each rib and lining, one set at a time, and clamp them in place with little spring clamps. After the front linings are dry, I will repeat the process with the back linings.

Starting to look more encouraging, now.

If you found this post helpful, please share with your friends!

Cello Linings for Free!

Please share with your friends!

Free Willow Sources

I like to use Willow for cello linings and cello blocks, but willow is not a common timber to be able to just go and buy. Last year I got a small log of it, from a limb that blew off someone’s tree, but I have not yet cut it up, so, in spite of the fact that I “have” it, it is not particularly accessible right now.

Bruce Harvey, of Orcas Island Tonewoods,  once suggested that I learn what willow grain looks like and start watching the pallets and dunnage at work. (Apparently, though it is not popular for much else, it works for pallets and the like.) It took me a while to really learn what the grain looked like, but eventually I learned to spot it, and sure enough, a week or so ago, I spotted a likely candidate in a stack of dunnage (the timbers used to separate parts of a load of steel, for shipping purposes). I grabbed it (a 4 x 4, a little over 3′ long, dirty and battered) and checked it by whittling one corner. Bingo! Pay-off!

Tonight I needed a pile of linings for the new cello I am building, so, though I got home late after teaching a class, I walked out to the bandsaw, and, in five minutes (literally) I had a stack of linings big enough for two or three cellos…and lots more left over. (Thanks, Bruce!)

Tomorrow night I will get home a little earlier and expect that I will bend them all and install all the front linings. The following evening (or maybe Friday), I can install all the back linings. Then, Saturday, I can trace the back plate, I hope. (I haven’t even joined the front plate yet, so it will have to wait. Maybe I can get that done this weekend, too. 🙂

I’ll post pictures in another day or so. A pile of linings isn’t very exciting, unless you are building a cello. 🙂

If you found this post helpful, please share with your friends!

Cello progress

Please share with your friends!

Cello ribs installed in the mold, glued and clamped to the blocks.

Yes, you have to keep the wood warm!

The weather outside persisted in temperatures hovering just above freezing, so I brought the project indoors, heated the joints with a heat-gun, brushed hot water, slathered hot glue and clamped ’em home. Good glue squeeze-out all around; should be very good joints.

All ribs installed–glued to the blocks in the mold. Next step is linings.

Next Step: Linings

Actually, the very next step is to trim the excess rib length off the corners, and smooth them so that they are square-ended and straight along the edges…and parallel to one another. But that is a small enough task that I will combine it with installing the linings. The linings are a pretty easy, pleasant step in cello building…they are easy to make, easy to install, and the work goes quickly. That is what is next, and I should have it done pretty soon. Nice weather or no. 🙂

Thanks for looking.

If you found this post helpful, please share with your friends!

Lion-head viola in progress

Please share with your friends!

Not your “typical” Lion-head viola

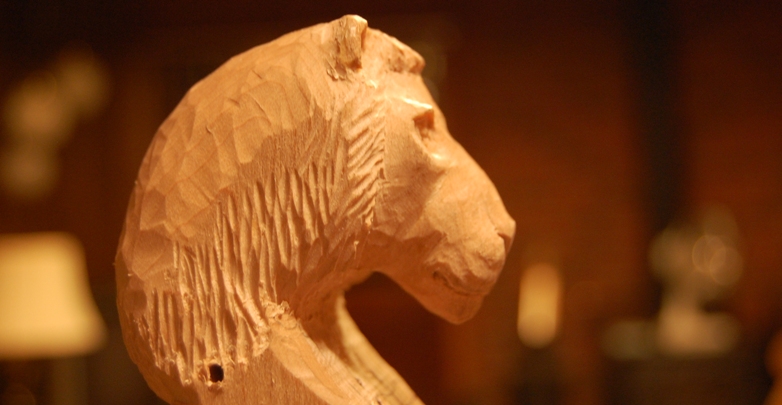
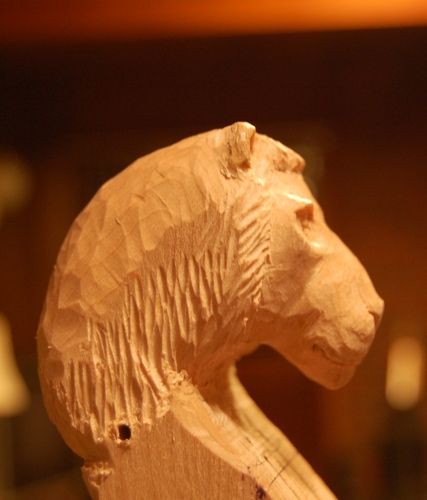
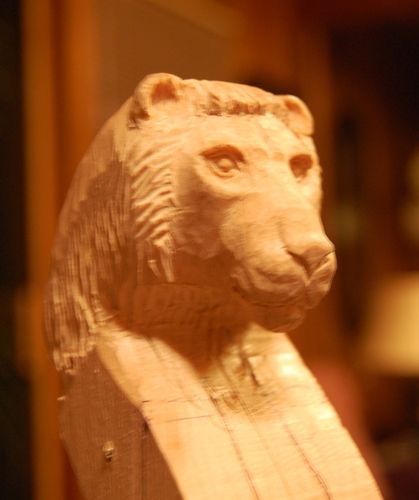
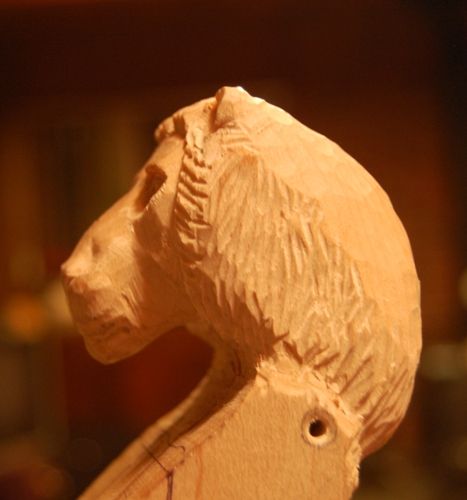
So many of the “lion-head” instruments of the past have been either so highly stylized that they were unrecognizable, or so poorly carved as to achieve the same result, or, when done in a completely recognizable fashion, were representative of a snarling, dangerous beast which I find difficult to associate with a viola. I wanted the dignity and power of the lion– the majesty, to coin a cliché, and not the predatory beast.

Grafted Scroll

I wasn’t even sure I could carve such a head, so, rather than risk a perfectly good neck-billet on a gamble against my questionable artistic ability, I decided to plan a grafted scroll. I have done this in the past, but this is the first time it was planned. Usually, a scroll graft is a repair, or a major alteration. In some (relatively rare) instances, a maker will perform a scroll graft in the new-making process, so that the new instrument will seem to be old. (No deception involved, it is just that virtually all instruments made before 1850 now have a scroll-graft, as a result of a shift in musical demands, and changing construction styles. Most of the “baroque” instruments were re-worked in this way, so that very few have the original neck.) The scroll-grafts I have done were repairs, up until now.

Knowing that there was a very good chance that my lion-head might not turn out well, I chose a very hard, even-grained maple block for the head, and only enough of the pegbox area to permit a graft. When/if the head turns out acceptably, I have a viola neck billet prepared to graft into the hard maple head, and after that it can be treated as any other scroll/neck for a viola.

Lion-head in the making

This is how the Lion-head looks for the moment. The mane will have to fair into the cheeks of the pegbox–(which haven’t been sawn out, yet, as full-width is easier to hold in the vise.) That will have to happen soon, to finalize the shape of the head and mane.

Oliver Lion-head Scroll (unfinished)
Lion-head scroll from bass side


Oliver lion-head scroll (unfinished)
Lion-head scroll front quarter
Oliver Lion-head scroll (Unfinished)
Lion-head scroll from Treble side

16.5″ Oliver Viola

The proposed viola is 16.5″ on the body, with a one-piece big-leaf maple back, and Sitka spruce top. The neck is big-leaf maple, except for the hard-rock maple head. (BTW, that hard-rock maple really earns its name– it was really hard to carve). As the viola is one of my own design, it is labelled an “Oliver” viola (my middle name, and that of my Dad and Grand-dad.) I use that name for all the instruments I design myself. Any design I copy from someone else’s work, I label as “Modelled after…”

The other violas I have made to this design (same body as #11 Oliver Viola– see the chronology) have had very good tone…I seriously doubt that the lion-head will affect the tone significantly for better or worse. But some people like a traditional scroll and will not like the lion. Others may find the lion attractive. We’ll see how folks respond. So far, I like it.

If you found this post helpful, please share with your friends!

Oil Varnish Glazing Procedure

Please share with your friends!

Glaze Procedure for Oil Varnish, Using Artist’s Oil Colors

Procedure for shading or antiquing oil-finish violins:

Water-based Stain procedure

1.      Using a clean brush, and very strong coffee or tea (with instant, you can make it as strong as you want), stain the instrument a nice tan color all over, including the “handle” area of the neck. This will probably take more than one application, but let it dry completely before repeating.

2.      The application of the (water/coffee) stain raises the grain as well, so, between applications of coffee, let the instrument dry completely, then lightly sand it with VERY fine micromesh, to get rid of any major irregularities but NOT diminish the texture (provided you like texture– I do; if you want less texture, sand more.). Sand the handle area mirror smooth between applications of stain. Warning: if you are using coffee or tea, absolutely do NOT use steel wool for smoothing. Iron reacts with the tannins in the wood and especially the tea and turns jet black…so if  tiny fragments of steel end up snagged in the fibers of the wood, they will leave black stains that will not come out. Some of us learn the hard way…

Seal the wood

3.      Once it is ALL the color of tan you want, and ALL the texture you want, and ALL dry, seal the instrument, using a mixture of oil varnish, yellow oil-soluble dye, and turpentine to thin the mix. (How much yellow? Depends on what you want to accomplish…I would say keep it very light.) The oil varnish is usually fairly thin to start with, so you won’t need a great deal of turpentine. It may take more than one coat to seal it–if so, make sure the WHOLE body gets the same number of coats, to avoid creating heavy areas. Allow the instrument to dry completely. I only apply this to the body and the scroll– not the handle portion of the neck. Incidentally, you want to seal the surface, not soak it all the way through. Go easy with this stuff. It is a good idea to sand (lightly, using 400-600 grit) before moving on, and wipe it down with a turpentine-dampened rag. This removes any unwanted particles, and leaves the surface clean and ready to coat again.

Color application

4.      Using Brown Madder Alizarin (Windsor-Newton) oil paint (get artist’s grade, not student grade; the artist’s grade has more pigment), thinned with a little oil varnish and a tiny amount of linseed oil in a small jar, get a mix that is soupy, but not water-thin. (You need the linseed oil to keep it from drying too rapidly) Incidentally, if you want a redder-brown, add a little Purple Madder Alizarin—it only takes a little.

5.      Apply the mixture using a fairly stiff brush, over the entire instrument except the neck (handle area). You might try just one area at a time, until you see what it will do. Get the color into every little crevice. Set the brush aside, and rub across the grain with your fingers. You want the mixture to be starting to set up a little, just as you get the glaze to the color you want. Remember that you will probably be applying two or more coats of glaze, so feel free to rub most of the coat off that you just applied. Rub harder in areas you want lighter, simulating wear. The reason you rub cross-grain is to encourage pigment to hang up in the deeper reeds, and stay there. I use the heel of my hand to get the look I want.

As the mixture begins to set up, you will feel it stiffening– at that point, you can rapidly pat it with your fingers, over and over, leaving hundreds of fingerprints, but removing all streaks. The “fingerprints” all blend together, making perfectly smooth color transitions, and if there are areas that are too dark, you can rub them a little (cross-grain) with a rag. At this point the dark reeds should be pretty visible, and the light areas are the only thing you are blending colors on.

6.      Once you have the whole instrument the color you want (but lighter than final planned color), and no bad spots, let it dry until it is hard to the touch. You can use your fingernail or the tip of a knife to carefully remove or press flat any “zits” that are sticking up.

Varnish between color coats

7.      Give it another coat of the yellow varnish, still pretty thin. When it is COMPLETELY dry, go over it with fine micromesh, to get any little “zits”, hairs, etc. off. Be careful not to rub through into the color coat.

8.      Subsequent glaze coats as needed. (The thinner the glaze coats, the more transparent the final effect—plan on several very thin coats, instead of fewer heavier coats.) Don’t go too far with this–you don’t want to obscure the wood. Check for any areas needing touch-up. Let it dry completely.

9.      Another coat of yellow varnish, or brown, if you want it darker. Allow it to dry, and lightly sand it, with extremely fine micromesh .

Final varnish procedure

10.  A last coat or two (or more, if you wish) of varnish, and final rubdown.

Neck Stain

11.  After the varnish is completely dry I used to use the neck stain from International Luthier’s Supply, in Tulsa (no longer available, as that company no longer exists). Six to eight coats, rubbed in vigorously, with a 4/0 steel wool rubdown between coats, seemed to work pretty well. Don’t apply this stuff before you are finished varnishing—the varnish doesn’t like it at all. (There are other ways to stain necks–take your pick…. Wish I knew what had been in the stuff I got from ILS, but they are gone for good. Too bad.)

12.  Note: I originally used tung-oil varnish for this process, but the process does not require the use of tung-oil varnish—any oil varnish would work; tung-oil varnish dries very rapidly, and just makes the process a lot easier to complete.

If you found this post helpful, please share with your friends!